How to Send Documents Securely on PC or Mac
This wikiHow teaches you how to safely share important documents with others in Windows or macOS. Open the document in Microsoft Word. The quickest way to do this is to double-click its file name.
Table of Contents
Method 1 of 4:
Password-protecting a Microsoft Word Document (Windows and Mac)
-
 Open the document in Microsoft Word. The quickest way to do this is to double-click its file name.
 -
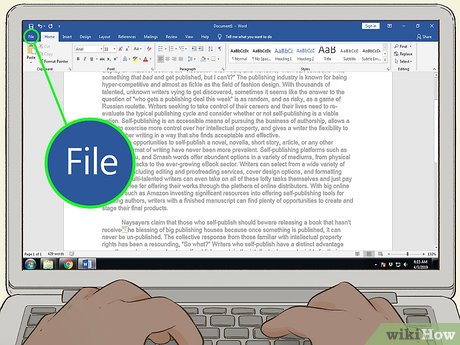 Click the File menu. It's at the top-left corner of the window (or in the menu bar on a Mac).[1]
 -
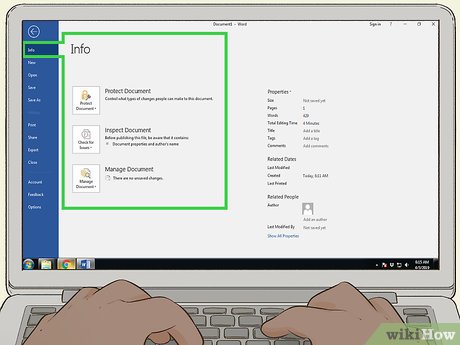 Click Info.
 -
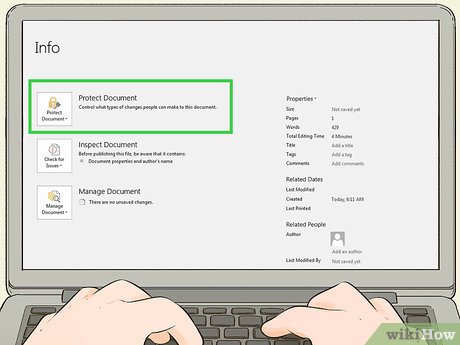 Click Protect Document.
 -
 Click Encrypt with Password.
 -
 Create and confirm the document password. Follow the on-screen instructions to type and confirm the password that will protect your document.
 -
 Save the file. Click the File menu and select Save to save the new version of your document.
 -
 Share the document with others. Now that the file is password protected, you can send it in a variety of ways:
- Attach the document to an email message in Gmail, Outlook, or Mac Mail.
- Add the file to a cloud drive like Google Drive, iCloud Drive, or Dropbox.
Method 2 of 4:
Attaching Files to Encrypted Messages in Outlook (Windows and Mac)
-
 Open Outlook on your PC or Mac. It's usually in All Apps area of the Start menu in Windows, and in the Applications folder in macOS.
 -
 Click New Email. It's the envelope icon at the top-left corner of the window.
 -
 Click the File menu. It's near the top-left corner of the screen.
- If you're using Outlook 2010, click the Options menu, then select More Options.
-
 Click Properties. If you're using Outlook 2010, skip to the next step.
 -
 Click Security settings.
 -
 Check the box next to 'Encrypt message contents and attachments.'
 -
 Click OK. This message will now be encrypted.
 -
 Click Close. Now that the encryption settings are set, you can create the message.
 -
 Enter a recipient, subject, and message.
 -
 Click Attach file. It's the paperclip icon at the top of the new message. This opens your computer's file browser.[2]
 -
 Select the attachment and click Open. This attaches the file to the message.
 -
 Click Send. The message will now be delivered to the recipient.
Method 3 of 4:
Encrypting a Document with EPS (Windows)
-
 Navigate to the file you want to encrypt. An easy way to do this is to press ⊞ Win+E to open the File Explorer, then double-click the folder that contains the file.
 -
 Right-click the file or folder. A context menu will expand.
 -
 Click Properties. It's the last option in the menu.
 -
 Click Advanced. It's near the bottom-right corner of the window.
 -
 Check the box next to 'Encrypt contents to secure data.' It's the last option on the window.
 -
 Click OK. If you selected a folder, a confirmation message will appear.
 -
 Select Apply changes to this folder, subfolders and files.
 -
 Click OK. The selected file or folder is now encrypted. To access the file or folder, you'll have to use your Windows login credentials.
 -
 Send the encrypted document.
- If you encrypted only one file, you can attach it to an email message. You can't compress the folder and then attach it to an email.
- If you encrypted a folder, upload it to a cloud drive like Google Drive, iCloud Drive, or Dropbox. Once uploaded, use the drive's tools to share the files as you wish.
Method 4 of 4:
Encrypting Documents with Disk Utility (Mac)
-
 Add the file you want to encrypt to a folder. If you're not sure how to do this, see Make a New Folder on a Computer.
 -
 Click the Go menu. It's at the top of the screen.
 -
 Click Utilities. It's near the bottom of the menu. A new Finder window will open.
 -
 Double-click Disk Utility. This opens the Disk Utility app.
 -
 Click the File menu. It's in the menu bar at the top-left corner of the screen.
 -
 Hover the mouse over New. Another menu will expand.
 -
 Click Image from folder.
 -
 Select the folder you want to encrypt and click Choose.
 -
 Select 128-bit or 256-bit from the 'encryption' drop-down menu.
 -
 Create a password. Enter a new password for the folder into the 'Password' box, then again in the 'Verify' box.
 -
 Click Choose.
 -
 Click Save.
 -
 Click Done. The files in the folder are now encrypted. Now you can upload the folder to a cloud drive like Google Drive, iCloud Drive, or Dropbox. Once uploaded, use the drive's tools to share the files as you wish.
Was this article helpful?
Your feedback helps us improve.
Related Articles
 How to send password protected files without buying software4 minutes read
 Guide to transfer ebook into the Amazon Kindle4 minutes read
 Instructions for scanning documents with 3 simple steps4 minutes read
 How to scan documents directly using WhatsApp2 minutes read
 How to Send a Word Document17 minutes read
 Send a fax from a Windows XP-based computer8 minutes read
Reader Comments 0
Sign in with email or Google to join the discussion.