How to remove the screen from the desktop in Windows 10
You can prevent Windows 10 from using the connected screen without disconnecting it, then easily allow Windows 10 to use the screen again when desired.
Table of Contents
You can prevent Windows 10 from using the connected screen without disconnecting it, then easily allow Windows 10 to use the screen again when desired.
This basically allows you to remove and restore an connected external monitor as needed, without having to physically disconnect and reconnect the monitor or turn the monitor on or off.
This guide will show you how to remove the screen from the desktop to prevent Windows 10 from using the screen and restore it when desired.
Remove the screen from the desktop in Settings
Note:
- You must be logged in as an admin to use this option.
- This option is independent of option 2 below.
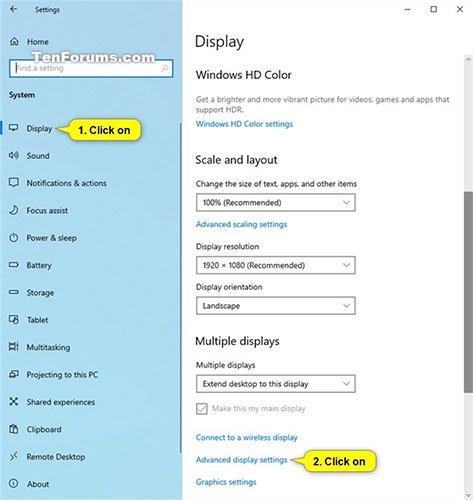
1. Open Settings and click on the System icon .
2. Click Display on the left side and click the Advanced display settings link on the bottom right.
 Click the Advanced display settings link at the bottom right
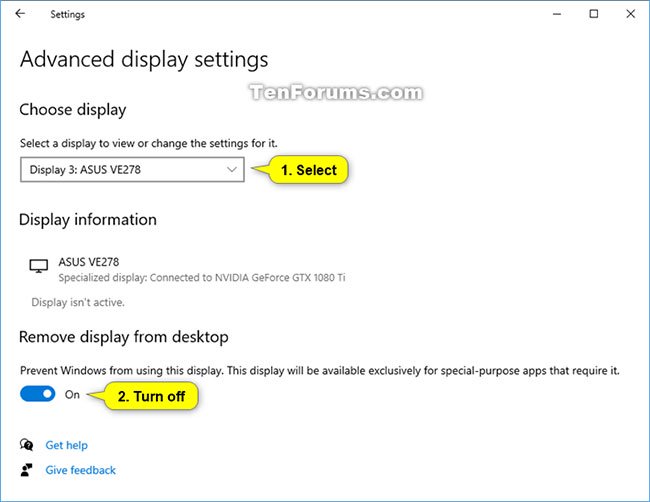
3. Select the screen you want to remove or restore in the Choose display drop-down menu .
4. Turn on (remove) or turn off (restore) the Remove display from desktop option, depending on what you want and the current state of the screen.

5. You can now close Settings if desired.
Remove the monitor from the desktop in the NVIDIA Control Panel
Note:
- This option is only available if you have installed drivers and NVIDIA graphics.
- This option is independent of option 1 above.
1. Open the NVIDIA Control Panel (for example, from the context menu on the screen or the notification icon).
2. Click the Set up multiple displays link in Display on the left.
 Click the Set up multiple displays link
3. In the Select the displays section you want to use on the right, select (restore) or deselect (remove) the screen, depending on what you want and click Apply.
 Select (restore) or deselect (remove) the screen
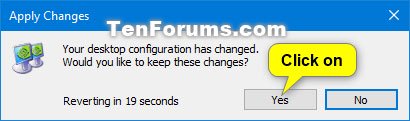
4. Click Yes in the Apply Changes dialog box when prompted to confirm.
Note : If needed, the changes will revert automatically after 20 seconds if you wait and don't click Yes before the time is up.
 Click Yes in the Apply Changes dialog box when prompted to confirm
5. You can now close the NVIDIA Control Panel if desired.
Was this article helpful?
Your feedback helps us improve.
Related Articles
 The trick for Windows 8 to boot straight into the desktop3 minutes read
 How to remove the login screen in Windows 102 minutes read
 The fastest way to adjust screen off time in Windows 7/8/8.1/105 minutes read
 The most effective way to fix Windows 10 desktop screen not displayed when starting up3 minutes read
 Set up Desktop wallpaper as a Start Screen screen background image on Windows 8.13 minutes read
 How to remove the Windows boot screen on Windows 103 minutes read
Reader Comments 0
Sign in with email or Google to join the discussion.