How to remove the login screen in Windows 10
If you feel that the login screen for Windows passwords is not necessary, users can follow the following tips..
There are many ways to customize Windows 10 , one of which is to remove the lock screen. Although the Windows 10 lock screen has some nice pictures, however, some people find it uncomfortable and want to immediately access the screen after booting the computer.
This article will show you how to remove the login screen in Windows 10. However, to do so, you will need to edit the Windows Registry. Therefore, if you have not previously edited the Windows Registry, it is recommended to back up before removing the login screen.
Step 1: Access the Registry Editor by entering Regedit in the search bar or Cortana.

Step 2: In the address bar of Registry Editor, type the following line:
ComputerHKEY_LOCAL_MACHINESOFTWAREPoliciesMicrosoftWindows
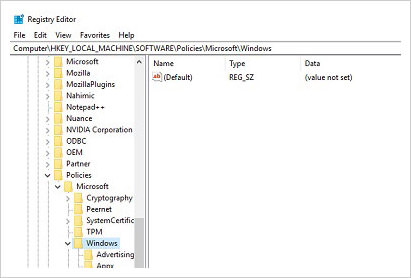
Step 3 : Then, right click on the blank space and create a New Key . The key will be named " Personalization ".

Step 4: In this Key, create a new DWORD and call it " NoLockScreen ". Once completed, set the value of NoLockScreen to " 1 ".

Once completed, restart the computer to check for new settings. If done correctly, Windows 10 will automatically display the login screen when rebooting.If you have disabled the required password to access Windows 10, you will immediately access the desktop.
In case you want to retrieve the lock screen, all you need to do is create the previously created " NoLockScreen " DWORD and change the value to " 0 ".
I wish you all success!