Table of Contents
This updated guide explains how to Read Dump Files through clear steps, practical examples, and important checks that help prevent common errors.
Reading with BlueScreenView
-
 Open Start. Click the Windows logo in the bottom-left corner of the screen.
-
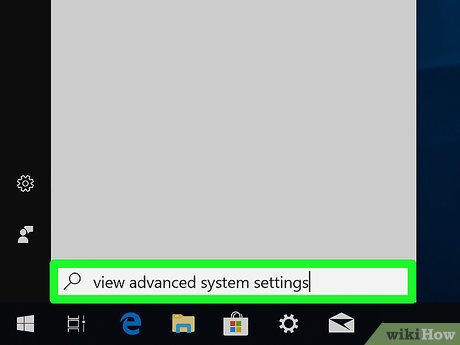 Type in view advanced system settings. This will search your computer for the Advanced System Settings section of Control Panel.
 -
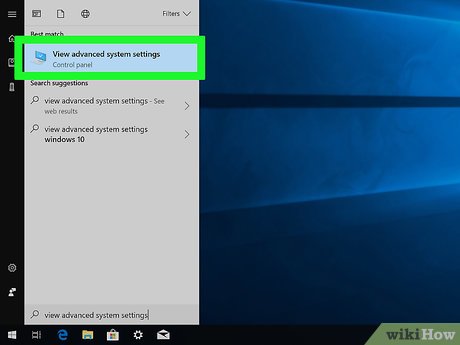 Click View advanced system settings. It's a computer monitor with a checkmark icon at the top of the Start menu. Doing so opens the Advanced System Settings window.
 -
 Click the Advanced tab. You'll see this at the top of the window.
- You may first have to click the computer monitor-shaped icon that appears at the bottom of the screen to open the Advanced System Settings window.
-
 Click Settings. It's below the "Startup and Recovery" heading near the bottom of the page. Doing this will open a separate window.
 -
 Click the "Write debugging information" drop-down box. You'll find this box in the middle of the separate window. Clicking it prompts a drop-down menu.
 -
 Click Small memory dump. It's in the drop-down menu. This option makes future memory dumps readable with a simple file explorer such as BlueScreenView.EXPERT TIPLuigi Oppido is the Owner and Operator of Pleasure Point Computers in Santa Cruz, California. Luigi has over 25 years of experience in general computer repair, data recovery, virus removal, and upgrades.Computer Repair Technician & Owner, Pleasure Point Computers
 Luigi Oppido Computer Repair Technician & Owner, Pleasure Point Computers
A memory dump file is a file that's taken from RAM. RAM has a number of allocation tables—or buckets—inside. A memory dump file is an entire download of whatever was inside that file when a catastrophic failure happened, and it goes into a log so an engineer or a software professional can look at it and see where the conflict happened.
-
 Click OK. It's at the bottom of the window. This will close the window and return you to the Advanced System Settings window.
 -
 Click OK. Doing so saves your changes and closes the Advanced System Settings window.
 -
 Open the BlueScreenView page. Go to https://www. nirsoft. net/utils/blue_screen_view. html in your browser. BlueScreenView is a program that finds and analyzes dump files for you, making it easy to see which programs were running directly before a crash.
 -
 Download BlueScreenView. Scroll down and click the Download BlueScreenView with full install/uninstall support link that's near the middle of the page.
 -
 Open the BlueScreenView setup file. Double-click the bluescreenview_setup file in your computer's "Downloads" location.
 -
 Install BlueScreenView. To do so:
- Click Yes when prompted.
- Click Next
- Click Next
- Click Install
- Wait for BlueScreenView to install.
-
 Open BlueScreenView. Make sure that the "Run NirSoft BlueScreenView" box is checked, then click Finish at the bottom of the window. BlueScreenView will open.
 -
 Review your dump files. BlueScreenView has a top pane and a bottom pane; you'll see the dump file(s) listed in the top pane, while the programs that were recorded by the currently selected dump file will appear in the bottom pane.
- You can select a dump file by clicking it in the top pane.
- At least one of the programs that were recorded by the dump file is most likely responsible for the crash.
Reading with the Windows Drivers Kit
-
 Open the Windows 10 Drivers Kit page. Go to https://docs. microsoft. com/en-us/Windows-hardware/drivers/download-the-wdk in your browser. The Windows Drivers Kit allows you to open dump files of all kinds, making it useful for checking a dump file from a past crash.
 -
 Download the Windows Drivers Kit setup file. Scroll down and click the Download WDK for Windows 10, version 1803 link, which is below the "Install WDK for Windows 10" heading near the top of the page. The setup file will download onto your computer.
 -
 Open the WDK setup file. Double-click the wdksetup file in your computer's default "Downloads" folder.
 -
 Install the Windows 10 Drivers Kit. To do so:
- Click Next on the first 4 pages.
- Click Accept
- Click Yes when prompted.
- Wait for the WDK program to finish installing.
-
 Open Start. Click the Windows logo in the bottom-left corner of the screen.
-
 Type in command prompt. This will search your computer for the Command Prompt app.
 -
 Right-clickCommand Prompt. It's a black box at the top of the Start window. A drop-down menu will appear.
-
 Click Run as administrator. This option is in the drop-down menu.
- You won't be able to complete this step if you're not on an administrator account on your computer.
-
 Click Yes when prompted. Doing so opens the Command Prompt app in administrator mode.
 -
 Switch to the WDK directory. Type in the following address and then press ↵ Enter:
cd C:Program Files (x86)Windows Kits10Debuggersx86
-
 Enter the installation command. Type in
windbg.exe -IAand then press ↵ Enter. -
 Click OK when prompted. This signifies that the Windows Debugger will now open dump files automatically.
 -
 Open WinDBG. Click Start, type in windbg, and click WinDbg (X86) in the results. The Windows Debugger program will open.
-
 Add a symbol path. The symbol path tells the Windows Debugger which information to display:[1]XResearch source
- Click File in the upper-left corner.
- Click Symbol File Path...
- Type in
SRV*C:SymCache*http://msdl.microsoft.com/download/symbols - Click OK
-
 Find your dump file. To do this, you'll need to go to the system root folder:
- Open Start
- Type in run and press ↵ Enter
- Type in %SystemRoot%
- Click OK
- Click the View tab.
- Check the "Hidden items" box if it isn't already checked.
- Scroll down and double-click the MEMORY. DMP file.
-
 Review the dump file's results. You should see a list of programs that were open when your computer crashed, which will help you determine which program(s) is/are responsible for the computer crash.
FAQ
What is the easiest way to Read Dump Files?
Start with the requirements in this guide, then follow each step in order. Check the result after every major change so problems are easier to identify.
Can beginners follow these instructions?
Yes. The process is organized into practical steps, and you can repeat any step before moving forward.
What should I check if the method does not work?
Confirm your software or device version, permissions, settings, file format, and internet connection when the task depends on online services.
Related Articles
 How to Delete Memory Dump Files in Windows5 minutes read
 How to Fix Corrupted Memory Dump File5 minutes read
 How to Read a Dump File (.Dmp): Complete Guide11 minutes read
 What Is DMP File? How to Open DMP Files in Windows 105 minutes read
 3 Ways to Configure BSOD Crash Dump on Windows3 minutes read
 How to Read EPUB Files on Your Computer, Software to Read EPUB Files3 minutes read
Reader Comments 0
Sign in with email or Google to join the discussion.