How to Zip a PowerPoint File
To zip a PowerPoint file, open the file's location→ Right-click on the file→ Click on 'Compress'. Click . Finder is a blue icon with a smiling face at the bottom of your screen.
Table of Contents
Method 1 of 2:
Mac
-
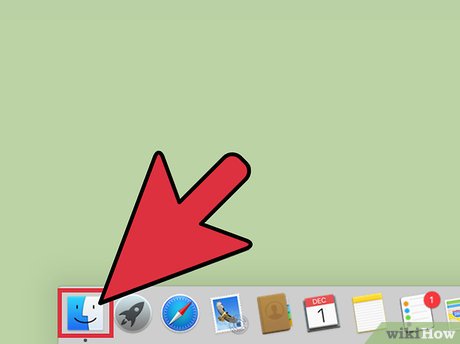 Click Finder. Finder is a blue icon with a smiling face at the bottom of your screen.
 -
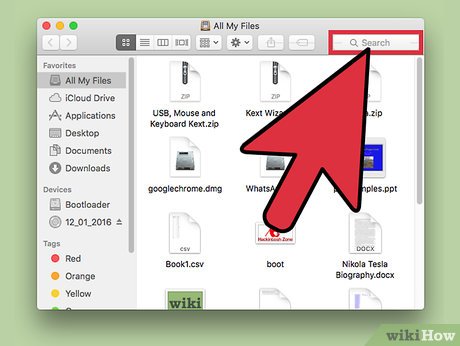 Click on the Search Bar. It is located in the upper-right hand in Finder.
 -
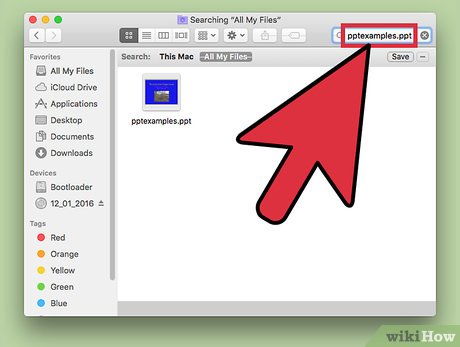 Type in the name of the PowerPoint file you want to zip.
 -
 CTRL+Click on the file.
 -
 Click on "Compress [your_filename]".
 -
 Enter a new name (optional). Normally, two files cannot share the same name. However, since your original Powerpoint file and new compressed file are two different types of files, they can share the same name.
 -
 Press Return.
Method 2 of 2:
Windows
-
 Click Start. It is located in the lower-left corner of your screen.
- In Windows 8, press Windows. It is on the bottom-left of your keyboard and looks like a window.
-
 Type in the name of the PowerPoint file you want to zip.
 -
 Right-click the file.
 -
 Click on "Open File Location".
 -
 Right-click the PowerPoint file.
 -
 Hover your mouse over "Send To".
 -
 Click on "Compressed (zipped) Folder".
 -
 Enter a new name (optional). Normally, two files cannot share the same name. However, since your original Powerpoint file and new compressed file are two different types of files, they can share the same name.
 -
 Press Enter.
Was this article helpful?
Your feedback helps us improve.
Related Articles
 Open a slide file in PowerPoint2 minutes read
 How to attach Word and Excel files in PowerPoint4 minutes read
 How to Loop in PowerPoint on PC or Mac7 minutes read
 Tips to reduce the size of PowerPoint files should be known11 minutes read
 How to lock and unlock Powerpoint file to edit4 minutes read
 How to Add Music to PowerPoint11 minutes read
Reader Comments 0
Sign in with email or Google to join the discussion.