Table of Contents
This practical guide walks through how to delete memory dump files in Windows, explains the main requirements, and highlights common issues that may appear along the way.
The crash dump files can then be used to assist developers in fixing BSOD system errors. User can send crash dump to developers when requesting support.
Memory dump files can waste a lot of hard drive space. They can take up many gigabytes of hard drive storage. Windows only automatically deletes crash dump files when hard drive space is limited. However, users can also delete crash dump with cleaning utilities.
1. Delete crash dump with Disk Cleanup
You can delete crash dump using Windows' Disk Cleanup tool. To do that, launch Run using the Windows + R keyboard shortcut .
Type cleanmgr in Run 's Open text box .
Press Ctrl + Shift + Enter to open Disk Cleanup as admin.
Select drive C: on the Drive selection window and click the OK button .

Select the checkbox System error memory dump files .
Then click the OK button .
If users cannot find the option System error memory dump files in Disk Cleanup, open the utility through the Command Prompt with admin rights. Import:
%SystemRoot%System32Cmd.exe /c Cleanmgr /sageset:16 & Cleanmgr /sagerun:16. in the Command Prompt and press Enter . This will open Disk Cleanup with more checkbox options.
2. Delete crash dump with CCleaner
In addition, users can delete crash dump with free CCleaner software. To do that, download CCleaner first. Follow the instructions in its setup wizard. Launch the CCleaner utility.
Select Custom Clean on the left side of CCleaner.
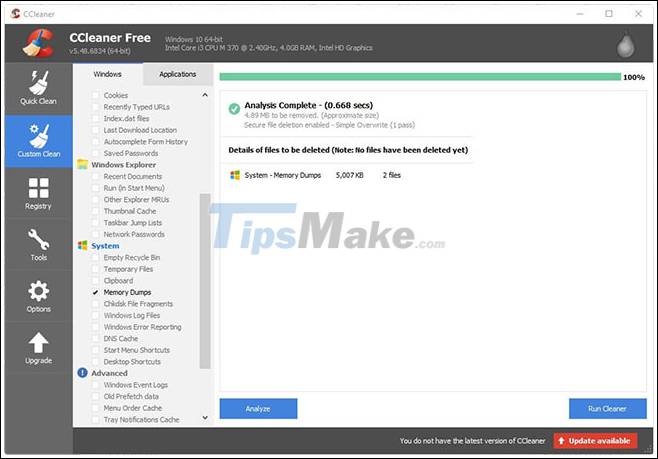
Then select the Memory Dumps checkbox .
Click the Analyze button .
Select the Run Cleaner option to clear the crash dump.
3. Delete crash dump via Command Prompt
You can also delete crash dump with a series of Command Prompt commands. To do so, open Run.
Type cmd in Run and press Ctrl + Shift + Enter .
Then, type the following separate commands into the Command Prompt and press Enter after each one:
fsutil usn deletejournal /d /n c: del '%temp%*' /s /f /q del 'C:$Recycle.bin*' /s /f /q del '%systemroot%temp*' /s /f /q vssadmin delete shadows /for=c: /all /quiet Dism /Online /Cleanup-Image /StartComponentCleanup /ResetBase4. Turn off crash dump
Users can turn off crash dump to ensure they don't take up extra storage space on HDD. Type Control Panel in Run 's Open text box and press Enter.
Then click System to open the Control Panel application shown right below.
Click Advanced system settings on the left side of the window to open the Advanced tab .
Then click the Settings button in Startup and Recovery.
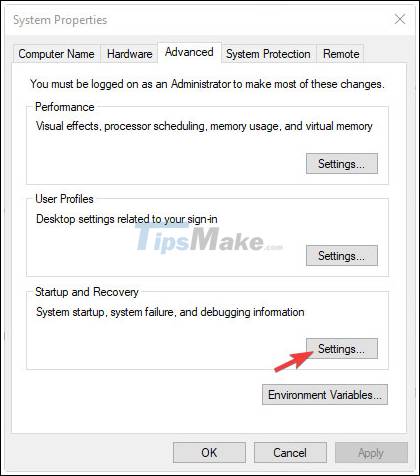
Select the (none) option on the drop-down menu shown directly below to disable crash dump.
Then click the OK button .
Key Takeaways
Use the information above as a practical reference for how to delete memory dump files in Windows. Review each step carefully, confirm any requirements, and choose the option that best fits your situation.
FAQ
What does this guide explain about Delete Memory Dump Files in Windows?
It explains the main concepts, practical considerations, and useful steps related to delete memory dump files in Windows without requiring advanced knowledge.
Who can benefit from learning about Delete Memory Dump Files in Windows?
This information is useful for readers who want a clear overview, practical guidance, and reliable steps related to delete memory dump files in Windows.
What should I check before applying this information?
Review the requirements, confirm that your device, software, or situation matches the instructions, and back up important data before making major changes.
Related Articles
 How to Fix Corrupted Memory Dump File5 minutes read
 How to Read Dump Files: Step-by-Step Guide8 minutes read
 Delete the Most 'Stubborn' Files on Windows10 minutes read
 What Is DMP File? How to Open DMP Files in Windows 105 minutes read
 Conduct: Analysis of Memory Dump File (*(* .Dmp)8 minutes read
 How to Delete 'iOS Files' Which Is Taking up Your Mac's Memory?4 minutes read
Reader Comments 0
Sign in with email or Google to join the discussion.