How to Put Music on iTunes
iTunes is a popular source for downloading and listening to music, but if you're not used to the program, figuring out how to add music can seem a bit challenging. Here's how to import music into your library from various sources, as well...
Table of Contents
Method 1 of 4:
Importing Music from CDs
-
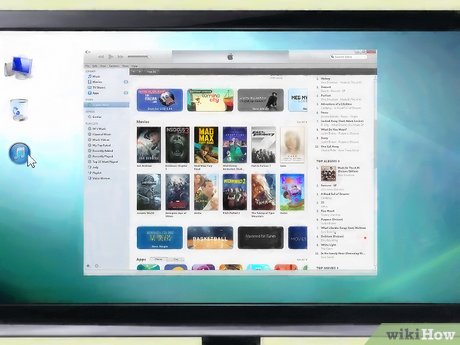 Open iTunes. Allow the program to load completely.
 -
 Insert your CD into the CD or DVD drive. After iTunes has finished opening, pop your CD into the computer. Wait a few seconds for iTunes to recognize the CD. If your computer is connected to the Internet, iTunes will look up the CD information online and supply it inside the program. If not, the program may prompt you to connect to the Internet or ask you if you want to skip the step.
- The information that is included if you are connected to the internet includes the album name, artist, song titles, composer information, and album artwork.
-
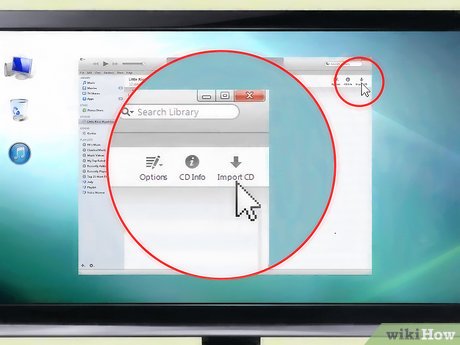 Import the songs. A dialog box should pop up, asking you if you want to import the CD. Click "Yes" if you want to import all the songs from the CD into your library. If you only want to import certain songs, click "No" and manually uncheck the boxes of the songs you do not want to import. When finished, click on the "Import CD" button in the lower right corner of the screen.
- iTunes may give you a second dialogue box with options for importing the songs. The default options should already be selected, but you can change the import settings at this point if you want.
-
 Wait for your songs to be imported. The program will show you the progress of each song as it imports it in a loading bar at the top of the screen. Depending on the length of the CD you are importing, this process will last anywhere from a few minutes to half an hour. When the CD is finished being imported, iTunes will give a small tone/beep to alert you.
 -
 Check your imported CD. View your music library in iTunes and scroll down to the location of your imported CD. Check to make sure that all album info was imported along with the music files. If they were not, you can manually add them by right clicking a song or selection of songs, and clicking the 'get info' button on the menu.
Method 2 of 4:
Importing Music from Your Computer
-
 Open iTunes. Wait for the program to completely finish opening before you attempt to add any music.
 -
 Open your iTunes Preferences.[1] If the "Copy Files to the iTunes Music folder when adding to library" box is checked, the music will not only be added to your library but also copied to a second location on your computer. You can toggle this option on and off by going to the Advanced tab in your iTunes Preferences dialog box, which can be accessed through the file menu.
 -
 Find the "Add to Library" option. This allows you to move songs from your computer to iTunes in an easy process. If you're using a Mac, you can find the option by going to the File menu and selecting "Add to Library." If you're on Windows, go to the File menu and select either "Add File to Library" or "Add Folder to Library." The former is for single file use, while the latter is used if you have an entire folder of audio music you want to add to your iTunes library.
 -
 Navigate to the file or folder. Find the mp3 files you would like to download from another location on your computer. You can select more than one item from the same folder at once by selecting a song and holding the 'shift' key until you have selected the total number of songs you want.
- You can add files in AAC, MP3, WAV, AIFF, Apple Lossless, or Audible.com formats.
- iTunes for Windows can also convert WMA content to one of the above formats when you add it to your iTunes library.
-
 Add the music file or folder. Double-click to select it or click on the "Add" or "Open" button in the file window. Because the files you are adding are already uploaded to your computer (as opposed to on a CD), it should take only a minute or less for the music to be transferred to your iTunes library.
 -
 Check the transferred files. Go to your iTunes library and scroll to where the imported song/album is located. Check to see that the album info, including the artist, song titles, album artwork, and album name, were all transferred with the music files. If they were not, you can manually add them by selecting the songs, right clicking them, and going to the 'get info' button on the menu.[2]
Method 3 of 4:
Purchasing Music in iTunes
-
 Open up iTunes. Allow a few minutes for the program to load before attempting to make any changes or selecting any options.
 -
 Go to the iTunes store. At the top right of iTunes, there should be a button that reads 'store'. Select this and allow the iTunes store to load. This button is different from the 'store' drop-down menu at the top, next to the 'file' and 'edit' drop-down menus.
 -
 Search the iTunes store. Once the storefront has loaded, you have several options for searching for music. Along the top there are multiple drop-down menus listing different options, including genres of music, audiobooks, and podcasts which you can browse through. If you have a specific song, album, or artist in mind you also have the option of searching that particular song in the search bar on the upper right hand side.
 -
 Purchase/download items. When you have found something that you would like to purchase or download, select the 'buy' button next to the file. The price for that file should be listed next to the 'buy' button. iTunes will prompt you with an appleID dialogue box, in which you must verify your purchase by entering in your iTunes ID and password. Click 'finish' when you have entered your accurate information
 -
 Allow the files to download. When you go back to your library in iTunes, the bar at the top will tell you the progress of your purchased files. You won't be able to access them until they have completed downloading, which will vary in time based on each file size and your internet strength.[3]
Method 4 of 4:
Selling Your Music on the iTunes Store
-
 Give your music a professional finish. Before you send your album through the necessary channels, you need to make sure that it is polished and presentable. Create album artwork for it, edit all the song titles, and add a description if necessary.
- Selling your music on iTunes can be fairly simple even for amateur artists, but you will have a great deal of competition to deal with, and your odds of having success will improve vastly if you make sure that your songs are in top condition.
- If you have no experience with mastering and do not know how to polish the music up to commercial standards by yourself, hire an engineer or specialist to do it for you.
-
 Make sure that your music is properly formatted. Convert the files to WAV, set at a 44.1 kHz sample rate and 16 bit sample size. You can convert your audio files in iTunes by importing them to the library using the WAV encoder, set to custom settings.[4]
 -
 Add the final touches. You also need cover artwork and complete track credits to submit before an online service will help you add your music to the iTunes store.
- You must have rights to the artwork.
- Aim to make the cover image a JPG file set to 1,000 by 1,000 pixels.
-
 Get a UPC code. Before you can sell your album, it needs to have a UPC code. Fortunately, obtaining one is pretty easy. You can obtain one by registering directly with the Uniform Code Council[5], or you can ask a CD manufacturer or distributor if they offer the service. The latter may prove to be a cheaper option. You can also get a UPC online through various online distributors like CD Baby or DiscMakers, and these tend to be even cheaper options.
 -
 Review Apple's application.[6] Working with Apple directly usually requires you to have a professional label backing you, or at least enough experience to prove that you are a professional. Even if you do not qualify to work with Apple directly, though, you can still work through a third party.
 -
 Find an Apple-approved aggregator (optional).[7] If you weren't able to get through the previous step yourself, get in touch with an aggregator, or a third-party distributing service that allows you to finish and distribute your music for a small fee. Check the Apple iTunes application page for a list of approved aggregators. There are many to choose from, each offering different services at different prices, but TuneCore, CDBaby, and Songcast are among the most popular.
- These will usually require you to pay a fee, but there are other aggregators like ADEDistribution that also provide a limited free service with few additional services.
- When looking for an aggregator, stick with a company that allows you to retain your rights. If you sign over the rights to your music, you will no longer be able to alter or use it as you please.
- Aggregators that allow you to keep all or nearly all of the royalties are also considered preferable since you will be able to earn more money off each sale.
- Read the fine print. No matter how popular or frequently used an aggregator is, you should read all the fine print about costs, fees, and legal matters before subscribing to the service. If you do not understand the legal aspect of things, find an acquaintance who does or hire a law professional to review it with you.[8]
Was this article helpful?
Your feedback helps us improve.
Related Articles
 How to copy music to iPhone without iTunes7 minutes read
 3 steps to add downloaded mp3 files to iTunes3 minutes read
 How to Add MP3 to iTunes7 minutes read
 How to Sell Your Music on iTunes10 minutes read
 iTunes may be killed and replaced with the Music app2 minutes read
 How to back up data on iTunes or Music library4 minutes read
Reader Comments 0
Sign in with email or Google to join the discussion.