How to manage wifi network in Windows 7
With Windows 7, Microsoft has made a major upgrade in managing Wi-Fi networks. If you consider the development of wireless networks within the last 5 years, you will find this upgrade really relevant. Therefore, this article will show you how to manage wireless networks with changes in Windows 7 operating system.
With Windows 7, Microsoft has made a major upgrade in managing Wi-Fi networks. If you consider the development of wireless networks within the last 5 years, you will find this upgrade really relevant. Therefore, this article will show you how to manage wireless networks with changes in Windows 7 operating system.
How to manage wireless networks in Windows 7
If you have a wireless network card installed, a network icon will be displayed in the Windows system tray. You can click on this icon to display available networks and quick access to the Network and Sharing Center.

In network and sharing center, the first 'stopover' is the wireless network management screen. To access, click Manage wireless networks on the left panel.

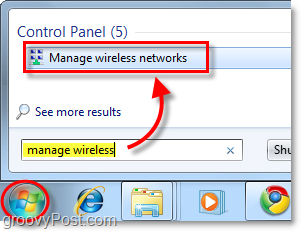
Alternatively, you can access this screen from the Start menu by typing manage wireless in the search section and clicking the Manage wireless networks link .
Now, the Manage Wireless Networks screen will display. The items listed here are the connected Windows 7 wireless networks and save the reconnected data. Here, you can do very few things, such as:
• Edit network priority by moving the network up or down in the list.
• Edit adapter properties
• Add new network
• Eliminate existing networks
• Edit profile types
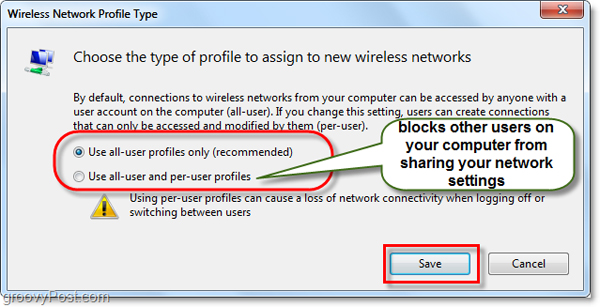
If there are multiple users in the same computer and security is a problem, the first thing you should do is click on Profile types and edit the settings here.

Alternatively, you can choose Use all-user profiles only (recommended) for the best security option. This feature relies on the network you are connecting to and different situations. However, if you want other users on one machine to access a common network, you will have to use ' Use all-user and per-user profiles '.
Now you will have to open the Network and Sharing Center to edit some other settings. You can open this window by clicking the back button on the window or simply clicking the Network and Sharing Center button.

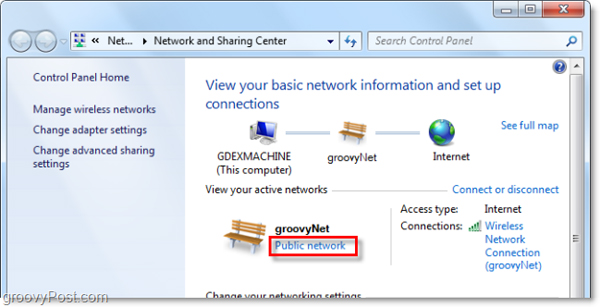
Network and Sharing Center is really a network management center. You can't do many things on the actual page, but it allows you to access all other interactive networks. For example, if you connect to a wireless network but set the wrong access type, you can make changes here. To change the way Windows uses the network you are connecting to, simply click on network type just under the network name. In the example below is Public Network.
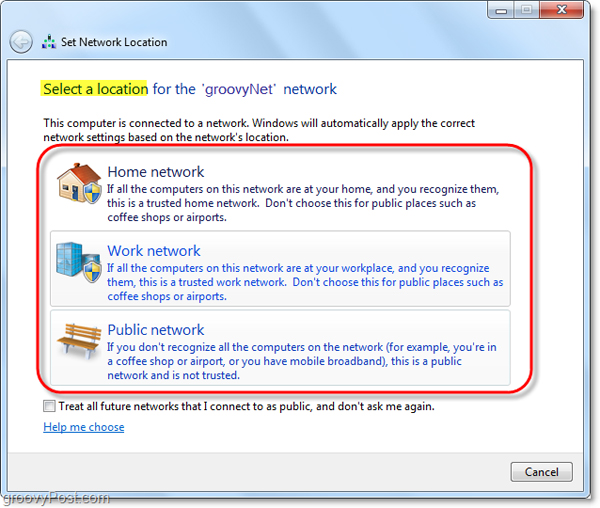
A new dialog box will appear and give you three different types of networks to choose from. Please choose the most appropriate type. Also, have a check box at the bottom of the window if you want Windows to remember this option and apply it to all new networks. However, you should turn off this feature, unless you want to use a network connection for a long time. Once completed, the screen will return you to the network and sharing center window.
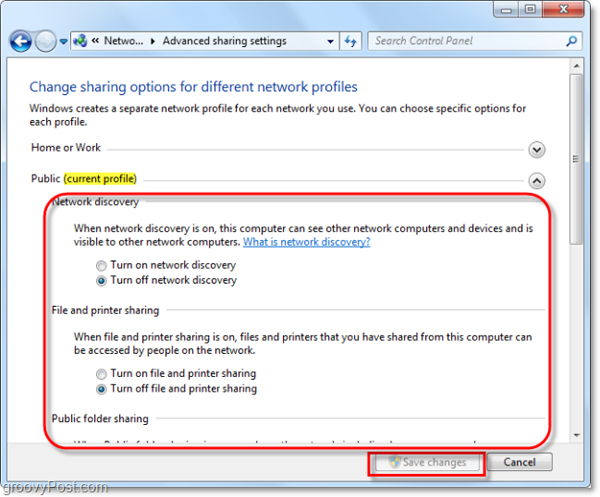
Now that we've identified the type of network we're using, let's customize how Windows 7 works with all networks. To do this, click Change advanced sharing settings from the Network and Sharing Center window .

This is a big step in managing wireless networks. From the advanced sharing settings window, you can completely customize how Windows uses all the networks you have assigned in a certain format. This means that all public networks you connect to will use this type of installation and the same for all home networks. You will not have to customize each connection, just specify the connections as home, work or public. Each installation has a precise and detailed description right next to it. So go through a variety of customizations and customize them based on your needs.
After you have finished enabling or disabling each feature, you should not forget to click Save Changes to save the changes.
Conclude
The above is all the steps to be able to manage wireless networks in Windows 7. Although the steps are not too complicated, it is still a 'small maze' for you, especially when you read this article but still use Windows XP. Hopefully this article will help you understand the basics of wireless network functionality in Windows 7 operating system.
Was this article helpful?
Your feedback helps us improve.
Related Articles
 Backup and Restore Wifi settings in Windows 72 minutes read
 How to hide WiFi network in Windows 103 minutes read
 How to log in to Wifi Modem Router to change Wifi name and password5 minutes read
 Manage Wifi connection in Windows 711 minutes read
 How to hide hidden WiFi network SSID on Windows 105 minutes read
 Please download Wifi analyzer application - Wifi Tool, for 30 USD, free of charge2 minutes read
Reader Comments 0
Sign in with email or Google to join the discussion.