How to automate GIMP by script
Photo editing can involve repeating a process many times, especially when you're working with a large photo album. If you're willing to work with scripts, you can use GIMP to automate some actions, saving you time and effort.
Writing Python scripts in GIMP is not easy, but it is very useful if you want to learn and gain experience. Here's how to start with a few very basic scripts.
How to automate GIMP by script
- Create a Python script
- Add some functions
- Reverse a layer
- The next steps to programming for GIMP
Create a Python script
Before starting to implement your project seriously, you need to set some groundwork. First, open the text editor, then copy and paste the code below:
 #! / usr / bin / python

 from gimpfu import *

 def first_plugin (timg, tdrawable):
 print "Hello, world!"

 register (
 "hello_world",
 "Presents a Hello, World! Message",
 "Presents a Hello, World! Message",
 "Brad Jones",
 "Brad Jones",
 "2017",
 "/ Image / Hello, World!",
 "RGB *, GRAY *",
 [],
 [],
 first_plugin)

 main ()
Below is a brief summary of what is happening here. The first two lines initialize the script and give you access to some useful libraries. The following code section def first_plugin contains instructions that you provide to GIMP. Information followed from the register is everything that GIMP needs to know about the plugin.
This is the information you need to provide to GIMP to register your script:
- Name: Name of the command (example: hello_world)
- Blurb: A brief description of the command (e.g. Presenting the announcement Hello, World!)
- Help: Help message is displayed (for example: Presenting the message Hello, World!)
- Author: The person who created the script (ex: Brad Jones)
- Copyright: Copyright owner (example: Brad Jones)
- Date: Date the script was created (eg 2017)
- Label: How the script will be referenced in the menu (eg: / Image / Hello, World!)
- Parameters: Parameters are attached to the plugin (eg [] - there are no parameters in this case)
- Results: Results from the plugin (e.g. [] - there are no results in this case)
- Function: The name used to indicate action in your code (example: first_plugin)
Finally, you need to call the main () command .
Save your script and select All Files from the Save as type menu. Be sure to include the .py extension in your file name.

Next, place this file in the GIMP plug-in directory, which can be found in Windows at Program Files> GIMP 2> lib> gimp> 2.0 (or ~ LibraryApplication SupportGIMP2.8scripts on a Mac). You may need admin rights to do this.
Create GIMP and open the Image menu . You will see Hello, World! right at the bottom.

Now is the time to make your script a bit more useful.
Add some functions
Now, you will have to rewrite your script so that it can actually do something practical. Open the text file again, then copy and paste the following code:
 #! / usr / bin / env python

 from gimpfu import *

 def test_script (customtext, font, size):
 img = gimp.Image (1, 1, RGB)
 layer = pdb.gimp_text_fontname (img, None, 0, 0, customtext, 10, True, size, PIXELS, font)
 img.resize (layer.width, layer.height, 0, 0)
 gimp.Display (img)
 gimp.displays_flush ()

 register (
 "python_test",
 "KIỂM TRA",
 "KIỂM TRA",
 "Brad Jones",
 "Brad Jones",
 "2017",
 "KIỂM TRA",
 "",
 [
 (PF_STRING, "customtext", "Text string", 'Scripting is handy!'),
 (PF_FONT, "font", "Font", "Sans"),
 (PF_SPINNER, "size", "Font size", 100, (1, 3000, 1)),
 ],
 [],
 test_script, menu = "/ File / Create")

 main ()
This is a bit more complicated than the Hello, World! Scripts, but they are very similar in structure. First, create an image.
img = gimp.Image (1, 1, RGB)
Then you add text based on user-provided parameters.
layer = pdb.gimp_text_fontname (img, None, 0, 0, customtext, 10, True, size, PIXELS, font)
Next, you resize the image to the size of the text.
img.resize (layer.width, layer.height, 0, 0)
Finally, you ask GIMP to display the image on the screen.
 gimp.Display (img)
 gimp.displays_flush ()
All that's left is to add the registration information that GIMP needs, with the addition of some parameter settings that you haven't done before.
 [
 (PF_STRING, "customtext", "Text string", 'Scripting is handy!'),
 (PF_FONT, "font", "Font", "Sans"),
 (PF_SPINNER, "size", "Font size", 100, (1, 3000, 1)),
 ],
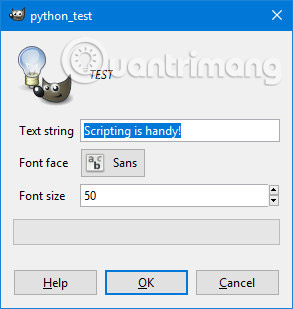
Save this file as you did with the Hello, World! Script, move it to the plug-ins directory and restart GIMP. Go to File> Create> TEST to try your plugin.

You will see a window where you can set different parameters.

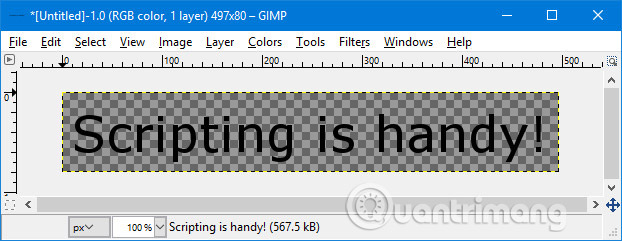
Click OK and you will create an image that looks like this.

This illustrates how you can use GIMP scripts to automate a process, including several different actions. Now, write a script to make changes to an image that you have opened.
Reverse a layer
Once you are comfortable with Python programming in GIMP, you can automate all types of editing for your images. However, we will start as simple as possible, by deploying a script to reverse the color of the current layer.
To get started, reopen the text editor, then copy and paste the following script:
 #! / usr / bin / env python

 from gimpfu import *

 def invert_current_layer (img, layer):
 pdb.gimp_invert (layer)

 register (
 "python_fu_invert_current_layer",
 "Invert layer",
 "Invert colors in the current layer",
 "Brad Jones",
 "Brad Jones",
 "2017",
 "/ Filters / Custom / Invert current layer",
 "*",
 [],
 [],
 invert_current_layer)

 main ()
This is the result of the script you created earlier. The first two lines of code specify a number of platforms, and some of the final lines take care of the registration. This is an important part:
 def invert_current_layer (img, layer):
 pdb.gimp_invert (layer)
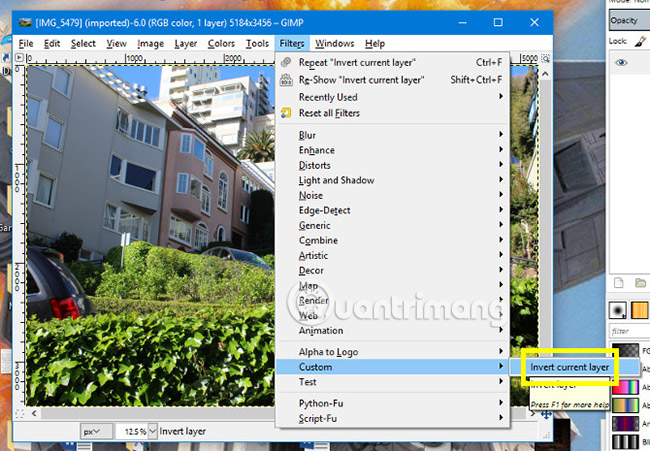
You are defining your process, letting GIMP know which components you will refer to, then using pdb.gimp_invert to guide the color adjustment program. Save this file in .py format, add it to the plug-ins folder , then open GIMP to check if it works.

Navigate to Filters> Custom> Invert current layer .

You will get a similar result as above. Of course, performing a reverse operation in GIMP is relatively easy, but this is only the starting point. The great thing about writing your own script is that you can create something that suits you perfectly.
The next steps to programming for GIMP
Once you understand the basic concepts of programming in GIMP, it's time to start testing. Think about the type of process you usually do a lot of times and it will be useful if automated. Then you will come to the most difficult part: Find out how to use code to realize those ideas.
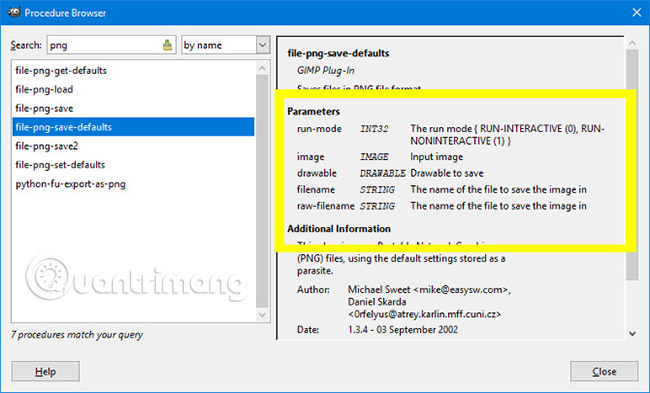
Fortunately, GIMP gives you some support. Navigate to Help> Procedure Browser and you will be able to access a list of all the processes you can use.

Procedure Browser not only lists processes but also provides you with information about the parameters you need to provide in your code.
You can scroll through the entire list of processes or use the search bar to narrow down the field. After that, just insert the process name and parameters into your script.

This information will be invaluable when you work on your scripts. Start with some simple tools, before you perform some really useful automated processes!
Do you need help with programming with GIMP? Or do you have a trick you want to share with other users? Either way, why not leave your comments in the comment section below?
See more:
- How to automate Photoshop with Photoshop Scripts
- Create ghosts in Photoshop or GIMP
- A full guide to editing photos in GIMP