How to Format a Hard Drive Using Ubuntu
You can format your drives using the Disks utility that comes installed with Ubuntu. If the Disks utility is giving you errors, or you have a corrupted partition, you can use GParted to format instead. You can also use GParted to resize...
Table of Contents
Method 1 of 2:
Performing a Quick Format
-
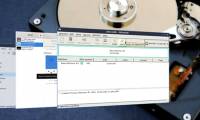
 Open the Disks program. You can quickly find this by opening the Dash and typing disks. This will display all of your connected drives on the left side of the window.
 -
 Select the drive you want to format. All of your drives will appear in the left frame. Be careful when you're selecting your drive, as everything on the partition will be deleted when you format it.
 -
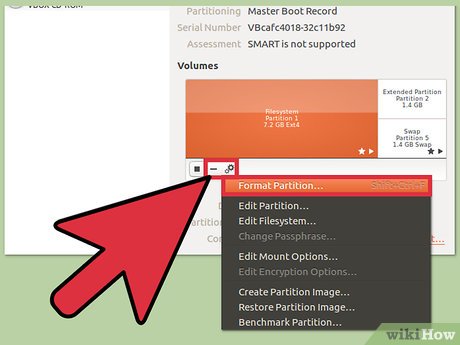 Click the Gear button and select "Format Partition." This will open a new window for configuring the file system.
 -
 Select the file system you want to use. Click the "Type" menu and select the file system you want to use.
- If you want to use the drive to transfer files between Linux, Mac, and Windows computers, as well as most devices that support USB storage, select "FAT."
- If you're just using the drive for your Linux computer, select "Ext4."
- If you're planning on just using the drive in Windows, select "NTFS."
-
 Give the volume a name. You can enter a label for the formatted volume into the empty field. This can help you identify your connected drives.
 -
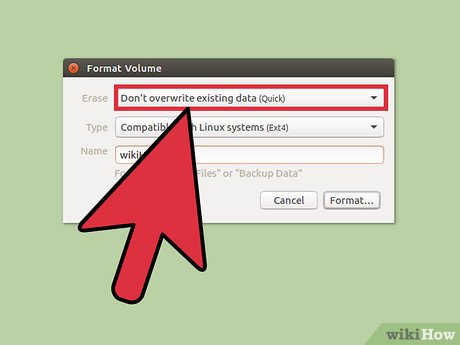 Select whether or not you want a secure erase. By default, the format process will delete but not overwrite the data on the drive. If you want to securely erase the contents, select "Overwrite existing data with zeroes" from the "Erase" menu. This will result in a slower but more secure format.
 -
 Click the "Format" button to start the format process. You'll be asked to confirm before you proceed. The format process will take longer for larger drives, and if you selected the more secure erasing option.
- If you encounter difficulties formatting the drive, try GParted in the next section.
-
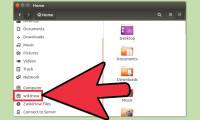
 Mount the formatted drive. Once the drive has been formatted, click the "Mount" button that appears beneath the Volumes graph. This will mount the partition, allowing you to access the file system for storage. Click the link that appears to open the it in your file browser, or open the Files program and look for the drive in the left frame.[1]
Method 2 of 2:
Using GParted
-
 Open the Terminal. You can open the Terminal from the Dash, or by pressing Ctrl+Alt+T.
 -
 Install GParted. Enter the following command to install GParted. You'll be prompted for your user password, which won't appear as you type it:
- sudo apt-get install gparted
- Press Y when prompted to continue.
-
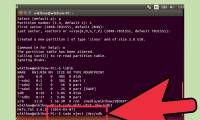
 Start GParted from the Dash. Open the Dash and type "gparted" to find the GParted Partition Editor." You'll see a bar representing the current drive's partitions and the free space on them.
 -
 Select the drive you want to format. Click the drop-down menu in the upper-right corner to select the drive you want to format. If you aren't sure which is which, use the size of the drive to help you determine.
 -
 Unmount the partition you want to change or remove. Before you can make changes in GParted, you'll need to unmount the partition. Right-click the partition from the list or the graph and select "Unmount."
 -
 Delete the existing partition. This will delete the partition and turn it into unallocated space. You can then create a new partition from that space and format it with a file system.
- Right-click the partition you want to remove and click "Delete."
-
 Create a new partition. After deleting the partition, right-click the unallocated space and select "New." This will start the process to create a new partition.
 -
 Select the size of the partition. When creating a new partition, you can use the slider to choose how much of the space you want to use for it.
 -
 Select the partition's file system. Use the "File system" menu to choose the format for the partition. If you intend to use the drive for multiple operating systems and devices, select "fat32." If you're just using the drive in Linux, select "ext4."
 -
 Give the partition a label. This will allow you to easily identify it on your system.
 -
 Click "Add" when you're finished configuring the partition. The partition will be added to your operations queue at the bottom of the screen.
 -
 Resize a partition (optional). One of Gparted's features is the ability to resize partitions. You can resize a partition so that a new partition can be created from the resulting free space. This allows you to essentially split a single drive into multiple pieces. This will not affect any data on the drive.
- Right-click the partition you want to resize and select "Resize/Move."
- Drag the edges of the partition to create free space before or after it.
- Click "Resize/Move" to accept your changes. You'll need to create new partitions from the resulting unallocated space following the instructions above.
-
 Click the green checkmark button to begin applying your changes. None of your changes will be applied to the drive until you click this button. Once you click it, any partitions that you set to delete will be removed and you will lose all of the data on them. Be absolutely sure you have the correct settings before proceeding.
- It may take a while to complete all of the operations, especially if you're performing several or the drive is large.
-
 Find your newly-formatted drive. Once the format process is complete, you can close GParted and find your drive. It will appear in the list of drives in your Files program.[2]
Was this article helpful?
Your feedback helps us improve.
Related Articles
 How to Format a Hard Drive on Ubuntu6 minutes read
 How to format the hard drive on Windows9 minutes read
 How to format a hard drive into NTFS in Linux4 minutes read
 How to Format a USB Flash Drive in Ubuntu4 minutes read
 How to Format a hard drive with the CMD command5 minutes read
 Instructions to install Ubuntu directly from the hard drive3 minutes read
Reader Comments 0
Sign in with email or Google to join the discussion.