How to Delete a Drive Partition on PC or Mac
This wikiHow teaches you how to delete a drive partition on PC or Mac. You can delete a drive partition in the Disk Management app on PC, or the Disk Utility app on Mac. Right-click on the Windows Start menu . It's the icon that has the...
Table of Contents
Method 1 of 2:
Using a PC
-
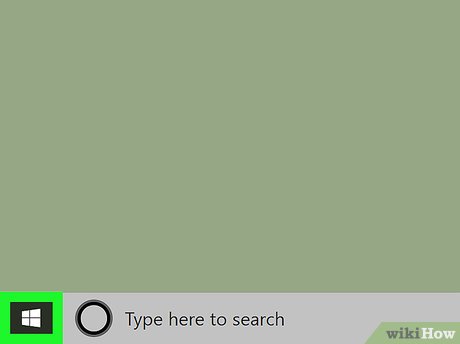 Right-click on the Windows Start menu. It's the icon that has the Windows logo in the task bar. By default, it's in the lower-left corner of the Windows desktop. This displays a pop-up menu.
-
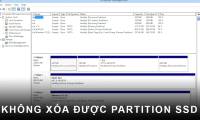
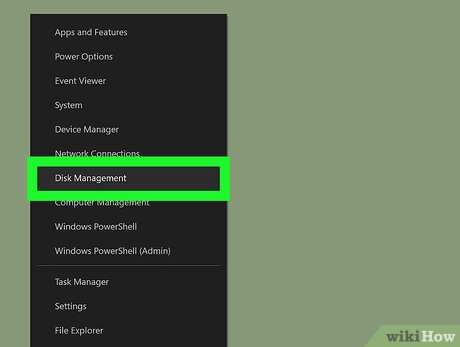 Click Disk Management. It's in the pop-up menu that appears when you right-click the Windows Start menu. This opens the Disk Management app.
 -
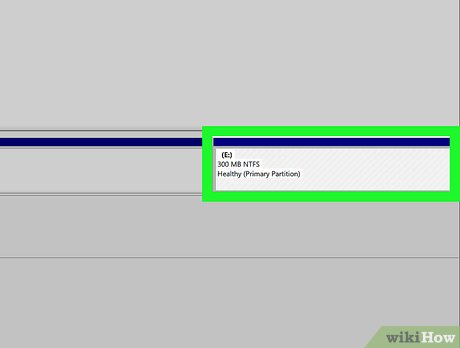 Right-click on the drive you want to delete. This displays a pop-up menu with options for the drive.
 -
 Click Delete Volume. It's in the pop-up menu that appears when you right-click on a drive in the Disk Management app. This deletes the drive. The new free space will be unallocated.[1]
- Warning: This will permanetly delete all the data on the partition. Make sure you backup any files you want to save to another drive before you delete the partition.
- Note: You cannot delete a drive that has your Windows installation on it.
-
 Right-click the main drive. This is the drive (usually C:) that the original partition was split from.
 -
 Click Extend drive. It's in the pop-up menu that appears when you right-click on a drive in Disk Management. This opens the Extend Volume Wizard.
- Alternatively, you can click Format Drive to reformat the unallocated free space as another partition.
-
 Click Next. It's in the lower-right corner of the Extend Volume Wizard.
 -
 Click Next again. This confirms that you want to add the entirety of the unallocated space to the main drive.
 -
 Click Finish. This adds the unallocated space back into your main drive. Your partition is now deleted.[2][3]
Method 2 of 2:
Using a Mac
-
 Click the magnifying glass icon. It's in the upper-right corner of the Mac desktop. This displays the Spotlight search bar.
-
 Type Disk Utility in the spotlight search bar. This displays a list of apps that match your search text.
 -
 Click Disk Utility.app. It's at the top of the list of search results. It's next to an icon that resembles a hard drive with a stethoscope. This opens the Disk Utility app.
 -
 Click the drive you want to delete. The drives are listed in the sidebar to the left of the Disk Utility app.
 -
 Click Erase. It's at the top of the Disk Utility app. This displays a pop-up.
 -
 Click Erase in the pop-up. This verifies that you want to erase the drive and erases it.
- Warning: This will permanetly delete all the data on the partition. Make sure you backup any files you want to save to another drive before you delete the partition.
-
 Click Done. Once your computer is done erasing the drive, click Done to close the pop-up window. Your partition has been erased. If you still want to use the partition, no further steps are needed. If you want to remove the partition, continue to the next step.
 -
 Click the Partition tab. It's the second tab at the top of the Disk Utility app. This displays a pie chart with your partitions.
 -
 Click the partition you want to remove in the pie chart. The selected partition will turn blue.
 -
 Click -. It's the icon with the minus (-) sign below the pie chart. This removes the partition from the pie chart, allocating the free space to the main drive.
 -
 Click Apply. It's in the lower-right corner of the Disk Utility app. This displays a confirmation pop-up.
 -
 Click Partition. This applies the partition and reallocates the newly erased partition to the main drive.
 -
 Click Done. Once the partition process is finished, click Done to close progress bar. Your partition has been erased.[4]
Was this article helpful?
Your feedback helps us improve.
Related Articles
 How to delete a partition on Windows hard drive?2 minutes read
 This is how to delete Recovery partition and Recovery partition 450 MB on Windows 1010 minutes read
 How to delete a partition on Windows hard drive?6 minutes read
 Instructions on how to fix the error of not being able to delete SSD Partition5 minutes read
 How to delete a drive cannot be deleted with Disk Management16 minutes read
 Paragon Partition Manager - Download the latest Paragon Partition Manager3 minutes read
Reader Comments 0
Sign in with email or Google to join the discussion.