Table of Contents
Learning how to fix the error of not being able to open.exe files due to viruses on doesn't have to be complicated. This updated guide presents a clear workflow, practical checks, and troubleshooting advice you can use while completing the process.
Key Takeaways
- Follow the steps to fix the error of not being able to open.exe files due to viruses.
- Follow the recommended steps in order to avoid common mistakes with fix the error of not being able to open.exe files due to viruses on.
- Review compatibility, settings, or requirements before making changes.
How to Fix the Error of Not Being Able to Open.exe Files Due to Viruses
1. Boot in Safe Mode
The first step is to boot your computer into Safe Mode with Networking. To do this:
On Windows 7, Vista and XP
Step 1: Close all running programs and applications, then restart your computer.
Step 2: Press the F8 key while the computer is booting, before the Windows logo appears.
Step 3: Now the Windows Advanced Options menu window appears on the screen, use the arrow keys to navigate and select the Safe Mode with Networking option, then press Enter.

On Windows 10, 8 and 8.1
Step 1: Press the Windows + R key combination to open the Run command window.
Step 2: Type msconfig there and press Enter to open the System Configuration window.

Step 3: On the System Configuration window, in the Boot tab, find and check the Safe Boot and Network options.
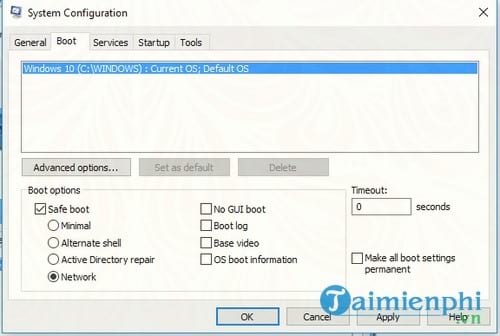
Step 4: Click OK and restart your computer.
Note:
Follow the same steps and uncheck the Safe Boot option. This helps you start Windows in Normal Mode.
2. Repair.exe file with RKILL
Step 1: Download RKill to your computer and install it here: Download RKill.
RKill is a specialized security software program to remove malware on computer systems.
Step 2: Run RKill and allow the program to remove any malicious processes that may be running on your computer.
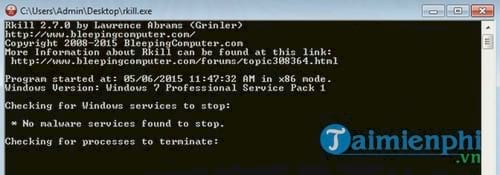
Step 3: After finishing the process, click OK to proceed to the next step.
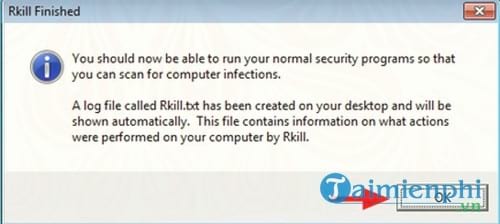
3. Uninstall programs of unknown origin.
Uninstalling software of unknown origin on the system helps you free up memory and is also a way to remove malware installed when you install necessary software for your computer. You will find many ways to uninstall software, you can follow the method below.
Step 1: To do this, first access Control Panel:
- On Windows 7 and Vista: open Start => Control Panel.
- On Windows XP: open Start => Settings => Control Panel.
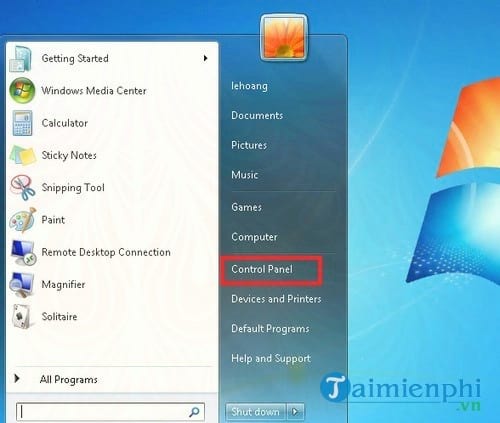
- On Windows 10, 8.1 and 8:
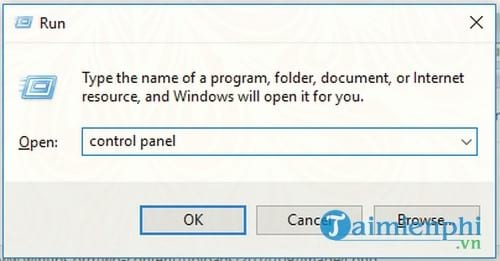
+ First press the Windows + R key combination to open the Run command window.
+ Type control panel there and press Enter.
Step 2: On the Control Panel window.
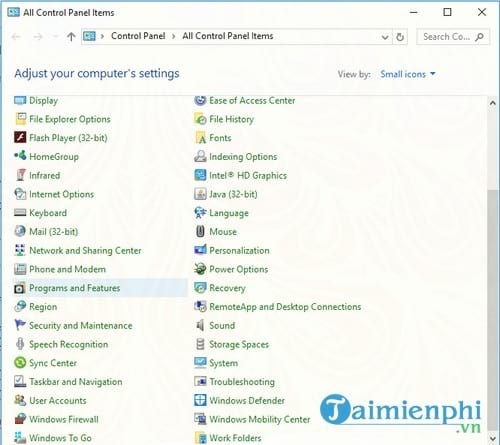
- Find and click Add or Remove Programs if using Windows XP.
- Find and click the Programs and Features (or Uninstall a Program) option if using Windows 10, 8, 7 or Vista.
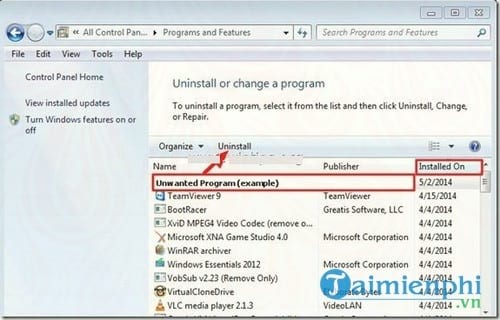
Step 3: A new window appears on the screen displaying a list of programs you have installed on your computer:
- Sort the displayed programs by installation date by clicking Install On.
- Uninstall any unknown programs recently installed on the system.
4. Remove Adware with AdwCleaner
Step 1: Download AdwCleaner to your computer and install it here: Download AdwCleaner.
Step 2: Close all programs and applications running on your computer, then run AdwCleaner.
Step 3: After accepting the terms, click the Scan button to start scanning.
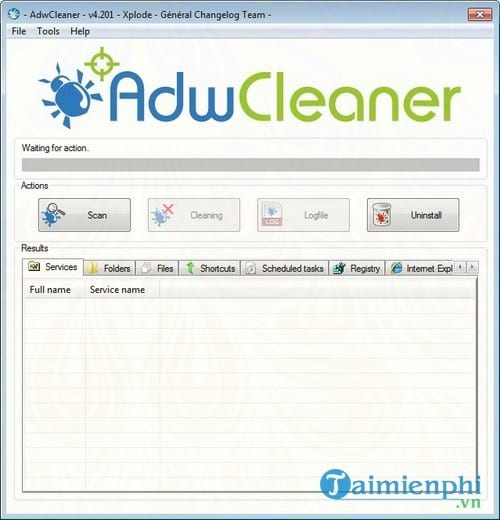
Step 4: The scanning process is finished, click the Clean button to remove all unwanted malicious programs on your computer.
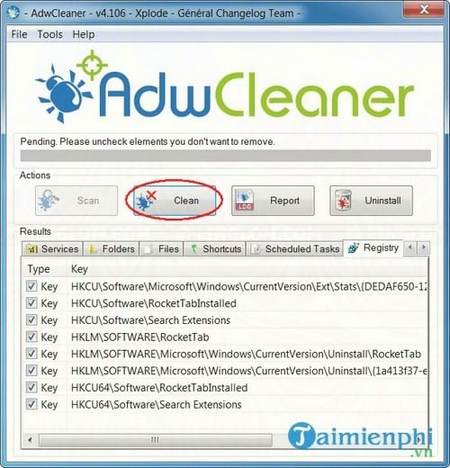
Step 5: On the AdwCleaner - Information window, click OK, then select OK again to restart your computer.
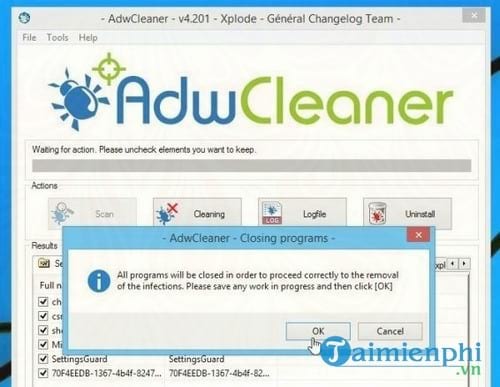
Step 6: After your computer finishes booting, close the AdwCleaner information window and proceed with the next steps.
5. Clean up junk files with JRT
Step 1: Download JRT - Junkware Removal Tool to your computer and install it here: Download Junkware Removal Tool.
Step 2: Press any key to start scanning your entire computer with JRT.
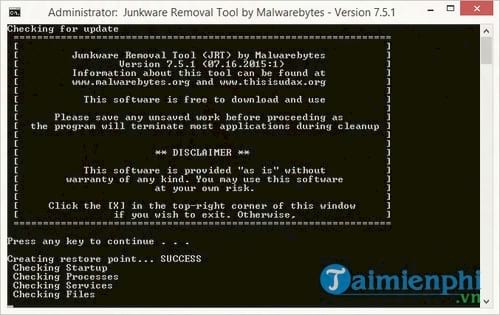
Step 3: Wait for the system scanning and cleaning process to finish.
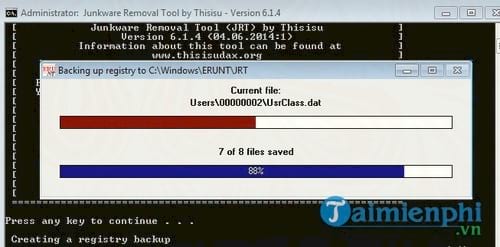
Step 4: Close the JRT log file window and restart your computer.
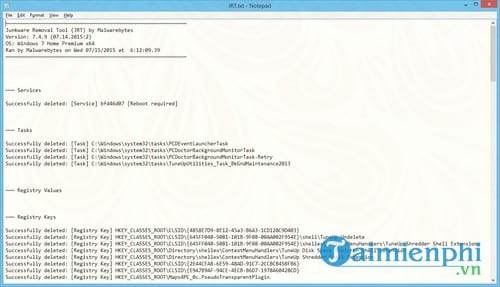
Check and restore the integrity of the HOSTS file.
The HOSTS file is a plain text file in the operating system (Windows, Mac,.) used to map Internet domain names (hostnames) with IP addresses. It can cause problems such as: if the hosts file is corrupted or modified by a virus.
- Unable to access the Internet. - Unable to download applications or files from the Internet. - Browser redirects to unwanted websites.
Here's how to check and restore the HOSTS file to its original state:
Step 1: Open Windows Explorer, then navigate to this path on your hard drive:
C:WindowsSystem32driversetc
Step 2: Find and copy the hosts file to the desktop. To copy the hosts file to the desktop:
- Right select the hosts file and select Copy.
- Next, right-select any blank space on the desktop screen, select Paste.
Step 3: Open the hosts file on Notepad. Right-select the hosts file on the desktop and select Open. This helps you do this.
Step 4: In the list of programs, select Notepad and then click OK.
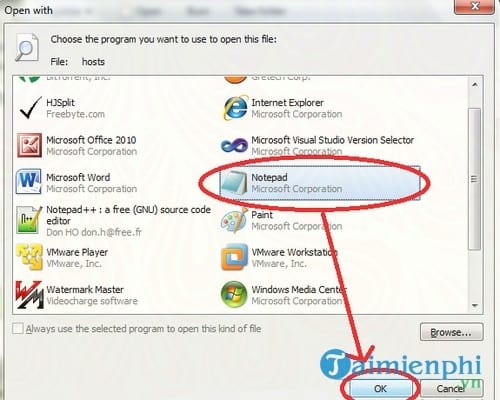
Step 5: If the hosts file is not edited (still has the default values), you will see the hosts - Notepad window like the image below:
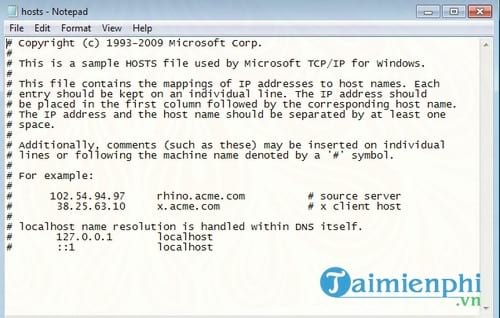
In this case, just close the hosts - Notepad window and continue with step 7.
Step 6: If the hosts file has been modified by a virus, you will see some additional entries at the end of the hosts file. In this case, you will have to restore the hosts file to its original default settings or create a new hosts file. To do this:
- Select and copy (press Ctrl + C) the text below:
# Copyright (c) 1993-2006 Microsoft Corp.
#
# This is a sample HOSTS file used by Microsoft TCP/IP for Windows.
#
# This file contains the mappings of IP addresses to host names. Each
# entry should be kept on an individual line. The IP address should
# be placed in the first column followed by the corresponding host name.
# The IP address and the host name should be separated by at least one.
# space.
#
# Additionally, comments (such as these) may be inserted on individual.
# lines or following the machine name denoted by a '#' symbol.
#
# For instance:
#
# 102.54.94.97 rhino.acme.com # source server.
# 38.25.63.10 x.acme.com # x client host.
# localhost name resolution is handled within DNS itself.
# 127.0.0.1 localhost
#::1 localhost
- Find the hosts - Notepad window that you opened earlier and delete all the contents in the window (press Ctrl + A to select all, then press Delete ).
- Paste the text you copied in the name (press Ctrl + V).
Step 7: On the File Menu, select Save and close the hosts - Notepad window.
Step 8: Finally, copy the hosts file on the desktop that you just edited, paste it into the following path: C:WindowsSystem32driversetc.
Step 9: Select Copy and Replace when prompted.
Step 10: Restart your computer.
Using Malwarebytes Anti-Malware.
Malwarebytes Anti-Malware is one of the most trusted anti-malware programs available today, removing all threats on your computer. We recommend you use Malwarebytes Anti-Malware. This helps you protect your computer from malware threats.
Quick installation guide:
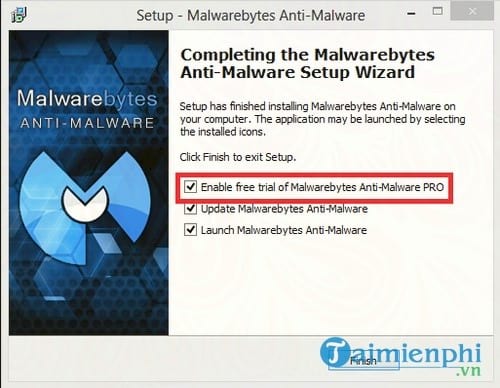
- Download link for Malwarebytes Anti-Malware here. - To install and use the free software, in the final installation window, uncheck the Enable free Trial of Malwarebytes Anti-Malware Premium option.
6. Scan and clean your computer with Malwarebytes Anti-Malware.
Step 1: Run Malwarebytes Anti-Malware and allow the program to update to the latest version if necessary.
Step 2: After the update process is complete, click Scan Now to start scanning and finding malware and unwanted programs on your system.
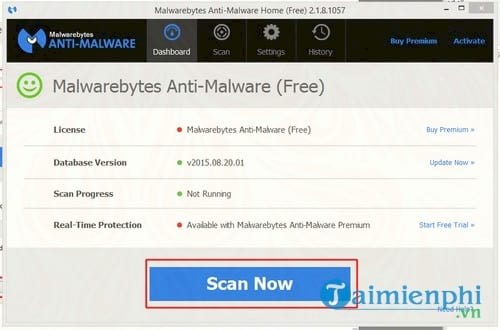
Step 3: Wait for the scan to finish.
Step 4: Click the Quarantine All (Remove Selected) button to remove all threats on the system.
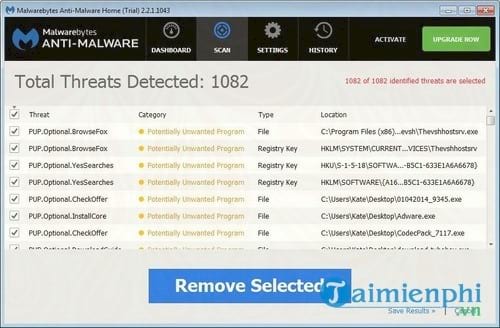
Step 5: Restart your computer to complete the process of removing malware and threats on your computer.
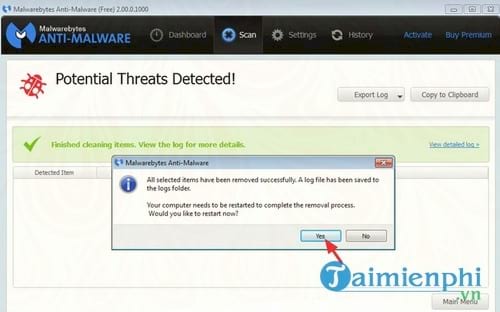
Step 6: After your computer finishes booting, run Malwarebytes Anti-Malware again to confirm there is no longer any malware on your system.
Advice:
Boot your Windows computer into Safe Mode and scan your system with Malwarebytes Anti-Malware. This helps you make sure your computer is safe and free of any malware.
7. Remove unwanted applications with ESET Online Scanner.
Step 1: Download and install.
Download ESET Online Scanner to your computer and install it here: Download ESET Online Scanner.
ESET Online Scanner is a powerful virus scanning tool that helps remove malware, viruses, protect the system and data on the computer.
Step 2: In the Computer Scan Settings section, select Enable detection of potentially unwanted applications.
Step 3: Expand Advanced settings and check all options including: Remove found threats, Scan Archives, Scan for potentially unsafe applications and Enable Anti-Stealth technology.
Step 4: Click Start to start scanning and cleaning the system.
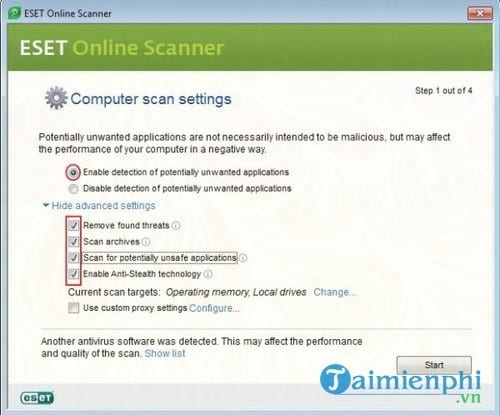
Step 5: Wait until ESET Online scanner scans, finds and removes viruses on your system.
You will completely eliminate junk files, viruses, and malware that are dangerous to your computer, giving you back a clean working environment after fully implementing the above methods to fix the error of not being able to open exe files due to virus attacks.
Final Thoughts
The most reliable way to handle fix the error of not being able to open.exe files due to viruses on is to follow the process in order, verify each important setting, and test the result before moving on. Use the guidance above as a practical reference, then adjust the details for your device, software version, or specific goal.
FAQ
What should I check before I fix the error of not being able to open.exe files due to viruses on?
Use the latest available software, confirm that your device meets the requirements, and make sure you have the necessary permissions, account access, or backup before changing anything.
Why might I be unable to fix the error of not being able to open.exe files due to viruses on?
Common causes include outdated software, missing permissions, incompatible settings, incomplete setup steps, or a temporary network problem. Recheck the process from the beginning and restart the app or device if needed.
Is it safe to fix the error of not being able to open.exe files due to viruses on?
It is generally safe when you use official tools, review every permission, and back up important data before making system-level or account-level changes.
Related Articles
 Fix a USB Drive That Is Malfunctioning and Won't Open Files6 minutes read
 How to Fix the Error of Not Being Able to Open JPG Files6 minutes read
 6 Ways to Fix Windows Terminal Not Opening Error4 minutes read
 Unable to Open PDF File with Adobe Reader6 minutes read
 The Most Effective Way to Remove Viruses on Your Phone3 minutes read
 How to Fix Photoshop Error Can't Open RAW Files3 minutes read
Reader Comments 0
Sign in with email or Google to join the discussion.