How to Explore the Easter Eggs in Windows 95
Windows 95 is a very ancient operating system which can't rival modern operating systems in most areas. However, one thing it does better than most modern operating systems is providing Easter Eggs. If you know what you're looking for, you....
Method 1 of 3:
The "The Microsoft Windows 95 Product Team!" Easter Egg
-
 Right click anywhere on the desktop (except from another icon).
 -
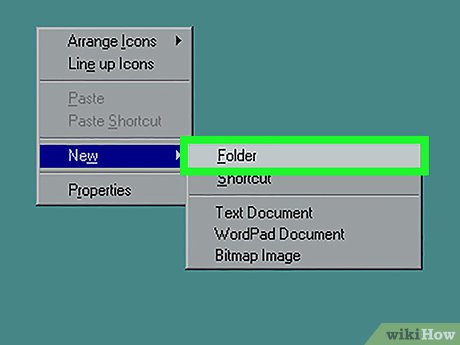 Hover over New and click Folder.
 -
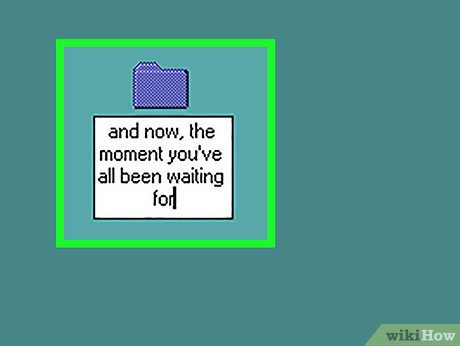 Type and now, the moment you've all been waiting for exactly and press ↵ Enter.
 -
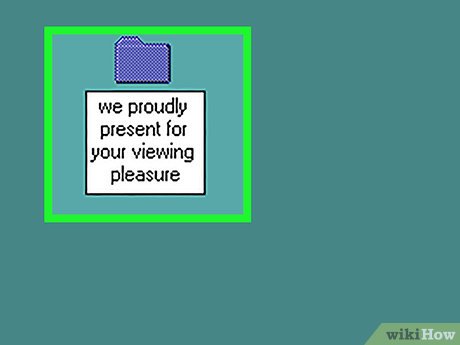 Press F2 and type we proudly present for your viewing pleasure, exactly. Press ↵ Enter.
 -
 Press F2 and type The Microsoft Windows 95 Product Team! exactly. Press ↵ Enter.
 -
 Double click your new created folder.
 -
 Turn your volume up, sit back and enjoy.
Method 2 of 3:
The "3D Text Screen Saver Volcano Names" Easter Egg
-
 Go to the desktop and right click then click Properties.
- Or go to Start > Settings > Control Panel > Display.
-
 Click the Screen Saver tab at the top of the screen.
 -
 Select '3D Text' from the drop down menu.
- If the '3D Text' screensaver is not there, then in 'Control Panel' go to "Add/Remove Programs Properties". Click the Windows Setup tab at the top. Click Accessories > Details > Screen Savers > Details. Click the checkbox for 'OpenGL Screen Savers' and select OK. Click OK, insert the Windows 95 installation disk, and click OK again. Then repeat the start of this method.
-
 Click Settings.
 -
 In the text box, type volcano and press Enter.
 -
 Click Preview.
 -
 Check out the results. On screen will be the name of a volcano.
 -
 To escape press Esc or move the mouse.
Method 3 of 3:
The Shadow knows! Easter Egg
-
 Click Start.
 -
 Click Help.
 -
 Click the tab Find.
 -
 If haven't already done so, choose an option and click Next >.
- It doesn't matter which option you choose.
-
 Click Finish.
 -
 Click Options.
 -
 Ensure that your settings are exactly as shown on the screen and click OK.
 -
 Type Who knows who built this tool?, exactly.
 -
 Hold Shift Ctrl and click clear simultaneously.
 -
 Click Options
 -
 Set all the options exactly as displayed in the picture, then click OK
 -
 Type in, exactly, The Shadow knows!.
 -
 Hold Shift Ctrl and click clear simultaneously.
 -
 This screen should display and will mark the Easter egg.