Table of Contents
This updated guide examines How to Dismount a Volume and organizes the essential facts, background, and practical takeaways in clear American English.
Method 1
Dismounting a Volume in Windows
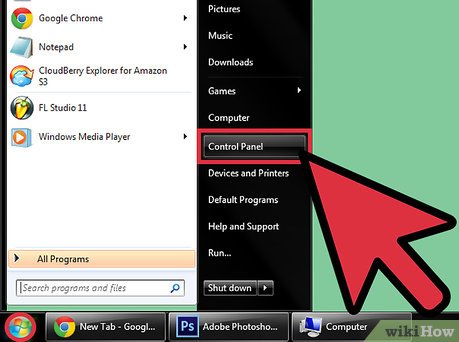 Click on 'Start' and select 'Control Panel.'The Control Panel window will display on-screen.
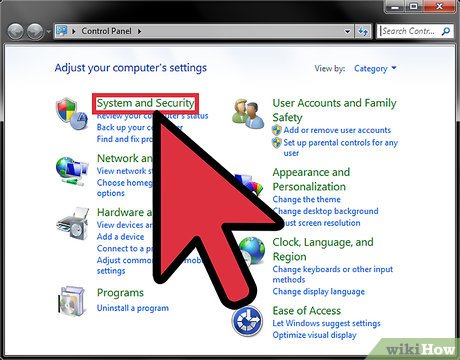 Click on 'System and Security,' then on 'Administrative Tools.'
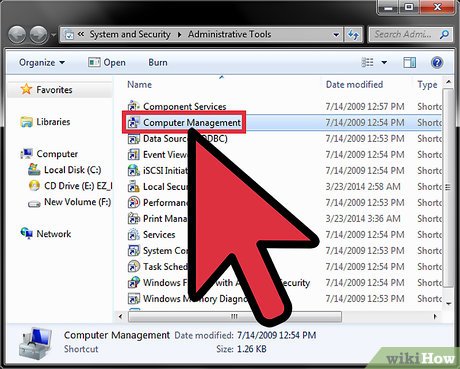 Click on 'Computer Management,' then enter the administrator password.Dismounting a volume can only be done by the administrator.
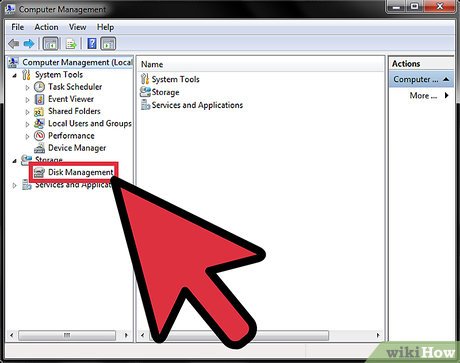 Click on 'Disk Management' under 'Storage' in the left pane.
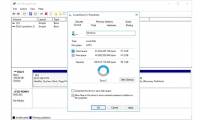
 Right-click on the volume you want dismounted and select 'Change Drive Letter and Paths.'
 Click on 'Remove,' then select 'Yes' when asked to confirm that you want to dismount the volume.The volume you selected will now be dismounted.[1]XResearch source
Method 2
Dismounting a Volume on Mac OS X
 Open the Applications folder and click on 'Utilities.'
 Click on 'Terminal.'The Terminal application will launch and display on-screen.
 Type 'diskutil list' into Terminal and hit 'Return.'This command will provide you with a list of all drives connected to your Mac computer so you can grab the 'drive identifier' of the volume you want dismounted.
 Locate the name of the volume you want dismounted in the list of results.For example, if you want to dismount a flash drive you had named 'wikiHow data,' find the volume for 'wikiHow data' in the list of results.
 Locate the drive identifier of that particular volume.The drive identifier will be named 'disk' followed by a combination of different numbers and characters, and is located at the end of the line for each volume listed. For example, the drive identifier may read as 'disk0s2' or 'disk1s2.'
 Type the following command into Terminal:'diskutil unmount /dev/disk1s2,' while making sure that the appropriate drive identifier for the volume you want dismounted is used in place of 'disk1s2' in this command. The volume will be officially dismounted when the following command is displayed in Terminal: '$ diskutil unmount /dev/disk1s2 Volume wikiHow data on disk1s2 unmounted'[2]XResearch source
Frequently Asked Questions
What is How to Dismount a Volume about?
It provides a structured overview of volume, explains the main context, and highlights practical takeaways for readers.
Why does this topic matter?
Understanding the main concepts helps readers evaluate the issue, avoid common mistakes, and make better-informed decisions.
How should readers use this information?
Use the guidance as a practical starting point, confirm details that may have changed, and follow current product, safety, or security recommendations.
Was this article helpful?
Your feedback helps us improve.
Related Articles
 What Is the Volume Label for a Volume?8 minutes read
 What Is Search Volume? Why Care About Search Volume?4 minutes read
 7 Ways to Fix Low Volume in Windows 108 minutes read
 How to Change Volume on Mac: Practical Guide4 minutes read
 How to Set an iPhone Volume Limit for Loud Media4 minutes read
 How to Set the Default Volume Level for Each Application5 minutes read
Reader Comments 0
Sign in with email or Google to join the discussion.