Table of Contents
This updated guide examines Use Volume Hd Recovery to Reinstall or Troubleshoot Os X and organizes the essential facts, background, and practical takeaways in clear American English.
With the removal of installation DVDs, Apple needs to provide alternative methods to install the operating system, repair boot drives, system files, and reinstall the operating system. All of these features were previously available on the installation DVD.
Apple's solution is to download OS X containing the program, not only install the operating system on the Mac, but also create a hidden volume on the boot drive, called Recovery HD. This hidden volume contains the minimum version of OS X that is enough to allow the Mac to boot and contain various utilities.
Utilities are in volume Recovery HD
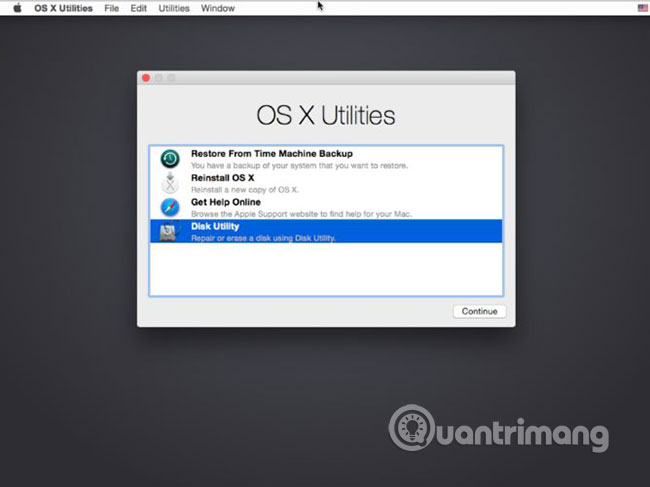
- Disk Utility : To repair broken drives and system files.
- Safari: Allows you to go online and research any issues you may encounter.
- Reinstall OSX : Can be used to install a new copy of the operating system on a Mac.
- Restore From Time Machine Backup : For times when everything goes wrong and you need to restore data from your backup.
- Terminal: To work with the Mac file system or edit the file.
- Network Utility: In case you need to troubleshoot the network.
- Firmware Password Utility: To set or delete firmware password, one of the security options for OS X.
As you can see, Recovery HD can do more than just install the operating system. HD Recovery provides almost all similar services that are included on older installation DVDs.
Access volume Recovery HD
In normal Mac operations, you may not pay attention to the existence of volume recovery HD. HD Recovery is not placed on the desktop and Disk Utility will hide it unless you use the debugging menu to display hidden volumes.
To use volume recovery HD, you must reboot your Mac and select Recovery HD as the boot device, using either of the following methods.
Reboot directly into HD Recovery
1. Restart the Mac while holding down theCmdandRkeys. Continue to hold both keys until the Apple logo appears.
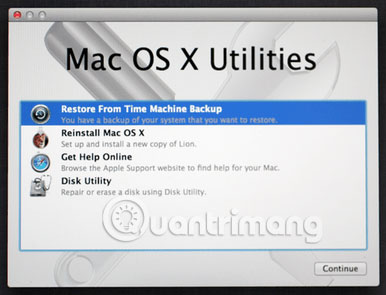
2. When the Apple logo appears, the Mac will boot from the Volume Recovery HD. Then (it may take longer to boot from Recovery HD, so be patient), a desktop will appear with a window containing Mac OS X utilities and a basic menu bar on the top.
Restart Startup Manager
You can also reboot your Mac into Startup Manager. This is the same method used to boot into Windows (Bootcamp) or other operating systems that you may have installed on your Mac. There is no particular advantage when using this method, but the article still mentions this section, for those who are familiar with the Startup Manager.
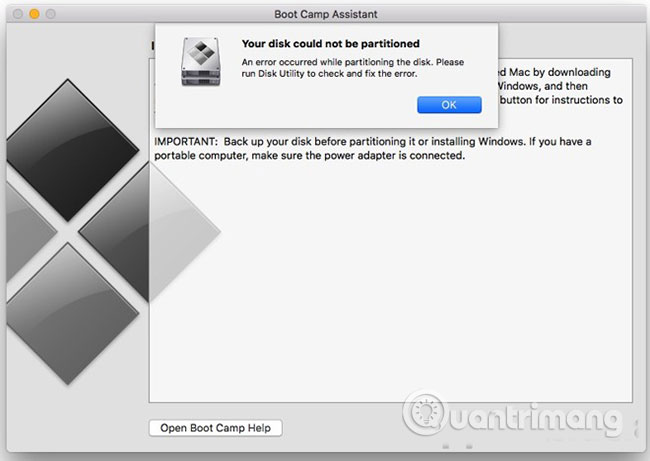
1. Restart the Mac and hold down theOptionkey.
2. Startup Manager will check all attached devices.
3. When Startup Manager starts displaying the icon of the internal and external hard drive, you can release theOptionkey.
4. Use the left or right arrow keys to select the Recovery HD icon.
5. Press theReturnkey when the drive you want to boot (Recovery HD) is highlighted.
6. The Mac will boot from Recovery HD. This process may take longer than a normal startup. When the Mac has finished booting, it will display a desktop with Mac OS X Utilities window open and a basic menu bar on the top.
Use HD Recovery volume
Now that the Mac has booted from the volume recovery HD, you are ready to perform one or more tasks on the boot device (which you cannot do when booting from a normal boot drive).
For convenience, the article includes appropriate instructions for each common task that Recovery HD is used for.
Use Disk Utility
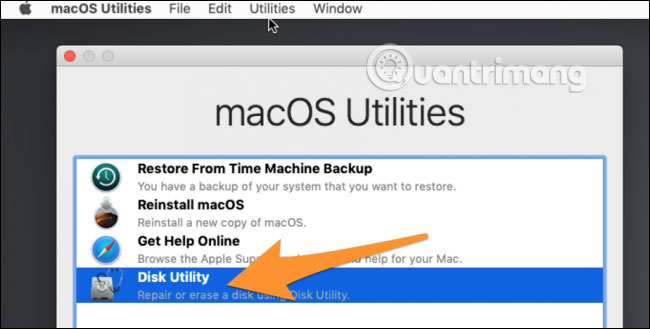
1. From the OS X Utilities window, select Disk Utility, and then click Continue.
2. Disk Utility will launch as if you are using the application from the normal boot drive. The difference is that by launching Disk Utility from the Volume Recovery HD, you can use any Disk Utility tool to check or repair your boot drive. For details on how to do this, see the following instructions. Remember that if any of these instructions require you to launch Disk Utility, you have completed it at this point.
- Use Disk Utility to repair the hard drive and decentralize the drive
- Hard drive format with Disk Utility
- Back up the boot drive using Disk Utility
When you finish using Disk Utility, you can return to OS X Utilities window by selecting Quit from the Disk Utility menu .
Get Help Online feature
1. From OS X Utilities window, select Get Help Online , then click Continue.
2. Safari will launch and display a special page with general instructions on how to use volume recovery HD. However, you are not limited to this simple help page. You can use Safari as usual.
Although bookmarks won't appear, Apple has provided bookmarks that take you to Apple, iCloud, Facebook, Twitter, Wikipedia and Yahoo websites. You will also find many popular news and websites bookmarked for you. You can also enter a URL to access the site you choose.
3. After using Safari, you can return to OS X Utilities window by selecting Quit from the Safari menu.
Reinstall OS X option
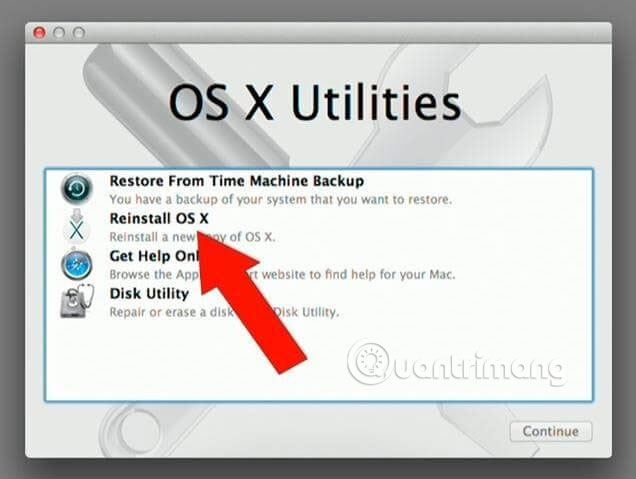
1. In the OS X Utilities window, select Reinstall OS X , and then click Continue.
2. OS X Installer will start and take you through the installation process. This process may vary, depending on the version of OS X reinstalled.
Restore From Time Machine Backup option
Restoring your Mac from a Time Machine backup will cause all data on the selected destination drive to be deleted.
1. Select Restore From Time Machine Backup in the OS X Utilities window and click Continue.
2. Restore Your System application will launch and guide you through the recovery process. Be sure to read and note the warnings in the Restore Your System application . Click Continue to continue.
3. Follow the steps outlined in the Restore Your System application . When the process is complete, the Mac will restart from the destination drive you selected.
Create HD Recovery Volume on another drive
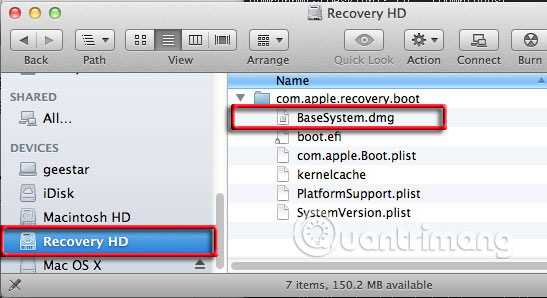
Volume Recovery HD can be a lifesaver, at least when it comes to troubleshooting and fixing problems with Macs. But the volume recovery HD is only created on the boot drive inside the Mac. If there are any errors with that drive, you might be in big trouble.
That is why you should create another copy of the HD Recovery volume on an external drive or USB flash drive.
Hope you are succesful.
FAQ
What is Use Volume Hd Recovery to Reinstall or Troubleshoot Os X about?
It provides a structured overview of Volume HD Recovery, explains the main context, and highlights practical takeaways for readers.
Why does this topic matter?
Understanding the main concepts helps readers evaluate the issue, avoid common mistakes, and make better-informed decisions.
How should readers use this information?
Use the guidance as a practical starting point, confirm details that may have changed, and follow current product, safety, or security recommendations.
Related Articles
 Hd Recovery: How to Create Mac Recovery Hd on Any Drive14 minutes read
 This Is How to Delete Recovery Partition and Recovery Partition11 minutes read
 Troubleshoot iPhone Volume Buttons Not Working8 minutes read
 How to Access Recovery Mode on a Mac M14 minutes read
 What Is the Volume Label for a Volume?8 minutes read
 What Is Search Volume? Why Care About Search Volume?4 minutes read
Reader Comments 0
Sign in with email or Google to join the discussion.