Table of Contents
This updated guide examines How to Rescue Files on a Corrupted Sd Memory Card with Photorec and organizes the essential facts, background, and practical takeaways in clear American English.
Method 1
Using PhotoRec (All Operating Systems)
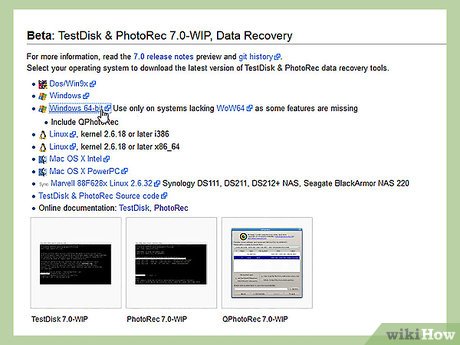 Download the PhotoRec software. PhotoRec is a free data recovery program that runs from a command line interface. It is not as flashy or intuitive as other recovery programs, but it is one of the most powerful free data recovery solutions, and works on virtually all operating systems.
- PhotoRec can be downloaded from the CGSecurity website. Ensure that you are downloading the correct version for your operating system.
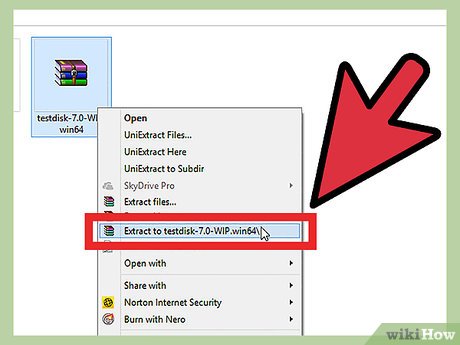 Extract the program. PhotRec is a lightweight program, and does not need to be installed. Instead, open the ZIP file after it is downloaded and copy the folder to an easy-to-access location on your hard drive, such as the root of C: drive or your desktop.
 Run the program. Double-click on the "photorec_os" file in the TestDisk folder. Theospart of the name will be replaced with whatever version you downloaded. For example, if you are using Windows, the file will be called "photorec_win".
 Select the card. Ensure that the SD card has been inserted into your computer's card reader, or that it is inserted in the camera and the camera is connected to the computer via USB. When PhotoRec starts, you will be given the option to choose which disk you want to recover data on. Use the arrow keys to select your SD card.
- If you have multiple partitions on the disk, you will be asked to select which partition you want. Most memory cards aren't partitioned, so you won't need to choose.
 Set your options. You are given a few options before the recovery process starts. Most users can leave these at their defaults, but if you want to recover files even if they are corrupted, you can enable that on this screen.
- Enabling "brute force" will recover fragmented files, and is very CPU intensive.
 Define what file types you are looking for. By default, all of the file types are highlighted. If you know exactly what files you are looking for, you can narrow it down to speed up the search. Each extension in the list has a brief definition next to it to help you determine what kind of file it is.
- If you are recovering for a camera, you will want to focus on RAW and CR2 files, as well as JPG
 Select the file system. PhotoRec will need to know what file system type the memory card has. Most memory cards are formatted in one of the systems in the "Other" category.
- If you aren't able to get any results, try running the scan again with the other file system option.
 Tell PhotoRec what space to check. PhotoRec will give you two options for space checking: Free or Whole. If your memory card is corrupt, you will get better results with the Whole option. The Free option will only look for files that have been specifically deleted.
 Set the location for recovered files. The last thing you need to do before you start scanning for files is set a location for recovered files to be saved. You will need to select a location on your computer and not on the memory card you are trying to recover from. Use your arrow keys to change directories.
 Wait for the scan to finish. You can see the scan results update as the scan is performed. PhotoRec will make at least two passes on the card to try to find as many files as possible. This will take several minutes.
 Browse your results. After the scan is complete, the recovered files will be available in the directory you set before the scan started. The original filenames will almost always be lost, so you will need to manually change them back to whatever you want.[1]XResearch source
- If the files you need are still corrupt, there is likely no way for them to be fully recovered.
Method 2
Using Recuva (Windows)
 Download and install Recuva. Recuva is a file recovery program that has a free version available for home use. It is Windows only, and has a graphical interface instead of using the command prompt. You can download Recuva from the Piriform website.
- Make sure to choose the Free version when selecting your download.
- Most users can leave the installation settings at their default.
 Insert your SD card. Ensure that the card has been inserted into your computer's card reader, or that the card is inserted in a camera and the camera is connected to your computer via USB.
 Choose the file types. When you start up Recuva and click past the Welcome screen, you will be shown a list of options for what types of files you want to search for. Choose the category that best suits your needs, or click the Other option to manually select all the file types you want to search for.
 Select the location. On the next screen, you will be asked where Recuva should look for files. Choose the "On my media card or iPod" option and clickNext.
 Choose whether or not to enable Deep Scanning. On the next screen, you will be given the option to enable a Deep Scan. This is a very time-intensive scan, and should only be done if your first scan doesn't recover the files you need.
 Start the scan. Click theStartbutton to begin the scan. The scan will begin, and a progress bar will display how far along it is. The time of the scan will depend on how large the SD card is.
 Browse through your results. When the scan is complete, you will be shown a list of all the recovered files. Click theSwitch to advanced modebutton. This will enable the drop-down filter, which will help you narrow the list down a little.
- Original file names are almost always deleted during a recovery, so you will need to manually rename recovered files.
 Select the files you want to recover. Check the box next to each file you want to recover. Use the preview to determine which files are the ones you want to keep. Once you've checked all the files you want to save, click theRecoverbutton. You will be asked where you want to save the files, and they will then be copied to that location.[2]XResearch source
Method 3
Using Data Rescue 3 (Mac)
 Download and install Data Rescue 3. Data Rescue 3 is a paid program, but is one of the more effective data recovery programs on Mac. If you want a free option instead, see the first section of this article.
- To install the downloaded program, double-click the DMG file that was downloaded and then drag the contents to your Applications folder.
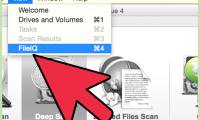
 Start the program. When you first start the program, you will be taken to the main menu. If this is your first time running Data Rescue 3, only the first option will be available: Start New Scan. Click it to get started.
 Insert your SD card. Ensure that the card has been inserted into your computer's card reader, or that the card is inserted in a camera and the camera is connected to your computer via USB or Firewire.
 Select the SD card. The SD card should appear in the list of available drives. If it is not available, ensure that it is inserted properly. Click theNextbutton after selecting the card.
 Select your scan type. You will be given several options for scan types. Quick Scan is your best bet for a first scan, as it is the quickest and still fairly powerful. You can come back and try a Deep Scan or Deleted Files Scan if the first scan does not provide any results. Click theStartbutton when you are ready.
 Wait for the scan to finish. The length of the scan will vary depending on the size of the SD card and how corrupted it is. You can look at the progress bar to see how far along the scan is.
 Select the files that you want to recover. When the scan is complete, you will be given a list of all the files and folders that were recovered. Browse through the results and check the files that you want to keep.
- Original file names are almost always deleted during a recovery, so you will need to manually rename recovered files.
- You can preview files by selecting them and clicking the Preview button at the bottom of the list.
 Recover the files. You can either drag and drop the files you want to keep into any location in your Finder, or by checking the files and clicking theRecoverbutton. You will be prompted for a location to save the files.
FAQ
What is How to Rescue Files on a Corrupted Sd Memory Card with Photorec about?
It provides a structured overview of files, explains the main context, and highlights practical takeaways for readers.
Why does this topic matter?
Understanding the main concepts helps readers evaluate the issue, avoid common mistakes, and make better-informed decisions.
How should readers use this information?
Use the guidance as a practical starting point, confirm details that may have changed, and follow current product, safety, or security recommendations.
Related Articles
 Photorec - Tool to Recover Lost Data7 minutes read
 How to Repair a Corrupted Memory Card: Step-by-Step Guide10 minutes read
 Instructions for Fixing Memory Card Errors Are Corrupted11 minutes read
 How to Recover Data from Memory Cards: Step-by-Step Guide6 minutes read
 How to Recover Photos from SD Memory Card: Practical Guide10 minutes read
 What Is the Function of Memory Card? Features, Uses, and Key Details7 minutes read
Reader Comments 0
Sign in with email or Google to join the discussion.