How to Delete Startup Entries
Most of the startup entries are created without us noticing it. Whatever program they might start, almost all of them slow down the boot process and/or the PC in general. Deleting certain ones of these elements can highly increase your....
Method 1 of 2:
Windows
Works for all Windows versions; tested on Windows XP and 7 (Virtual-PC)
-
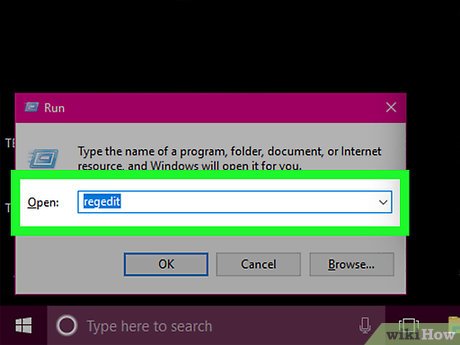 Hit ⊞ Win+R and type in regedit.
- You have to provide administrator permissions in order to make any changes to the registry.
-
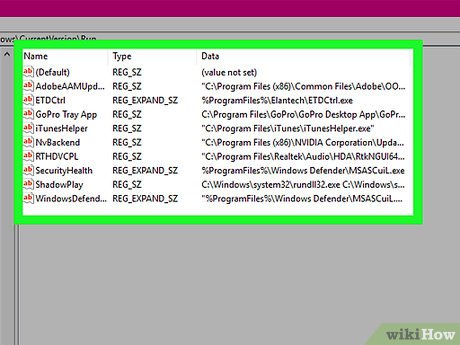 Navigate to certain registry keys and find the desired values. These keys are:
- HKLMSoftwareMicrosoftWindowsCurrentVersionRun
- HKLMSoftwareMicrosoftWindowsCurrentVersionRunOnce
- HKLMSoftwareMicrosoftWindowsCurrentVersionRunServices
- HKLMSoftwareMicrosoftWindowsCurrentVersionRunServicesOnce
- HKCUSoftwareMicrosoftWindowsCurrentVersionRun
- HKCUSoftwareMicrosoftWindowsCurrentVersionRunOnce
- HKCUSoftwareMicrosoftWindowsCurrentVersionRunOnceEx
- Don't worry if the keys ending with RunOnceEx, RunServices and RunServicesOnce don't exist - this just means that no programs have created startup entries that would cause programs to run once and then close themselves automatically and trigger system services.
-
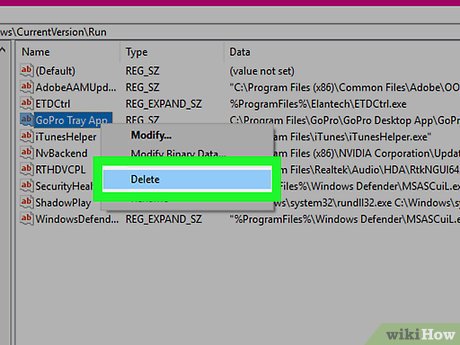 Delete the correct values. They should be named after the corresponding programs.
- Make sure not to delete any important values out of any other keys if you don't know what you're doing.
-
 Confirm your changes. Close the registry editor and restart your computer/log off and back on.
Method 2 of 2:
Mac OS X
-
 Open up the Apple menu. This is the upper left corner of the screen.
 -
 Navigate to the following path.
- System Preferences > Users and Groups > Login Items
-
 Choose the account you want to modify. All usernames will appear in the left sidebar of the window.
 -
 Click the Lock icon.
- If this menu is already unlocked, you can skip this and the next step.
-
 Enter your password.
 -
 Click an application you wish to remove from startup.
 -
 Click the - button. It is located under the list of applications. This will stop the application or service from running on startup.
- You can re-add items using the + button.