How to Control Windows 8 Startup Programs
Part 1 of 3:
Using the Windows 8 Task Manager
Using the Task Manager is the most common way of enabling or disabling startup programs.
-
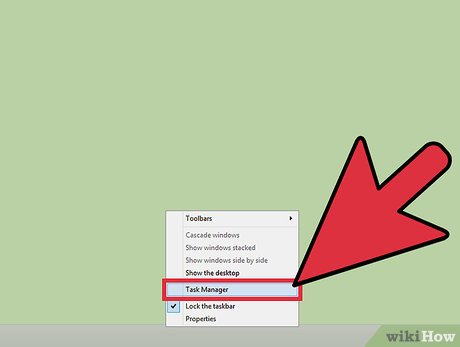
 Open Task Manager. To start enabling or disabling startup programs, open your task manager first. To open your task manager, simply move your cursor over the windows menu bar, right-click, and then choose Task Manager.
- You can also simply press Ctrl + Alt + Delete with your keyboard.
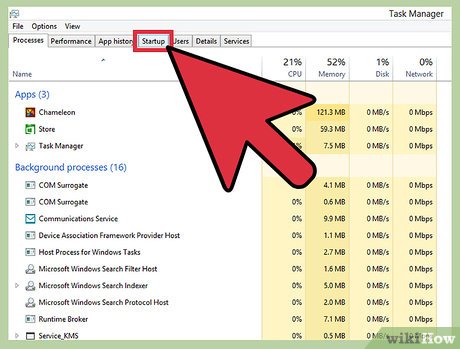
- Your Task Manager window will appear as soon as you click on Task Manager. This is where you can monitor the programs running in the background, such as system files and other softwares.
-
 Click the Startup tab. Now click on the Startup to see the list of startup programs. In the list, you'll see the name, publisher, status, and startup impact. Choose programs that you wish to be removed from the startup.
 -
 Right-click on the program you've chosen and click Disable to remove it. Once you're done, simply close the task manager.
- Click on Enable, if you want the program you chose to start whenever you switch your computer on.
Part 2 of 3:
Using the Startup Folder
Another way to disable and enable startup programs is to delete or add startup items in the startup folder.
-
 Open Windows Explorer. First thing you need to do is to open your windows explorer by pressing Windows + E keys.
 -
 Add or Delete Startup Items for a Specific User. If you don't want your other users to have the same startup item, refer to this guide. In the windows explorer, navigate to the hidden system folder: C:Users(User-Name)AppDataRoamingMicrosoftWindowsStart MenuProgramsStartup.
- You can also press Windows + R to open Run and then type in shell:Startup and hit OK.
- Now you're in the Startup folder. In the folder, you can either add or delete shortcuts for whatever items you'd like in the Startup folder.
- The program shortcuts you add in will automatically start whenever you open your computer.
- If you remove programs from the startup folder, they're considered as disabled.
- You can add as many shortcuts as you want, but keep in mind that adding a lot of startup programs may or may not cause heavy processing that will lead to slow startup loading.
-
 Add or Delete Startup Items for All Users. This is the same as number 2, but the startup will be available to all users. To make this work, you must be signed in as an administrator. First, open your windows explorer and then navigate to the hidden folder at C:ProgramDataMicrosoftWindowsStart MenuProgramsStartup.
- Alternatively, you can open Run and type in shell:Common Startup.
- The startup folder for all users will open. You can now add shortcut programs in that folder or delete the existing shortcut to disable it.
- When you're finished, close the startup folder.
Part 3 of 3:
Using msconfig
- Open run by hitting ⊞ Win+R.
- Type msconfig and hit ↵ Enter. It will open System Configuration panel.
- From the tabs above select the tab named "Startup"
- Here you will see a list of all startup programs. Disable them by unchecking and Enable them by checking the box.
- Press OK and your settings will be saved.
Share by
Isabella Humphrey
Update 04 March 2020


