How to change fonts in Windows 11
Tired of Windows 11's default fonts? Here's how to set them to whatever you like. This article shows you how to change the Windows 11 system font so that different areas of the OS will use the font type you prefer.
Table of Contents
Choose an available font from the list in the Personalization settings. It also includes a way to restore the default font if you don't want to use a custom font anymore.
The process of changing fonts is not as simple as it is on Windows 7 and 8. The following guide will show you how to do it in detail, whether you are trying to select a font from the Control Panel or install one from a online source.
1. How to change default font using Control Panel
Windows 11 includes different fonts by default that you can install and set up for free. They are available in the personalization section of Control Panel. After choosing a font, you need to set it up using Registry Editor, which is an administrative utility in Windows.
1. Choose a font
To get started, here's all you need to do:
- Type Control Panel in Windows search and click Open .
- In the next window, select Appearance and Personalization
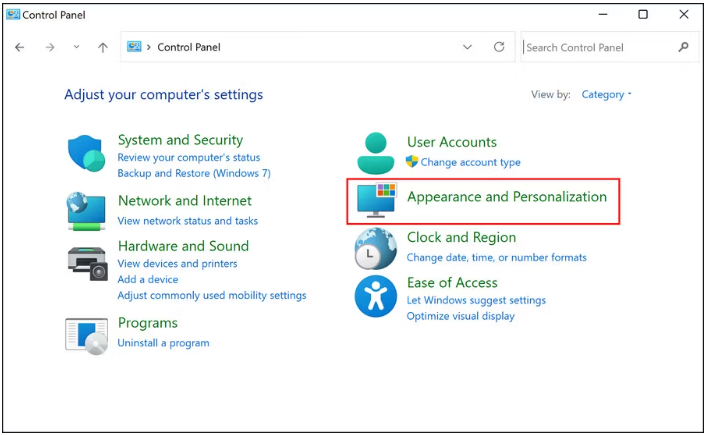
- Click the Preview, delete, show, and hide fonts option in Fonts. You will now see a list of all available fonts.

- Choose a font family and then select the desired font within it. Make sure you note down the font name.

You have now successfully selected a font. However, if you're not comfortable using the Control Panel, you can also choose the font using the Settings app.
Follow these steps to continue:
- Press Win + I together to open Settings.
- Select Personalization > Fonts .
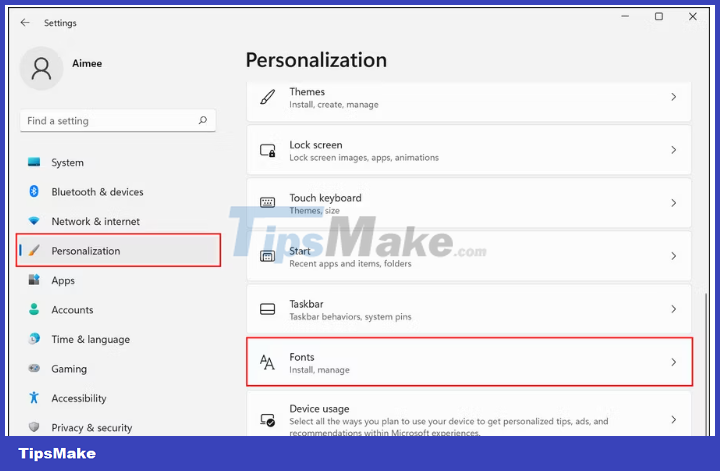
- In the next window, scroll down to see the list of available fonts and choose one from them.

- Record the full name of the selected font.
2. Install Font using Registry Editor
Now that you've chosen a font, it's time to set it up. For this, we will use the Windows Registry. Since Registry Editor is an advanced tool, we strongly recommend that you create a Registry backup before proceeding, just to be safe.
Once you've created a backup, follow the steps below to continue:
- Type Notepad in Windows search and click Open .
- In the Notepad window, enter the code mentioned below. Make sure you replace Font name with the full name of the font you selected earlier.
Windows Registry Editor Version 5.00
[HKEY_LOCAL_MACHINESOFTWAREMicrosoftWindows NTCurrentVersionFonts]
'Segoe UI (TrueType)'=''
'Segoe UI Bold (TrueType)'=''
'Segoe UI Bold Italic (TrueType)'=''
'Segoe UI Italic (TrueType)' =''
'Segoe UI Light (TrueType)'=''
'Segoe UI Semibold (TrueType)'=''
'Segoe UI Symbol (TrueType)'=''
HKEY_LOCAL_MACHINESOFTWAREMicrosoftWindows NTCurrentVersionFontSubstitutes]
'Segoe UI'='Font name'

- Once done, navigate to File > Save as .

- Enter a name for the file and add .reg to it. For example, if you choose the font Inter, you can name the font Inter.reg.
- Now, launch this document and select Yes in the Registry Editor prompt.
- Click OK to continue.

- Finally, restart your PC to take effect.
2. How to install and set up new fonts from the Microsoft Store
If you don't like any of the fonts available in the Control Panel/Settings app, you can install new fonts from the Microsoft Store. The integrated store has quite a few free and paid options for you to consider.
Here's how you can install and set up new fonts from the Microsoft Store:
- Launch Settings and navigate to Personalization > Fonts .
- Scroll down in the following window and click Get more fonts in Microsoft Store .

- Once you're in the Microsoft Store, choose the font you like.

- Click the Get button and wait for the font to download.
- Once the font is downloaded, click Open and the font will automatically add itself to the Fonts section of the Settings app.
- Note down the full name of the font and install it using Registry Editor by following the steps we mentioned above.
3. How to install and set up new fonts from third-party applications
There are several font websites that offer hundreds of different free and paid options. Before you start downloading fonts from the internet, it's important to know that Windows 11 supports the following font formats:
- TrueType (.ttf file extension)
- TrueType Collection (.ttc file extension)
- OpenType (.otf file extension)
- PostScript Type 1 (.pfb + .pfm file extensions)
The best place to find free fonts on the web is Google fonts .
Once you have downloaded the font of your choice, follow these steps to install it:
- If the font is already available in one of the formats we listed above, just double-click it to install it.
- Now, go to the Appearance and Personalization > Fonts section of Control Panel.
- You will see the font listed there. Select it and follow the steps mentioned in the first method to complete the process.
- Alternatively, you can also right-click on the downloaded font file and select Copy .

- Then, type C:WindowsFonts in File Explorer's search bar and click Enter .
- Paste the copied file anywhere in the space in the following window and use the steps outlined above in this article to set up the font.

4. How to restore Win 11 Fonts to default
If at any point in the future you want to undo the changes and restore Windows default fonts, follow these steps:
- Go to the Appearance and Personalization > Fonts section of the Control Panel.
- Select Change Font Settings .

- Next, click the Restore default font settings button to restore the font to default.

- Restart your PC to take effect.
Was this article helpful?
Your feedback helps us improve.
Related Articles
 How to add fonts, change beautiful fonts for iPhone keyboard2 minutes read
 How to change fonts on Windows computers6 minutes read
 How to Change App Fonts on iPhone4 minutes read
 How to install and uninstall fonts on Windows 113 minutes read
 How to change the font on Android phones6 minutes read
 How to download and install fonts on Windows 11 simply4 minutes read
Reader Comments 0
Sign in with email or Google to join the discussion.