How to Create and Install Symbols on Microsoft Word
This wikiHow teaches you how to create your own symbols and use them in Microsoft Word. Creating and installing symbols is different than inserting pre-installed symbols into your document. You can create and install symbols on Windows by...
Table of Contents
Method 1 of 2:
Installing Symbols on Windows
-
 Open Start. Click the Windows logo in the bottom-left corner of the screen.
-
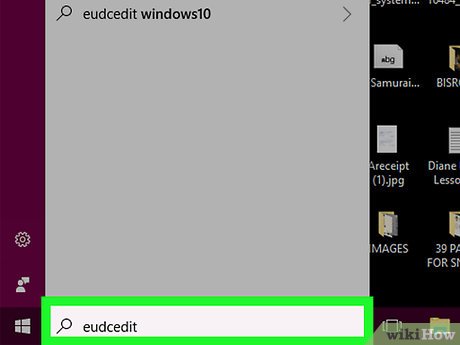 Type in eudcedit. This is the code you'll need to locate Private Character Editor since the program doesn't have a built-in shortcut.
 -
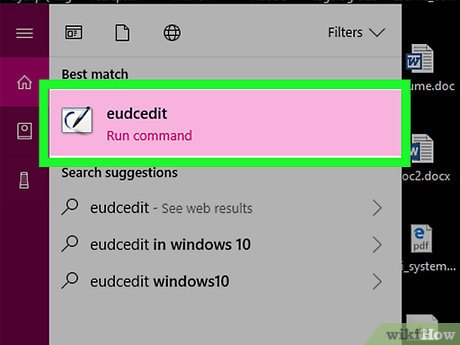 Click eudcedit. It's at the top of the menu. This will open the Private Character Editor program.
 -
 Select a space for your symbol. Click one of the grid squares in the window.
- Your selected space will correspond to Character Map later (for example, if you pick the upper-left corner box, the symbol will be in that box when you open Character Map later).
-
 Click OK. It's at the bottom of the window. Doing so confirms your space and opens the symbol editor window.
 -
 Draw your symbol. Click and drag your mouse around the window to draw. This part is largely up to you, though keep in mind that the bottom of the window represents the bottom of a text line; if you create a symbol that starts above the bottom of the window, it will be higher than the rest of the text in the line.[1]
- You can select different drawing tools in the left-hand side of the window to change the drawing style.
- If you make a mistake, you can undo it by pressing Ctrl+Z, or by using the eraser tool in the bottom-left side of the window.
- You can use an existing symbol as your base by clicking Edit, clicking Copy Character..., selecting a character, and clicking OK.
-
 Save your symbol. Click the Edit menu item in the upper-left side of the window, then click Save Character. The symbol is now installed on your system.
 -
 Open Character Map. Click Start, type in character map, and click Character Map at the top of the Start menu.
- The Character Map program keeps track of all available symbols on your system.
-
 Click the "Font" drop-down box. It's at the top of the Character Map window. A drop-down menu of different font names will appear.
 -
 Click All Fonts (Private Characters). This option is near the top of the drop-down menu. Doing so will display a list of your created symbols.
- You may have to scroll up to see this option.
-
 Insert your symbol into a Microsoft Word document. If you want to place the symbol in a Word document, click the symbol to select it, click Select, click Copy, and then open the Microsoft Word document and paste in the symbol by pressing Ctrl+V.
- Your symbol may not be large enough or bold enough to be easily visible in Word. You can change that by selecting the symbol and raising the font size to the appropriate level.
Method 2 of 2:
Installing Symbols on Mac
-
 Download the Calligraphr template. Calligraphr is a free service which allows you to create your own font. In order to download the font creation form, you'll need to create an account on Calligraphr's website.
- Follow How to Create a Font for more detailed steps on how to create an account, log in, and download a template.
-
 Select the template file. Open the template file's download folder, then click the template file to select it.
 -
 Click File. It's at the top of the screen. A drop-down menu will appear.
 -
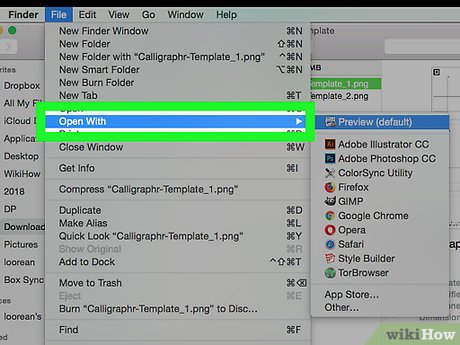 Select Open With. You'll see this near the top of the File window. Selecting it prompts a pop-out menu.
 -
 Click Preview. It's in the pop-out menu. Doing so opens the Calligraphr template in your Mac's Preview program.
 -
 Click the "Markup"icon. This option is at the top of the Preview window.
- On some versions of macOS, the "Markup" icon resembles a bag instead.
-
 Click the "Draw"icon. It's in the Markup toolbar. This will allow you to draw by clicking and dragging your mouse.
-
 Draw your symbol on top of a letter. Whatever you draw on top of a letter (e.g., A) is what will be typed when you press that letter's key.
- You can repeat this process for multiple symbols in order to bind them to letters (e.g., A-Z).
- Keep in mind that capital letters and lower-case letters have their own distinct bindings.
-
 Save your template. Press ⌘ Command+S to do so. This will save the changes you've made to the Preview template, which will allow you to create your own font by uploading the template back to Calligraphr and then downloading the resulting font file.
 -
 Upload your template. Go back to https://www.calligraphr.com/en/ in your computer's web browser, then do the following:
- Click START APP
- Click MY FONTS
- Click Upload Template
- Click Choose File
- Select your template file, then click Open
- Click UPLOAD TEMPLATE
-
 Scroll down and click ADD CHARACTERS TO YOUR FONT. It's near the bottom of the page. A window will open.
 -
 Create your font file. Click Build Font at the top of the page, enter a name for your font, and click BUILD.
- The name that you select for your font is the name that will display for the font when you select it in Microsoft Word.
-
 Download and install your font. Click the font file that ends in .ttf to download it onto your Mac, then double-click the font file and click Install at the bottom of the window.
 -
 Insert your symbol into Microsoft Word. If you want to type your symbol into Word, open a Word document, then select your custom font on the Home tab and type the symbol's corresponding letter. You should see the symbol appear.
- You'll have to switch to another font in order to type actual letters.
Was this article helpful?
Your feedback helps us improve.
Related Articles
 How to Insert Symbols into Word Documents4 minutes read
 How to type angle symbols in Word simply and quickly2 minutes read
 How to insert gamma symbol in Microsoft Office - Insert Special Mathematical Symbol in Microsoft Office3 minutes read
 5 install Microsoft Word you should customize12 minutes read
 Create a quick dot (……………) line in Microsoft Word3 minutes read
Reader Comments 0
Sign in with email or Google to join the discussion.