Table of Contents
This practical guide explains how to configure static ip address on ubuntu 22.04 lts and 22.10 with clear steps and useful context. It also covers common requirements, potential problems, and the details that can help you get better results.
Set Static IP on Ubuntu Using Nmcli Command
It's pretty easy to configure Ubuntu 22.04 static IP settings using the nmcli command. nmcli is a text-based utility used to check the status of the wired connections you are using on your device.
With this command, you can access additional network information such as connection status, host device name, and general permissions in the network configuration. Also, this command is useful in Ubuntu server static IP settings.
You can get information about your connection with the following command:
nmcli connection showThe output of this command will be as follows:
NAME UUID TYPE DEVICE Wired connection 1 12f312a7-f0e7-334a-8ab4-c7b3f8249c7e ethernet enp0s3 Create a static link with the command below. Then configure the enp0s3 and ipv4 settings manually with the appropriate parameters in the nmcli command:
sudo nmcli con add type ethernet con-name 'static' ifname enp0s3 ipv4.method manual ipv4.addresses 192.168.1.89/24 gw4 192.168.1.1If you use the nmcli connection show command again, you can see that the static link has been added.

After this process, add the static connection you created to the DNS IP:
sudo nmcli con mod static ipv4.dns 192.168.*.*Now use the command below to enable the connection:
sudo nmcli con up id 'static'If the output shows "connection enabled successfully" then you have successfully set up a static IP address on your machine.
You might consider using a static IP address to avoid connection problems caused by dynamic IP addresses. A static IP address allows you to have a fixed identity and location when connected to the Internet.
You can verify the static IP you want to assign to your device by running the following command:
ip route
Using Netplan to Install Static IP on Ubuntu
Just like nmcli, another command that you can use to set a static IP on Ubuntu is netplan. You can easily do a static IP setup for Ubuntu using the netplan command in versions 22.04 LTS and 22.10. To do this, follow the steps below.
First find your network interface name with the command below:
sudo ip a
What you see here is your network interface name. This name may be different on each device.
Now, create a file named 01-netcfg.yaml in the directory /etc/netplan. Edit it with your favorite text editor.
sudo vim /etc/netplan/01-netcfg.yamlAdd the following lines to the file:
network: version: 2 renderer: networkd ethernets: eth0: #Edit this line according to your network interface name. dhcp4: no addresses: - 192.168.1.10/24 gateway4: 192.168.1.1 nameservers: addresses: - 8.8.8.8 - 8.8.4.4As can be seen, you have disabled the DHCP IP setting with the dhcp4: no command. Then you added the IP address and DNS settings specified by Google.
After saving this file, run the following command to apply the changes:
sudo netplan applyConfigure Static IP Settings on Ubuntu Using the GUI
The graphical interface in Ubuntu 22.04 is quite useful if you don't want to use the command line. So much so that you can easily set Ubuntu's static IP address using this interface.
To do this, click the Network icon in the upper right corner of the screen. Then, select Wired Settings from the drop-down menu. Click the gear icon to open the settings window.
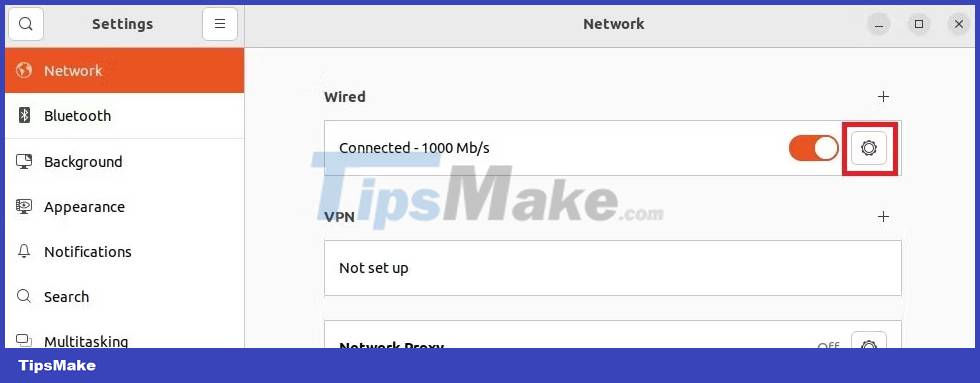
Then switch to the IPv4 tab in the window that opens.

As you can see, DHCP is enabled by default. Change IPv4 Method to Manual when you want to use static IP instead of dynamic IP. Next, change the address, netmask and gateway settings. Finally, modify the DNS settings and click the Apply button.

You must restart the wired connection for all these actions to take effect. To do this, simply toggle the switch next to the network name on and then off.

Conclusion
Understanding Ubuntu 22.04 LTS makes it easier to compare options, avoid common mistakes, and apply the information in this guide more effectively. Review the relevant requirements before making changes or choosing a solution.
FAQ
How do you configure static ip address on ubuntu 22.04 lts and 22.10?
Follow the steps in this guide in order, confirm the required settings or tools, and verify the result before making additional changes.
Is it safe to configure static ip address on ubuntu 22.04 lts and 22.10?
It is generally safe when you follow the recommended instructions, use trusted tools, and avoid changing settings you do not understand.
What should you do if the process does not work?
Recheck the requirements, restart the device or application when appropriate, and review each step for missed settings or compatibility issues.
Related Articles
 What Is IP Address: What Is a Static IP Address?11 minutes read
 How to Configure a Static Internet Protocol (IP) Address on6 minutes read
 How to Configure Static IP Addresses on Linux7 minutes read
 How to Assign Static IP Addresses in Windows 7, 8, 10, Xp or7 minutes read
 Why Use Dynamic DNS Instead of Static IP Address?7 minutes read
 Here's How to Check If Your IP Address Is Static or Dynamic1 minutes read
Reader Comments 0
Sign in with email or Google to join the discussion.