Table of Contents
This updated guide explains how to Configure a Static Internet Protocol (IP) Address on through clear steps, practical examples, and important checks that help prevent common errors.
Part 1 of 3:
Finding Your Addresses on Windows
-
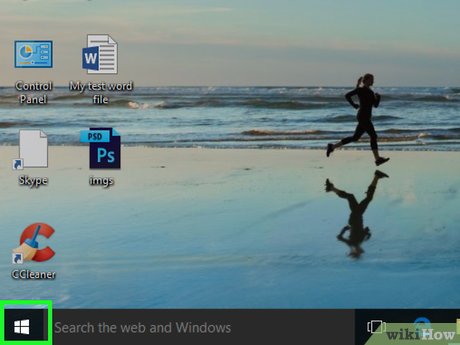 Open Start. Click the Windows logo in the bottom-left corner of the screen. The Start menu will pop up.
-
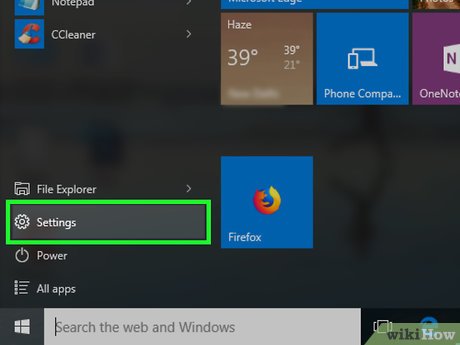 Open Settings. Click the gear-shaped icon in the lower-left side of the Start menu.
-
 ClickNetwork & Internet. It's in the middle of the Settings window.
-
 Click View your network properties. This link is near the bottom of the page.
- If you don't see this link, scroll down. You may also need to click the About tab in the upper-left corner of the window.
-
 Scroll down to the "Wi-Fi" heading. It's near the bottom of the page. You'll see a list of information about your Wi-Fi connection here.
 -
 Note the "Default gateway" address. The address to the right of the "Default gateway" heading is the address you'll enter in a web browser to access your router's page.
 -
 Press ⊞ Win+X. Doing so will open the advanced Start menu.
- You can also right-click the Start icon in the lower-left corner of the screen.
-
 Click System. It's in the advanced Start menu. Doing so opens a window with your Windows computer's specifications.
 -
 Note your computer's name. This is a name (typically a jumble of letters and numbers) to the right of the "Device name" heading in the middle of the page. At this point, you're ready to proceed with setting a static IP address.
Part 2 of 3:
Finding Your Addresses on Mac
-
 Open the Apple menu. Click the Apple logo in the top-left corner of the screen. A drop-down menu will appear.
-
 Click System Preferences.... You'll find this option in the drop-down menu.
 -
 Click Network. It's in the System Preferences window.
 -
 Click Advanced.... This option is in the lower-right side of the window. Doing so opens a new window.
 -
 Click the TCP/IP tab. It's at the top of the window.
 -
 Note the "Router" address. The address to the right of the "Router" heading (usually some variation of "192.168. X. X" or "10.0.0. X") is the address you'll use to access your router's page.
 -
 Find your Mac's name. You'll need to know the name of your Mac in order to find your Mac on your router's page; once you do this, you'll be ready to set a static IP address:
- Close the Advanced window.
- Click ⋮⋮⋮⋮ in the upper-left side of System Preferences.
- Click Sharing .
- Note the "Computer Name" entry at the top of the window.
Part 3 of 3:
Setting a Static IP Address
-
 Open a web browser. Click or double-click the app icon for your preferred web browser (e. g.,Google Chrome).
-
 Enter your router's address. In the address bar at the top of the browser window, type in the address you retrieved for your router, then press ↵ Enter. This will open your router's page.
 -
 Log in if necessary. If prompted for a username and/or password, type in the required credentials and press ↵ Enter.
- If you didn't set a username and/or password, you'll probably need to use the factory credentials found either in the router's manual or on the router itself.
-
 Find the list of connected Internet items. Since each router's page will vary in terms of item placement and titling, you may have to poke around the router page or menu to find this section.
- For example, some routers place the Connected Devices button on the main page, while other router pages require you to click Settings or Advanced to see the list of connected items.
-
 Find your computer's name. Look for the name that you found earlier in the list of connected items.
 -
 Click the Reserve button. You'll probably find this next to (or below) the computer's name and address, though you may first have to click your computer's name to do so.
- Again, your router's page may show a different option here.
- If prompted to confirm your choice or specify an unused IP address, do so before proceeding.
-
 Click Save or Apply. It's usually at the bottom of the page. This will save your changes and apply your new IP address to the computer.
- You may need to restart your computer for the changes to take place, and the router may reboot as well.
FAQ
What is the easiest way to Configure a Static Internet Protocol (IP) Address on?
Start with the requirements in this guide, then follow each step in order. Check the result after every major change so problems are easier to identify.
Can beginners follow these instructions?
Yes. The process is organized into practical steps, and you can repeat any step before moving forward.
What should I check if the method does not work?
Confirm your software or device version, permissions, settings, file format, and internet connection when the task depends on online services.
Related Articles
 What Is an IP Address?8 minutes read
 What Is IP Address: What Is a Static IP Address?11 minutes read
 Static IP Address or Dynamic IP More Secure?6 minutes read
 How to Configure Static IP Address on Ubuntu 22.04 LTS and 22.106 minutes read
 Set up the Linksys Router with a Static IP Address4 minutes read
 How to Configure Static IP Addresses on Linux7 minutes read
Reader Comments 0
Sign in with email or Google to join the discussion.