How to clear the DNS cache buffer in Google Chrome
Clearing the DNS cache can help you troubleshoot host connectivity when accessing some websites. To get better Internet performance, Google has built a temporary storage system, not only with website content but also DNS. Therefore, Google Chrome has an integrated internal storage system - a hidden feature that allows users to manually delete the cache of the Chrome DNS host from the browser.
What is DNS Cache?
The browser's DNS cache is usually a data bank that stores IP addresses for each site you visit. Its essence is to make your computer easy to access the IP addresses of websites when they change or create new servers.
When a website changes its IP address, you may experience a DNS error when accessing it. In addition, continuous access to sites with safety ratings may also damage your DNS cache. In such cases, deleting Chorme's DNS cache can improve connections.
- How to take photos of the website, capture the whole website on Chrome and Firefox
- How to adjust the volume of each Chrome tab up to 600%
How to clear the DNS cache buffer in Chrome
First, you need to launch Google Chrome and press Ctrl + L to move the mouse pointer to the URL bar. Enter the URL below in the address bar and press Enter.
chrome: // net-internals / # dns
This will open Chrome's DNS page. Looking at the image below, you will see there are 8 active entries and a list of all DNS entries that the system has selected and stored. Locate and click the button with the Clear host cache content.

Check to see if the number of active entries has been reduced. This operation will also delete the list of visited websites.
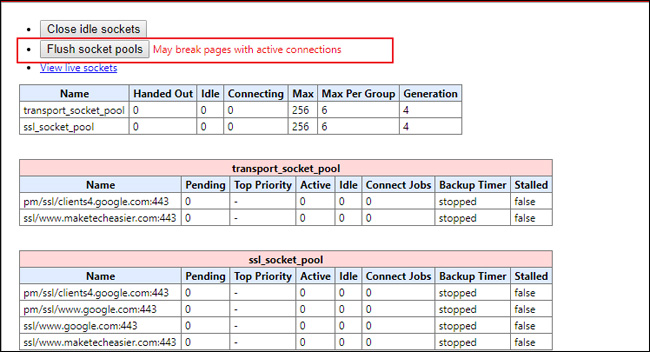
Next, you will need to delete the socket cache. Enter the URL below to access the socket page.
chrome: // net-internals / # sockets
When it opens the socket pool, click Flush pocket pools to clear the socket cache.

It is done! Now you have completely deleted the cache cache DNS on Chrome.
Note: This way of clearing cache applies to all Chrome browser versions.
Clear DNS cache on Windows
To clean up the DNS cache buffer on Windows, you can refer to the article:
- Instructions for deleting DNS on Windows 7 / 8.1 / 10
Good luck!