How to add Quick Launch bar in Windows 10
Although Windows 10 is now very popular in the market, we cannot deny the usefulness of some of the old features in previous versions, such as the Quick Launch bar. The first Quick Launch bar appears in Windows XP, then it is deployed to Windows Vista and is enabled by default. However, to Windows 7, Microsoft decided to remove this tool on the Windows interface. This small but useful feature is located on the left side of the taskbar, near the Start button and easy access to desktops and programs. In this article, we will show you how to create this Quick Launch bar in Windows 10.
- Don't miss out on useful tools available on Windows 10!
- Refresh the Windows 10 interface with 8 customizable tools
Why is the Quick Launch bar needed in Windows 10?
Quick Launch allows users to quickly access running programs, and provides a way to group related applications without causing "expansion" in the taskbar with pin applications. Here are 2 possible reasons why you might want to activate this tool:
- Quick Launch toolbar is highly customizable. You can easily add a folder or place a shortcut without using third-party applications such as Winaero Taskbar Pinner.
- Even if you adjust the pinned icons with small size, Quick Launch will still separate them for easy access and display.
How to create a Quick Launch bar in Windows 10
To restore the Quick Launch bar, just follow the steps below:
Right-click an empty area on the taskbar. Hover over Toolbars and select New Toolbar . This will open a file search window.

Click the address bar in the New toolbar window to edit, then copy and paste the " % appdata% MicrosoftInternet ExplorerQuick Launch " path into the New toolbar's address bar and press Enter.

Click the Select Folder button, then the Quick Launch bar will appear on the taskbar near the network icon and notifications.

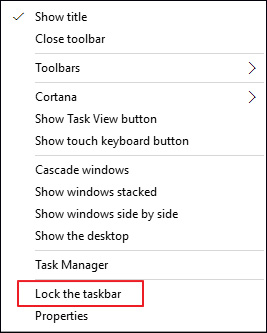
In previous versions, Quick Launch bar was on the left, near the Start button. So we need to move it to the same location on Windows XP. To move Quick Launch, we need to unlock it first. Right-click the blank space on the taskbar and select Lock the Taskbar from the pop-up menu.

Now, you can drag the Quick Launch toolbar to the left and place it next to the Cortana icon.

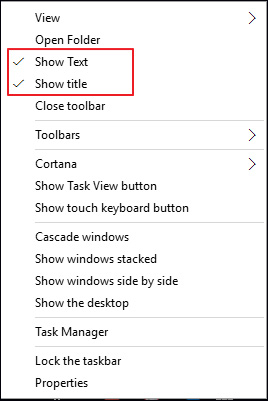
You can see on the screen only the Quick Launch title, not the icon as in Windows XP. However, you can still customize the settings to make it look similar to the XP version. To do that, right-click on the Quick Launch bar and uncheck Show Text and Show title .

Now the Quick Launch toolbar appears more organized and ready to use. To add an item, simply drag the item until you see the Add to Quick Launch message .
If you don't want to use Quick Launch anymore, you can easily delete it from the taskbar. To do this, right-click an empty area, go to Toolbars and uncheck Quick Launch. With only this operation, the Quick Launch bar will quickly disappear.
Just a few simple steps, you brought the Quick Launch bar to the Windows 10 interface. This toolbar is also available in Windows 7 and 8 versions if you know how to find it again!
- Create Quick Launch bar in Windows 7
Good luck!
You should read it
- ★ Users will be allowed to create their own Quick Actions on Windows 10
- ★ Create a quick access key in the Quick Access section in Excel
- ★ Use the Quick Look feature of OS X on Windows
- ★ How to create a virtual machine repository for Hyper-V Quick Create
- ★ How to change the Quick Access icon on File Explorer Windows 10