How to add email signatures in Microsoft Office 365
Quantum has instructed how to add email signatures in Outlook 2010, 2016. But what if you use Microsoft Outlook Web App in Office 365? Today's article will show you how to insert and change signatures in Outlook Web App in Office 365.
- How to add email signatures in Microsoft Office 365
- Step 1: Log in to Microsoft Office 365
- Step 2: Open Microsoft Outlook Settings
- Step 3: Access Email Signature in Settings
- Step 4: Format your email signature
- Step 5: Add Office 365 email signatures
- Step 6: Automatically insert your email signature
- Step 7: Insert your email signature manually
- Step 8: Change email signatures in Outlook Office 365
If you register all or most of your emails in the same way, you can create email signatures. It shows professionalism in business communication and acts as a digital business card. Well-designed email signatures can also serve as advertising tools for any business, website, blog or book.
Quantum has instructed how to add email signatures in Outlook 2010, 2016. But what if you use Microsoft Outlook Web App in Office 365? Today's article will show you how to insert and change signatures in Outlook Web App in Office 365.
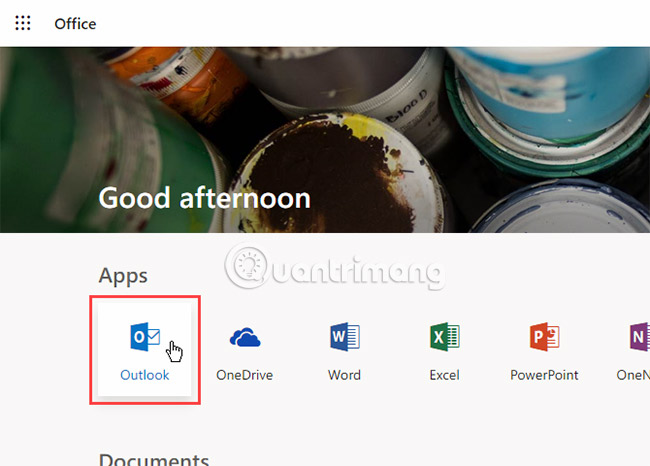
Step 1: Log in to Microsoft Office 365
To access Microsoft Outlook online, visit the Microsoft Office website and sign in with your personal Microsoft account. Or you can log in with a Microsoft account for your business or school.
Then, click Outlook in Apps.
Step 2: Open Microsoft Outlook Settings
Click the Settings gear icon in the upper right corner of the window.
Then, click View all Outlook settings at the bottom of the Settings window .

Step 3: Access Email Signature in Settings
On the Settings screen , click Mail in the left window. Then, click Compose and reply to the message in the middle panel.

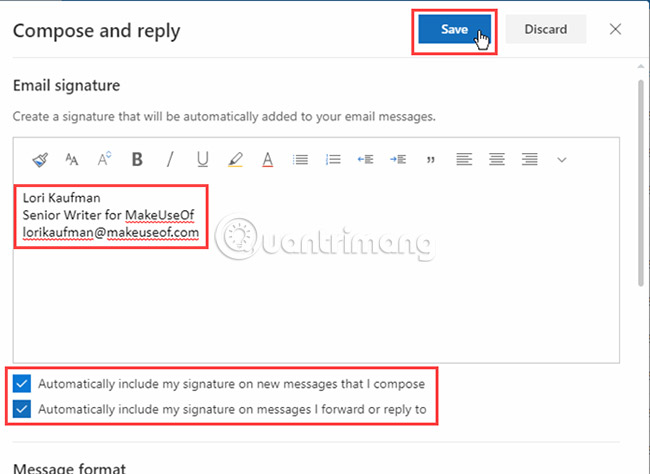
Step 4: Format your email signature
The Email signature box has a toolbar at the top that allows you to format your signature. You can make text bold, italic or underline, and resize and align text.
When testing the formatting toolbar, it applies the format you selected at the beginning of the signature, regardless of where the cursor is. Therefore, you may have to place your formatted text at the top of the signature, then copy and paste it where you want it.

Step 5: Add Office 365 email signatures
Enter the text you want in your signature into the Email signature box . If you're not sure what to set, there are great online email signature generators that can help.
Outlook Web App does not allow you to insert image files into your signature. But you can copy an image from another program and paste it into your signature. Any text or image you paste will be inserted into the cursor, not at the beginning of the signature, as with the format that the article discussed in the previous step.
In addition, you can use the free email creator application to design and paste content here.
There are two options to automatically include your signature in the email:
- To include your signature automatically on all new messages, select Automatically include my signature on new messages that I compose.
- To automatically include your signature when you reply to a message or forward a message, select Automatically include my signature on messages I forward or reply to .
Since only one signature is allowed in Outlook Web App, the signature part will be the same for new emails as well as forwarded emails and emails. The Outlook desktop application will allow you to have different signatures for email replies and new emails.
Click Save and click X in the upper right corner to close the Compose and reply dialog box.
If you use both Outlook Web App and the Outlook application for the desktop, the signature created in one application will not be available in the other. You must create your own signature in each application. The web application only allows you to create a signature. But you can create a default signature and many alternative signatures in the Outlook application on the desktop.
Step 6: Automatically insert your email signature
If you have chosen to automatically insert your signature in all new emails, you will see your signature in the body of the message when you click New message.

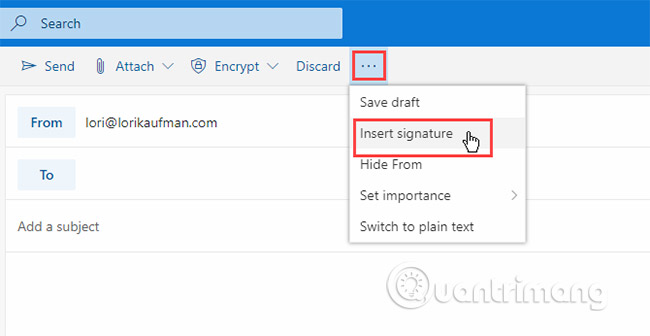
Step 7: Insert your email signature manually
If you choose not to automatically add your signature to all emails in Outlook Web App, you can manually add that signature by clicking the menu button at the top of the email and selecting Insert Signature.
The signature is inserted into the body of the email and the cursor is placed at the top of the message body. Don't forget to add recipients and subject lines.
Step 8: Change email signatures in Outlook Office 365
To change your signature in Outlook Web App in Office 365, simply return to the Compose and reply screen in Settings and change the content in Email signature.
Your modified signature will be inserted into all emails, replies and new transitions from this point forward.
Email signatures allow you to easily and quickly create professional personal impressions. Good luck!
See more:
- 8 professional email signature tips
- Instructions for creating Gmail signatures with images
- Create signatures that match the email content in Gmail
- How to create a signature in Outlook 2010, 2016
- Practice applying electronic signatures to practice
- How to add links to email signatures on iPhone and iPad
- Create multiple signatures in Gmail with Canned Response (canned response)
- How to use Mailbum to create a professional signature
- Microsoft 365 is having problems, users cannot access URLs from emails
- How to encrypt email on Microsoft Outlook
- Microsoft blocks the bulk email response feature to 'save' businesses
- Tips for using Microsoft Office to increase work efficiency
- How to turn on and off macros in Microsoft Office 365
- How to uninstall Microsoft 365 Office on Windows 10
- Students and students enjoy free Office 365
- Office 365 will be updated every 3 months
- Four reasons do not need to upgrade to new Microsoft Office
- Microsoft Office 365 goes deep into the 'cloud'
- More 4 Asian countries are offered Office 365
- 7 ways to work with slow network connection
- 5 best email signature creators today


-
 How to create a signature using AI Signature on Canva
-
How to insert a signature in Google Docs
-
How to create and insert a signature into a PDF file on a Mac
-
How to create an Email Signature Generator using ChatGPT
-
How to create document signature on iPhone
-
How to insert a link image in Outlook signature
 How to create a signature using AI Signature on Canva
 How to insert a signature in Google Docs
 How to create and insert a signature into a PDF file on a Mac
 How to create an Email Signature Generator using ChatGPT
 How to create document signature on iPhone
 How to insert a link image in Outlook signature
-
Application
-
Web Email
-
Website - Blog
-
Web browser
-
Support Download - Upload
-
Software conversion
-
Social Network
-
Simulator software
-
Online payment
-
Office information
-
Music Software
-
Map and Positioning
-
Installation - Uninstall
-
Graphic design
-
Free - Discount
-
Email reader
-
Edit video
-
Edit photo
-
Compress and Decompress
-
Chat, Text, Call
-
Archive - Share
-
-
System
-
Mac OS X
-
Hardware
-
Game
-
Tech info
-
Technology
-
Science
-
Life
-
Electric
-
Program
-
Mobile