Fix Service Host Local System status using multiple CPUs in Windows 10
In Task Manager, you can see that Service Host: Local System is taking up most of disk, CPU and memory usage. Today's article will show you how to overcome the situation that Service Host Local System is using a lot of CPU..
In Task Manager, you can see that Service Host: Local System is taking up most of disk, CPU and memory usage. Today's article will show you how to fix Service Host Local System status using multiple CPUs in Windows 10 with 7 solutions.
Solution 1. Disable Superfetch
To get started, the article will introduce the first method to solve the problem of Service Host Local System with high disk usage.
You can try disabling Superfetch. For details on how to do this, please refer to the article: How to enable and disable SuperFetch on Windows 10/8/7.
Then restart the computer to see if the problem has been resolved.
Solution 2. Change the registry value data
To solve the Service Host Local System problem that uses a lot of CPU, you can try fixing the registry.
However, please note that changing the registry is risky. Therefore, you should back up Windows 10 to keep your computer safe before continuing.
Now, the article will show you how to change registry value data to solve the Service Host Local System problem that uses a lot of memory.
Step 1: Open the Registry window.
- Press Win + R at the same time to open Run.
- Enter regedit and click OK to continue.
Step 2: Change the value data.
- In the Registry Editor window , navigate to the ControlSet001 folder with the following path:
HKEY_LOCAL_MACHINE > SYSTEM > ControlSet001- Then expand the ControlSet001 folder to find the Services folder and select the Ndu key .
- In the right panel, select the Start key and double-click it.
- Next, change the Value data to 4 and click OK to continue.
 Change Value data to 4
After completing all the steps, you can exit the Registry Editor window and restart the computer to check if the problem has been solved.
Solution 3. Run the System File Checker
The problem of Service Host Local System using a high level of disk drive may be due to corrupted system files. So, if you encounter Service Host Local System that uses a lot of CPU, you can try running System File Checker to check and repair corrupted system files.
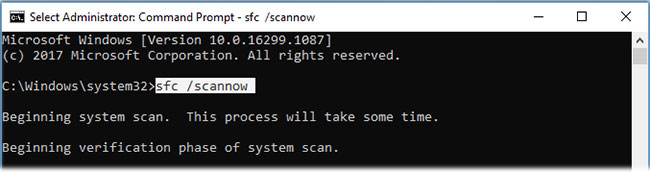
Step 1: Open a Command Prompt window with admin rights.
Step 2: Enter the command.
- In the window that appears, type sfc / scannow and press Enter to continue.
- Do not close the window until the scan is finished.
 System File Checker can help you find corrupted system files and repair them
When the scan is complete, the System File Checker can help you find corrupted system files and repair them.
Solution 4. Disable Background Intelligent Transfer Service
The fourth method to fix the problem is to try turning off Background Intelligent Transfer Service.
Step 1: Open the System Configuration window .
- Press Win + R to open Run
- Enter msconfig in the box and click OK to continue.
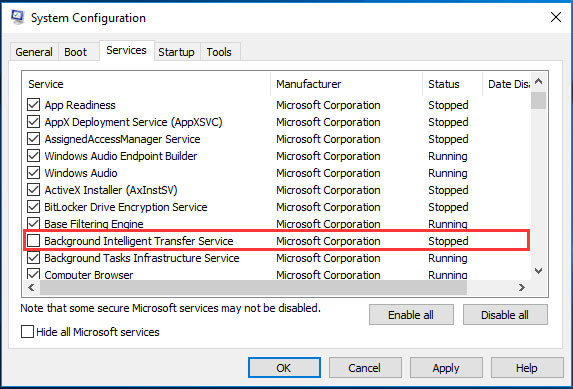
Step 2: Disable Background Intelligent Transfer Service
- In the System Configuration window , go to the Service tab .
- Scroll down and find Background Intelligent Transfer Service , then uncheck it.
- Click Apply and OK to confirm changes.
 Disable Background Intelligent Transfer Service
After completing all the steps, restart the computer.
Solution 5. Disable the Service Host Local System task
The fifth solution to serve high local system CPU is to directly disable the Service Host Local System. You can finish this action to fix the problem.
Step 1: Open Task Manager.
Step 2: Disable the Service Host Local System task
1. In the pop-up window, go to the Processes tab to continue.
2. Scroll down to find Service Host Local System . You can also expand it to see which items are consuming CPU, disk and memory.
3. After you know which item is eating up your CPU, disk and memory, you can right-click it and select End task from the context menu to turn it off.
 Disable the Service Host Local System action
4. Next, you will see a warning message asking you to confirm whether you want to end Service Host: Local System.
5. You need to check the Abandon unsaved data and shut down option . Then press Shut down to continue.
You can then monitor your CPU in Task Manager and check if the Service Host Local System status using multiple CPUs has been resolved.
Solution 6. Execute Clean Boot
On top of that, the problem of Service Host Local System using a high level of drive can be caused by third-party software. Therefore, to fix the problem, you can perform a clean boot and check to see if the problem is caused by third-party software and services.
Follow the instructions in the article: How to perform Clean Boot on Windows 10/8/7.
After restarting the computer in Clean Boot, you can check if the problem is solved. If the problem is resolved, you can re-enable each service again and check which service is causing the problem.
If you find problematic items, you can choose to disable or reinstall it.
Solution 7. Upgrade the CPU
If none of the above solutions work, you can choose to upgrade the CPU. The problem of Service Host Local System using a high drive may be caused by the old CPU. So, if you encounter this problem, you can try upgrading the CPU.
However, upgrading the CPU also has certain risks. The computer may not be able to boot up due to some compatibility issues after upgrading the CPU. If so, you may need to reinstall Windows. Therefore, remember to back up the data before updating the CPU to stay safe.
After you've backed up your important files, it's time to upgrade your CPU. But please note that the CPU should be selected according to the motherboard model and performance parameters. You can then install the new CPU on the computer. Finally, all you need to do is upgrade the driver.