Table of Contents
The Simplest Way to Read and Open Host File on Windows XP/7/8/10 is easier to approach with a clear overview and reliable steps. This guide organizes the essential information, highlights practical details, and explains what to check along the way.
Key Takeaways
- Review instructions for opening the hosts file.
- Explore some errors when editing host file.
- Follow the recommended steps in order to avoid common mistakes with the simplest way to read and open host file on windows XP/7/8/10.
Instructions for Opening the Hosts File
Step 1: Find the folder containing the host file on the computer system. (For Windows XP and Windows 8,8.1 operating systems, you do the same) Method 1: Open the Windows installation drive (default is drive C:). Then find the etc folder path, this folder contains the host file: "C:WindowsSystem32driversetc".
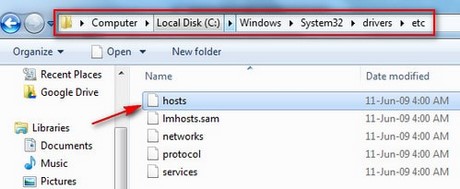
Method 2: Open the Start menu in the lower right corner of the screen, enter the path C:WindowsSystem32driversetc in the Search program and files box. The etc folder will immediately appear, just select it.

Step 2: Right-select the host file and select Open. The Open with dialog box appears, select the application to open the host file (here select open as notepad) and finally click OK.

The opened hosts file has the form.

Host file blocks sending malicious code via Facebook messages.
Add the following 2 lines to the hosts file on your computer. This helps you block sending malicious code via Facebook messages.
127.0.0.1 ojoku.bigih.bid 127.0.0.1 plugin.ojoku.bigih.bid.
Some Errors When Editing Host File
- Cannot save the file after editing because the account is not Admin. See instructions for fixing the error of not being able to save the host file on the computer - Some anti-virus software prevents editing the host file. How to fix: - Open the host file with an Administrator account. - Turn off the anti-virus software to make editing easier.
With a few simple steps, you can read, open files on Windows to edit or add command lines to block websites, redirect domains or optimize network connections. Try temporarily disabling your antivirus software or opening Notepad with Administrator rights for easier manipulation if you encounter an error that prevents you from saving the file after editing.
Final Thoughts
The most reliable way to handle the simplest way to read and open host file on windows XP/7/8/10 is to follow the process in order, verify each important setting, and test the result before moving on. Use the guidance above as a practical reference, then adjust the details for your device, software version, or specific goal.
FAQ
What should I know first about The Simplest Way to Read and Open Host File on Windows XP/7/8/10?
The Host file plays an important role in controlling network connections on your computer.
How do I get the best results with The Simplest Way to Read and Open Host File on Windows XP/7/8/10?
Use current software or equipment, follow the steps in order, review the recommended settings, and test one change at a time so you can identify what improves the result.
What should I do if The Simplest Way to Read and Open Host File on Windows XP/7/8/10 doesn't work as expected?
Check compatibility, permissions, connectivity, and version-specific settings. Restart the relevant device or app, then repeat the process carefully before trying a more advanced fix.
Related Articles
 How to Edit the Host File, How to Edit the Host File, Read and Open the3 minutes read
 How to Open the Host File on Windows 10, Edit the Hosts File5 minutes read
 How to Open the Hosts File with Admin Rights - Apply to Open the File7 minutes read
 How to Open the Hosts File on Windows - the Hosts File Stores the6 minutes read
 Simple and Fast Steps to Edit Host File on Windows 104 minutes read
 3 How to Rotate a PDF File and Save It as the Simplest New File4 minutes read
Reader Comments 0
Sign in with email or Google to join the discussion.