Table of Contents
This guide provides a clearer, better-organized overview of Edit Menu Context on macOS. It focuses on the essential facts, practical steps, and common questions readers are most likely to have.
The drawback is that the context menu on macOS is not as flexible as the context menu on Windows. On Windows, you can easily tweak the Registry to add applications to the right-select menu or perform a certain action. However, macOS is famous for being a "difficult to unlock" operating system, so it is understandable that editing the context menu is more difficult.
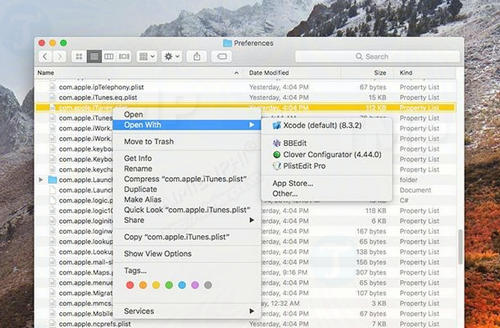
How to edit Menu Context on macOS
This way of editing context menus on macOS requires users to have a lot of experience. So in this article TipsMake walks you through some simple ways to edit the context menu on macOS in the most detailed way so you can easily follow.
Add/remove Services in Context Menu on Mac
The main method for adding and removing items in the context menu (the context menu when you right-select) on macOS is through services. Services appear in the Services drop-down menu when the user hovers over the Service section in the bottom corner on the right-select menu. In addition, macOS also provides GUI-based methods for adding and removing items in the conext menu on Mac.
Step 1: Open The System Preferences Application on the Apple menu.

Step 2: On the System Preferences window, find and select Keyboard .

Step 3: Next select The Shortcuts tab In the top corner of the window.

Step 4: Select Services From the menu in the left pane.

Step 5: The screen displays a list of all available services, arranged in main categories. Check the services to enable or disable the display of related services.
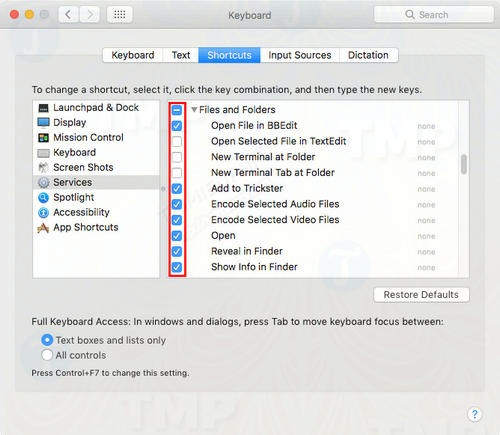
Step 6: Applications can add their get services here. You can find these services based on the items (files, folders, text) used as input on the context menu. For example, if the item displays on the context menu when you right-select selected text, you will find this service in the Text drop-down menu.

Displays Services in the Main Context Menu
If you have many services or use them frequently, you will notice the limitations of having to wait for a drop-down menu to appear to open the services. However, with just one Terminal command to edit the context menu on macOS, you can display all services on the dropdown menu.
Step 1: Open Terminal in " Applications => Utilities => Terminal. app ".
Step 2: Paste the command below into the Terminal window:
Defaults Write -G Nsservicesminimumitemcountforcontextsubmenu -Int 999

The above command will default to the minimum services needed to create the Services submenu. The last number in the command (999 in this example) sets the number of items needed to create the Services submenu. If the service number is less than this value, the Services submenu will not appear.
In this case 999 has no different meaning from infinity, so you will see the Services submenu.
Step 3: Exit and restart Finder by entering the Terminal command below:
Killall Finder

Edit the "Open with" Menu
The Open With submenu on the context menu is arranged a bit haphazardly. However, you can completely edit the Open With menu to your liking.
Remove Duplicates on the Open with Context Menu
Sometimes the LauchServices database can be corrupted or corrupted, leading to duplicate items in the Open With menu.
Step 1 : Run the Terminal command below to rebuild the LaunchServices database:
/System/Library/Frameworks/CoreServices. framework/Frameworks/LaunchServices. framework/Support/lsregister -kill -r -domain local -domain system -domain user

Step 2: Kill and restart finder with Killall Finder Command.
You may have to wait a few minutes before restarting to rebuild the LaunchServices database.
Prevent Specific Applications from Linking to Extensions
You can also prevent a specific application from linking to a specific extension file in the Open With menu.
Step 1: Right-select the application that has the item you want to edit and then choose Show Package Contents .
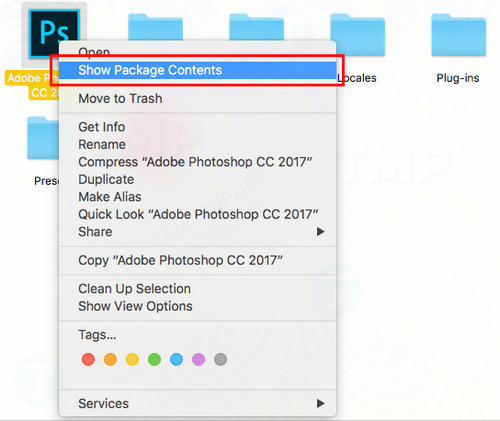
Step 2: Open the Contents folder .

Step 3: Copy the file ' Info. plist ' and rename the file to another name, such as ' Info-backup. plist ' to create a backup file.
Step 4 : Open the Info. plist File in a text editor like TextEdit.
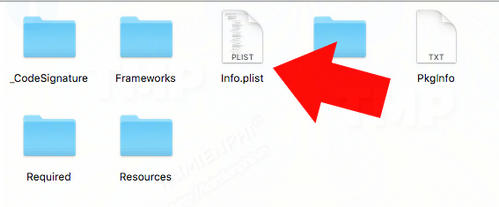
Step 5: Search for information by pressing the key combination Command + F , then enter " CFbundleTypeExtensions " into the box.
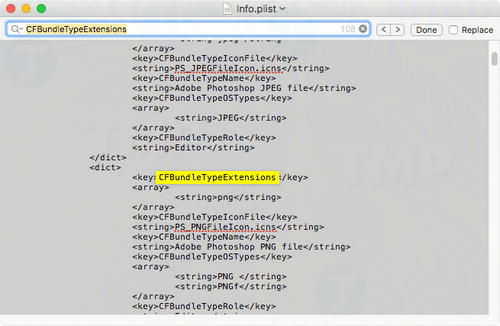
Step 6: The above operation displays a lot of information. With complex applications like Photoshop, you will find related extensions. Locate the ". " Containing the file type you want to prevent. For example, if you want to remove Photoshop from the Open With menu on PNG files, you search for "png" In CFbundleTypeExtensions.
Step 7 : Delete the related entry ". " . In this example, delete " png ".

Step 8: Open Terminal and run the Killall Finder Command to apply the changes.
Although on macOS you don't have as much control over the context menu as on Windows, you can still take a few steps to edit the context menu on macOS. In addition, you can add more options to the Services menu, Create thumbnails on Mac Using the built-in Automator application on macOS, and create services.
When using Mac, users need shortcuts to operate faster, save time doing other tasks, a list of keyboard shortcuts for Mac is available on the site Thuthuat. TipsMake. vn, in the list of shortcuts in Mac has many keys that you will feel familiar with if you are familiar with Windows.
FAQ
What is the main point of Edit Menu Context on macOS?
The drawback is that the context menu on macOS is not as flexible as the context menu on Windows.
Why might the details change over time?
Software versions, prices, policies, services, and product availability can change. Check the official source before making a purchase or changing important settings.
How can I use this information safely?
Follow official instructions, verify downloads and claims, back up important data, and avoid sharing passwords or sensitive account information.
Related Articles
 How to Add 'Edit or Run with' to the Right-click Menu of PS110 minutes read
 How to Add Items to the ''create New'' Context Menu in Windows 106 minutes read
 The Context Menu of Windows 11 Will Have a New Eye-catching4 minutes read
 7 Top Context Menu Editors for Windows: Expert Selection Guide7 minutes read
 How to Delete Options in the Windows Context Menu11 minutes read
 This Small Application Helps Bring the Context Menu3 minutes read
Reader Comments 0
Sign in with email or Google to join the discussion.