Table of Contents
This guide provides a clearer, better-organized overview of Simple Way to Fix Camera Error on Macbook. It focuses on the essential facts, practical steps, and common questions readers are most likely to have.
The Macbook has a built-in webcam, but if users want, they can also connect an external webcam to their device. If if the webcam or camera on your Macbook is not working properly or not working at all, you can apply some of the following fixes.
How to Fix Camera Error on Macbook
Method 1: Check If the Webcam Is Covered or Not
Before diving into more complicated troubleshooting steps, first try checking to see if the webcam is glued or covered. In some cases, especially if using a shared computer, other you can use webcam stickers to protect their privacy.
If not, review the next few ways below to fix Macbook camera errors.
Method 2: Check Webcam Permissions
When you first open an application that requests Webcam access, a notification appears on the Macbook screen. If you deny access to the app, you cannot make voice or video calls. This can lead to misunderstandings that the Macbook webcam or camera is faulty or not working.
To give the application permission to access the webcam, open System Preferences => Security and Privacy => Camera. from the official provider displays a list of applications that require webcam access. Your task is to find and select the application to grant access to the application and you're done.
Additionally, if you want, you can also change any settings by clicking the lock icon in the bottom corner of the screen, entering the Admin password (or Touch ID, Apple Watch) for authentication and approval, or application withdrawal.

Method 3: Kill Process Vdcassistant and Applecameraassistant
VDCAssistant and AppleCameraAssistant are processes related to the webcam on Macbook. Sometimes these processes can stop working or not work properly, which can cause a variety of webcam-related problems.
To fix camera errors on Macbook, the solution in this case is to kill the above processes.
Follow the steps below:
First open Terminal by going to Applications => Utilities , or enter search keywords and Spotlight search box.
Next step enter the command below and select Enter :
Sudo Killall Vdcassistant; Sudo Killall Applecameraassistant
Enter the admin password for authentication. macOS will relaunch webcam-related processes. Finally, try checking to see if the Webcam is still faulty or not.
Method 4: Restart Macbook
If if you kill processes related to the webcam but are not available, you can try killing the entire system. Sometimes camera problems on Macbooks occur because Several applications accessing and using the webcam at the same time.
To fix the problem, the fastest solution is to restart the Macbook. select Apple menu => Restart. At this point, a window appears in the window, where you find and uncheck the Reopen Windows When Logging Back in option.
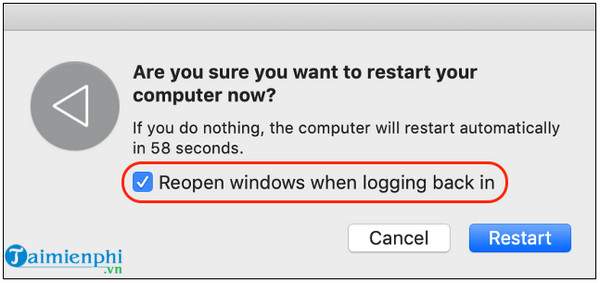
Select Restart and wait until the Macbook has finished restarting, try checking to see if the webcam is working and if the problems still exist.
Method 5: Reinstall the Application That Wants to Access the Webcam
Suppose if the webcam or camera error on Macbook occurs on a specific application. Even though access to the application has been granted, the issue still occurs. The main culprit in this case may be the application.
Try deleting or uninstalling the application from the Applications Folder by dragging and dropping the application into the trash icon, or selecting the application and pressing Command + Delete.
The next step is to download and reinstall the application, check to see if the application can access the webcam or not.
It is also important to note that during the application installation process, if a notification asking for camera access is not displayed in the window, it may be because the app is not compatible with a newer version of macOS.
Method 6: Check Screen Time on Macbook
The Screen Time feature on macOS lets you monitor how they use their Macbook. However, this feature can also limit applications from accessing and using the webcam.
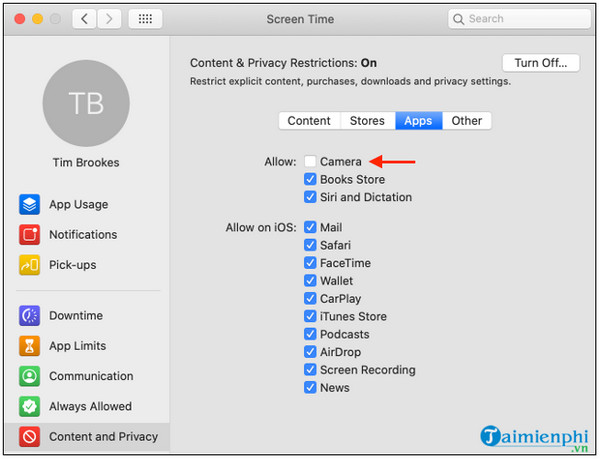
To check if the Screen Time feature is the cause of problems, camera and webcam errors on the Macbook, open System Preferences => Screen Time => Content and Privacy => Camera. Make sure Camera in The Apps tab Is enabled.
Or another way is to enter the authentication password and change the settings or set to remove this limit.
Method 7: Reset SMC
On a Macbook or iMac with a built-in webcam, you can check if the device is receiving the webcam properly. select The Apple menu In the top left corner => About .
Next select System Report => Camera. Here you will see a section called FaceTime HD Camera (Built-in) With a serial number and model ID. You can also check in the USB Section to see if webcams are listed here.
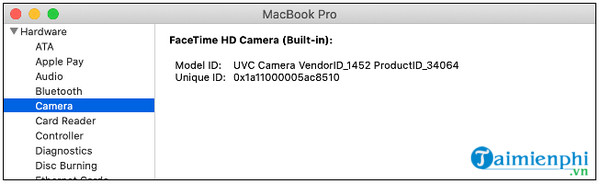
If the webcam is not displayed here, it is most likely due to a hardware error or physical damage.
There are 2 solutions to fix the issue in this case. The first solution is to try resetting the SMC (System Management Controller). In which the SMC is responsible for low-level settings such as LED lights, battery, cooling fan,.. However, sometimes SMC can affect the built-in webcam on the Macbook. Try resetting the SMC and check if the webcam error persists or not.
Or another solution is to bring the device to reputable Macbook repair centers for help.
Method 8: Fix External Camera and Webcam Errors on Macbook
If you are using an external webcam, such as a USB webcam, and you are also experiencing the issue. First, make sure the device is properly connected to the Macbook. Or try removing and re-plugging the device into another USB port to see if the issue persists.
Suppose if the webcam is connected to the Macbook via a USB hub (hub), try removing the device from the drive and connecting it directly to the device.
Also try checking whether your Macbook is receiving an external webcam or not by accessing The Apple menu In the top left corner => About => System Report => USB . Expand the options and search to see if your webcam is listed here.
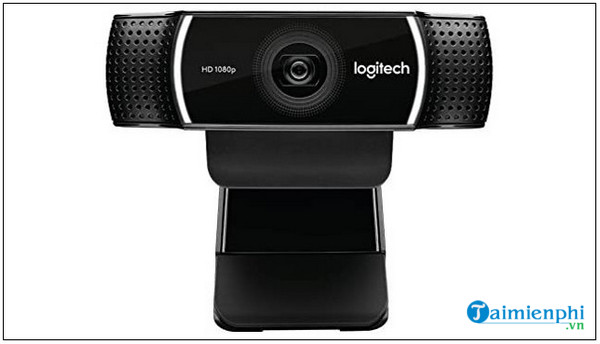
If there is no LED displayed on the webcam or the device cannot be found in the System Report section, it may be due to a faulty webcam. Try connecting the webcam on another computer to see if there is an error or not.
Finally, try visiting the manufacturer's website to download the required software for the webcam to work on the Macbook and check if the webcam is working or not.
The above article TipsMake has just shown you some ways to fix Camera errors on Macbook. Hopefully the above little tips will help you fix problems related to webcam and camera on your Macbook.
FAQ
What is the main point of Simple Way to Fix Camera Error on Macbook?
The Macbook has a built-in webcam, but if users want, they can also connect an external webcam to their device.
Why might the details change over time?
Software versions, prices, policies, services, and product availability can change. Check the official source before making a purchase or changing important settings.
How can I use this information safely?
Follow official instructions, verify downloads and claims, back up important data, and avoid sharing passwords or sensitive account information.
Related Articles
 The New MacBook Pro Will Have a Full HD Camera3 minutes read
 How to Fix Frozen Macbook Error12 minutes read
 Video Software Calls for a Dangerous Vulnerability That Allows3 minutes read
 'Unfortunately, Camera Has Stopped' Error on Android Device, This11 minutes read
 How to Fix Macbook Battery Error17 minutes read
 Quick Fix the Error Cannot Open Camera 0xa00f4244: We Can't Find2 minutes read
Reader Comments 0
Sign in with email or Google to join the discussion.