Draw nested circles
In this exercise we use the circle drawing tool (Ellipse Tool) and some commands to draw nested circles. If you have 'hand-in', you can draw beautiful pictures using these tools.
In this exercise we use the circle drawing tool (Ellipse Tool) and some of the following commands:
- Combine (Ctrl + L) : link object, the intersection of objects will be created by empty areas.
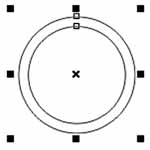
Figure 1

Figure 2
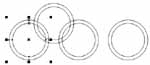
Figure 3

Figure 4

Figure 5

Figure 6

Figure 7

Figure 8
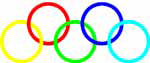
Figure 9
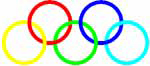
Figure 10
- Break Curve Apart (Ctrl + K) : return a group of objects exiting the Combine command.
- Intersect : Creates the third object, the intersection of two objects.
- Align and Distribute : used to compare objects (Align Left, Align Right, Align Top, Align Bottom, Align Centers, Align Centers, Center to Page, Center to Page Horizontally, Center to Page Vertically).
- Oder : change the order for the object, normally the objects on the screen are arranged in the default order, the created object will be on the previous created object.
-
To Font : put on top.
-
To Back : put the bottom.
-
Forward One : put up on an object.
-
Back One : put down under an object.
-
Print front of : up on the object we need.
-
Behind : down below the object we need.
-
Reverse order : Reverse the order for the objects.
- Tranfrom - Position : change the object to an exact position on the screen.
How to draw :
- Select the Ellipse Tool ( Ellipse Tool ), draw a circle by pressing Ctrl and dragging the mouse.
- Draw the second circle so that it is smaller than the first one.
- Select Object - Align and Distribute :
+ Align Centers Horizontally
+ Align Centers Vertically
- Select Object - Combine (you can press the shortcut Ctrl + L), we get a towel shape (Figure 1).
- Select Object - Transformations - Position with parameters:
+ Position: H: 90mm, V: 0mm
+ Click Apply To Duplicate tab twice (Figure 2).
- Select the first scarf
- Select Object - Transformations - Position with parameters:
+ Position: H: 45mm, V: 30mm
+ Click Apply To Duplicate tab, we will get the 4th scarf (Figure 3).
- Choose the shape of the scarf number 3
- Select Object - Transformations - Position with parameters:
+ Position: H: 45mm, V: 30mm
+ Click Apply To Duplicate tab, we will get the 5th scarf (Figure 4).
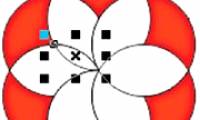
- Fill each image (as you like) so that each image has a different color (Figure 5).
- Select the 1st and 4th scarf picture (Figure 6).
- Select Object - Shaping - Intersect , we get an object that is the intersection of the rims 1 and 4 (Figure 7).
- Select Object - Break Curve Apart (Ctrl + K).
- Delete one of the two objects is the intersection of Figures 1 and 4.
- Fill the other object with the same picture as 1 or 4 so that Figure 1 is inserted in Figure 4 (Figure 8, 9).
- Similarly, we choose pairs of shapes 2-4, 2-5, 3-5 follow the above four steps, we get the result as shown in Figure 10.
Lam Khe
Was this article helpful?
Your feedback helps us improve.
Related Articles
 Corel Draw 12 - Draw patterns in circles3 minutes read
 How to draw circles in Photoshop2 minutes read
 How to draw triangles in Photoshop2 minutes read
 Canvas element in HTML54 minutes read
 Marvel at the mysterious giant swastika circle that appears on the field1 minutes read
 Corel Draw: What is Corel DRAW - Introduction11 minutes read
Reader Comments 0
Sign in with email or Google to join the discussion.