Table of Contents
This updated guide examines Deploy Ccr Cluster of Exchange 2007 Sp1 on Windows Server 2008 and organizes the essential facts, background, and practical takeaways in clear American English.
Part 1: Prerequisites & failover configuration Since clustered mailbox servers based on CCR clusters have become a very popular method of providing highly effective messaging solutions in cost and commensurate with service level agreements (SLA). ) in many business organizations around the world. Now that both Exchange Server 2007 Service Pack 1 (SP1) and Windows Server 2008 have been released to manufacturers (RTM), we think this will be a good time to provide you with ideas. Useful formula in this series. Through the content of the lesson, you will have a further vision to prepare your real world deployments. Before I get started, let me explain why you have many benefits when deploying mailbox servers that have been linked to Exchange 2007 groups based on CCR cluster technology using failover clusters of Windows Server 2008 instead of having to Performing the group functions that were tested in Windows Server 2003. First, Exchange Server 2007 SP1 can take advantage of the improved failover cluster component (previously known by server cluster). in Windows Server 2008. Windows Server 2008's failover cluster component allows you to easily deploy CCR clusters and improve the stability of the failover cluster solution as well as be more secure than previous versions of Windows Server. In addition, because the new failover cluster in Windows Server 2008 supports multiple subnets, unlike Exchange 2007 RTM, Exchange 2007 SP1 has support for GeoClusters (geocomplete clusters) on switching capabilities. failover on two subnets (although nodes must still be in the same Active Directory address). In addition, the CCR cluster of Exchange 2007 SP1 supports both Internet Protocol version 4 (IPv4) as well as IPv6 and DHCP has been assigned IP addresses (both IPv4 and IPv6, although IPv4 is not recommended unless the DHCP server is available). set to allow operation with unlimited lengths). Note : You can take a look at the list of automatic failover cluster improvements in Windows Server 2008 here. Prerequisites Before following the steps in this series, you must have a test environment that meets the following conditions: • A Windows 2003 SP1 server (preferred for SP2) or Windows Server 2008 Standard version is configured as a domain controller in an Active Directory forest that has at least 2000 Native domain functional level. • A Windows 2003 SP1 server (preferred for SP2) or Windows Server 2008 Standard version that installs the Exchange 2007 SP1 Client Access and Hub Transport server roles (optional, you can install these roles on domain controllers ). • Two Windows Server 2008 servers with Enterprise versions are used as nodes in the failover cluster. Two Windows Server 2008 servers with Enterprise edition will be equipped with two network interfaces (one for the public network and one for the private network) and at least two drives - one for the System partition, and one for the Exchange database and can add one to the transaction log files (in the test environment, these files will be put together with the Exchange database) We used 32-bit Exchange 2007 SP1 and Windows Server 2008 versions, which means less memory is needed per box (500 MB for Domain Controller, 700 MB for server where Client Access server roles are available). and Hub Transport has been installed, and 700 MB for failover clusters) compared to 64 bit versions. Although the recommendations for the above configuration are sufficient for the lab environment, you should note that the 32-bit version of Exchange 2007 is not supported in the production environment and recommendations for best practices. For Exchange 2007 CCR clusters in the production environment is also very different from the environment used here. If you only have a limited set of test boxes, you should deploy this lab environment with a virtual solution. If you choose to use 32bit versions for Exchange 2007 and Windows Server 2008, you can use anything from Microsoft Virtual PC, Microsoft Virtual Server, VMWare workstation / server or real enterprise virtualization platform like VMWare ESX Microsoft's new server or HyperVisor (HyperV) is included in Windows Server 2008. Configuring Failover Cluster When you have an Active Directory forest consisting of a domain controller and an installed Exchange 2007 Client Access and Hub Transport server roles server, you are ready to configure two servers, which will be two node in our failover cluster. The first thing to do when the server is turned on is to partition the drive and configure the appropriate network interfaces. To divide the drive, open Windows 2008 Server Manager and Storage , then select Disk Management . Right-click on LUN then select Online in the right-click menu as shown in Figure 1.
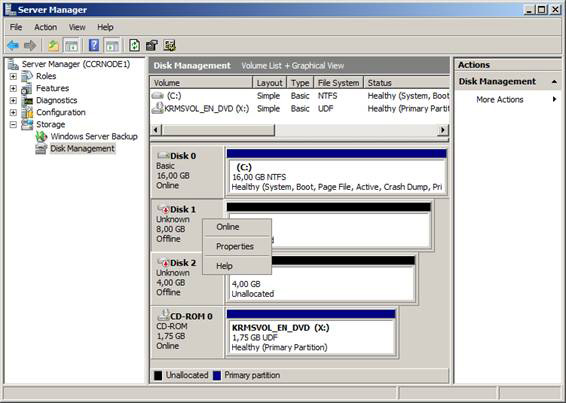 Figure 1: Transfer disks to online
Right-click one of the drives again, this time select Initialize Disk . In the Initialize Disk window, you accumulate both disks and make sure that MBR (Master Boot Record) is selected, unless you have used disks larger than 2TB or use Itanium computers as fail-cluster nodes, then click OK (Figure 2).
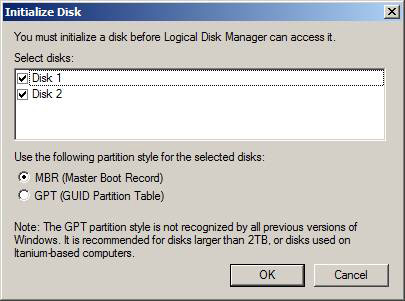 Figure 2: Initializing the disk
The discs are now online, we can start dividing them. To do so, click the disk space that has not yet been split, then select New Simple Volume in the context menu (Figure 3).
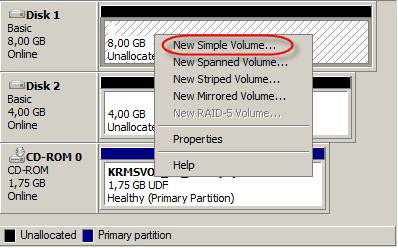 Figure 3: Creating drives
In the New Simple Volume wizard , click Next . Specify the size of the new drive and click Next .
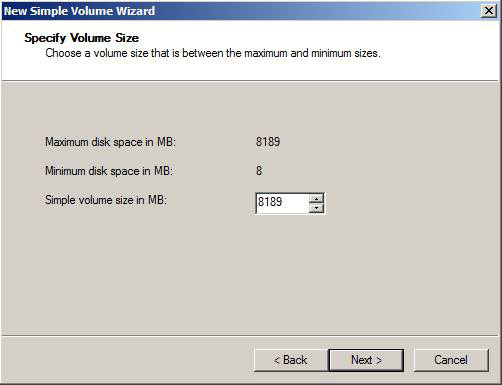 Figure 4: Specify the size of the drive
Now we need to assign a drive letter to each drive. When ready, click Next (Figure 5).
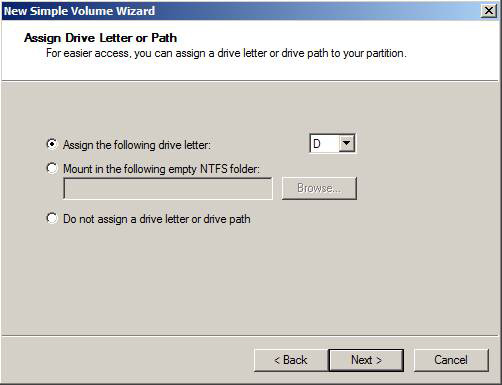 Figure 5: Assign a drive letter to the drive
This is also the time to label and format the drive. Click Next (Figure 6).
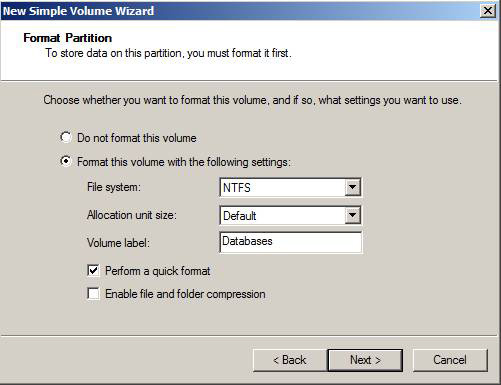 Figure 6: Assigning labels and formatting to the drive
Finally click Finish to exit the utility. Follow the steps above with the second drive, but its label is Logs (Figure 7).
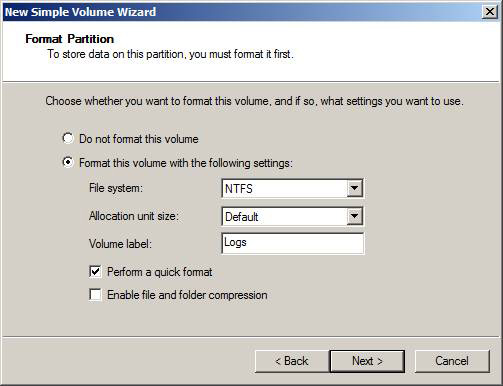 Figure 7: Label and format of the drive for log files
The next step is to name two network connections ( Public and Private ) for the external network and the internal network as shown in Figure 8. The private network will only be used to synchronize between the two failover clusters.
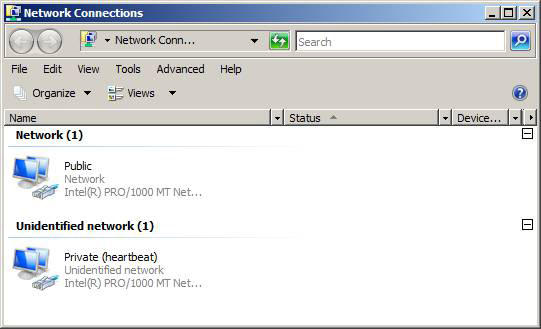 Figure 8: Name the network connections
The best general operation when configuring the server to become nodes in a failover cluster is to change the binding order of the network interface. To do that, click Advanced > Advanced Settings , make sure Public is listed first in the binding list, then Private (heartbeat) and finally Remote Access Connections as shown in Figure 9.
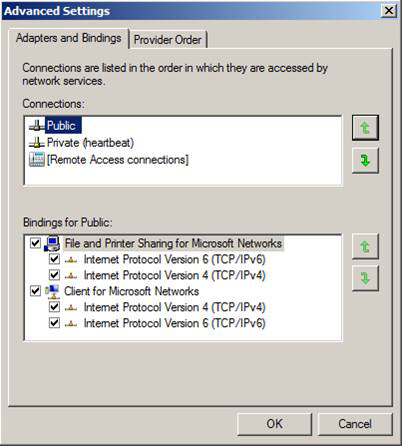 Figure 9: Binding order
When installing Windows Server 2008, IPv6 is enabled by default, although this Internet Protocol version is supported by Exchange 2007 SP1, but we will not use it in this series. Therefore, you should deselect Internet Protocol Version 6 (TCP / Ipv6) for both Public and Private network interfaces as shown in Figure 10.
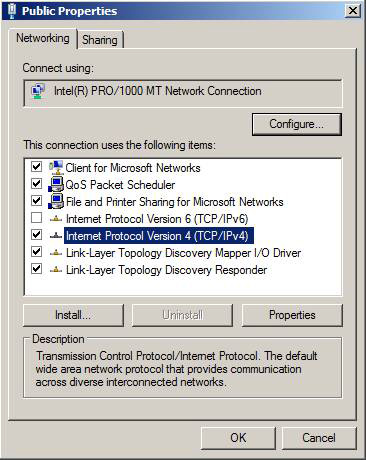 Figure 10: Disable Ipv6 on the Public network interface
In addition, we also recommend disabling the Client for Microsoft Networks and File and Printer Sharing for Microsoft Networks in the Private network interface. Now we can start configuring IP settings for each network interface. Let's start with the general network interface (Figure 11).
 Figure 11: Configuring IP settings for the common network interface
Now continue and configure the IP settings for the private network interface. Note that you should only specify an IP address and a subnet mask for the private network interface as shown in Figure 12.
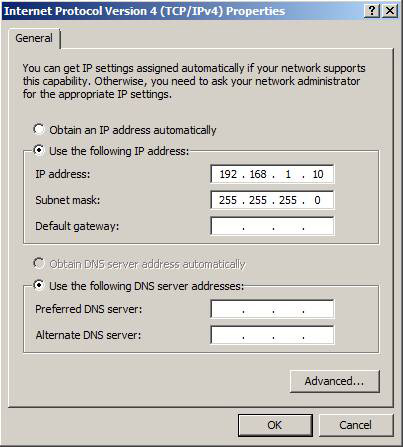 Figure 12: Configure IP settings for the private network interface
You must also cancel Append parent suffixes of the DNS primary suffixes and Register this connection's addresses in DNS (Figure 13).
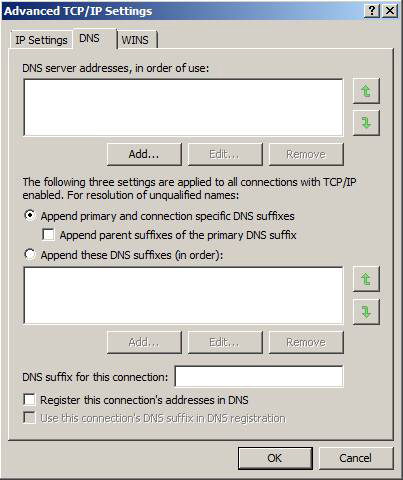 Figure 13: Configuring DNS settings on the private network interface
Click on the WINS tab and uncheck Enable LMHOSTS lookup , select Disable NetBIOS over TCP / IP (Figure 14).
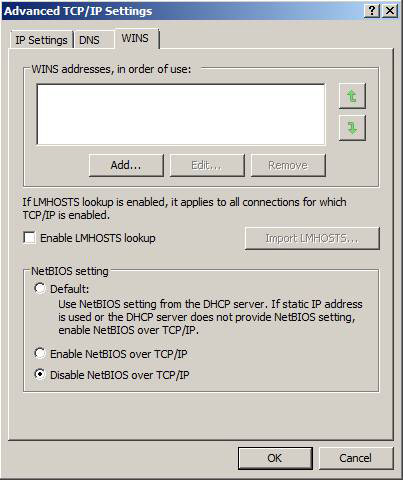 Figure 14: Configuring WINS settings
With the appropriate network settings configured, let's forward and name each failover cluster node with sufficient names such as CCRNODE1 and CCRNODE2 or whatever name you want to use in your environment. Once the name is set, add them as members in the Active Directory forest (Figure 15).
 Figure 15: Change the computer name and add it to the domain
Finally, restart the servers for the changes to take effect. Conclude Part 1 of this 3-part series has shown you how to deploy an Exchange 2007 SP1 CCR Cluster on a Windows Server 2008 Failover cluster. In Part 2, we will set up Windows Server 2008 Failover Cluster as well as deploy CCR based on clustered mailbox server.
 Part 2: Creating and validating Failover Cluster
Frequently Asked Questions
What is Deploy Ccr Cluster of Exchange 2007 Sp1 on Windows Server 2008 about?
It provides a structured overview of server, explains the main context, and highlights practical takeaways for readers.
Why does this topic matter?
Understanding the main concepts helps readers evaluate the issue, avoid common mistakes, and make better-informed decisions.
How should readers use this information?
Use the guidance as a practical starting point, confirm details that may have changed, and follow current product, safety, or security recommendations.
Was this article helpful?
Your feedback helps us improve.
Related Articles
 Deploy Ccr Cluster of Exchange 2007 Sp1 on Windows Server 200813 minutes read
 Failover Cluster Management Configuration of Server 200817 minutes read
 Cluster Failover: Checkover Failover Cluster Strategy -- Part 18 minutes read
 Strategy for Checking Failover Cluster -- Part 28 minutes read
 Installing, Configuring, and Testing Exchange 2007 Ccr on Mailbox8 minutes read
 Installing, Configuring and Testing Exchange 2007 Ccr on Mailbox9 minutes read
Reader Comments 0
Sign in with email or Google to join the discussion.