Create private cloud with Hyper-V (Part 1)
Cloud computing has emerged in the last few years. The cloud provides infrastructure services (IaaS) that offer unprecedented flexibility as they enable the provision and deployment of new virtual machines quickly.
Table of Contents
TipsMake.com - Cloud computing has emerged in the last few years. The cloud provides infrastructure services (IaaS) that offer unprecedented flexibility as they enable the provision and deployment of new virtual machines quickly.
>>> Create private cloud with Hyper-V (Part 2)
Although it is not possible to deny the benefits that IaaS clouds can bring, it is undesirable for organizations to depend on the Internet to access the cloud servers. They will not be able to access the server if the Internet connection is lost or when the connection is congested. This is what businesses and organizations wonder.
With the solution to build a private cloud, businesses will not only benefit from the flexibility of the IaaS cloud, but also avoid the risk of losing server access due to Internet connection failure.
The series will guide users how to build their own cloud to quickly deploy different types of network servers. The cloud will have a self-service portal that allows administrators (or authorized users) to use a simple web interface to select the resources they want to provide and assign functions for server to deploy. For example, with the click of a button, an administrator can execute a new domain controller or a new Exchange Server.
Active Directory
The private cloud solution introduced in this article requires an Active Directory infrastructure. Due to the way cloud is built, you need domain controllers. In some situations, the private cloud may not be accessible after performing virtualization on domain controllers. To avoid this, it is recommended to place at least one domain controller outside of the virtualized environment.
Microsoft Deployment Toolkit
The first step to building your own cloud is to install Microsoft's Deployment Toolkit 2010. Microsoft Deployment Toolkit (MDT) is a free tool that can be downloaded here.
Here we will install the Deployment Toolkit on a physical server that has access to other servers forming the cloud. MDT is not a highly required application so we do not have to use a program-specific server. The server used will serve as a repository for executable image files. This requires the use of a server with large storage space for image files to create. And these image files must be accessible via network sharing.
MDT installation
Windows MDT is only 15MB in size. After the download is complete, run the executable file to display the installation window. In this article, we will use the Update 1 (5.1.1642.01) update of the toolkit.
Click Next to bypass the welcome screen. The program will ask if you accept the terms of the agreement. If accepted, click Next to continue. The program continues to ask what components users want to install. Choose to install all components (this is the default option) and click Next to install.
Create a public folder
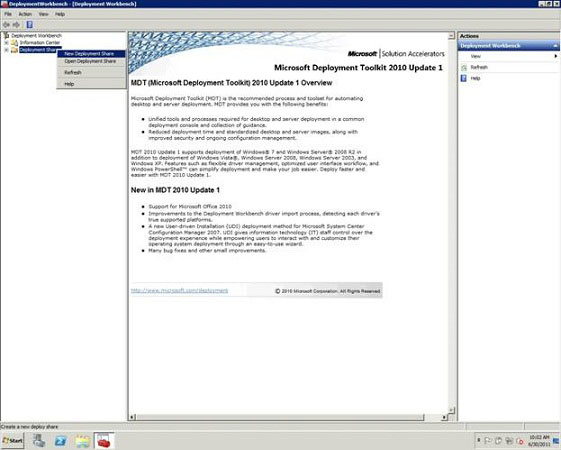
Now Windows Deployment Toolkit has been installed. We will need to create a public folder (deployment share). To do this, open the Deployment Workbench, right-click on the Deployment Shares folder and select New Deployment Share from the context menu, as shown below.
While creating a public folder, an error message may appear asking to update to a newer Windows Automated Installation Kit. Download the Automated installation Kit. Remember that before installing this new version, users must install SP1 for Windows Server 2008 R2. Download the service package here.
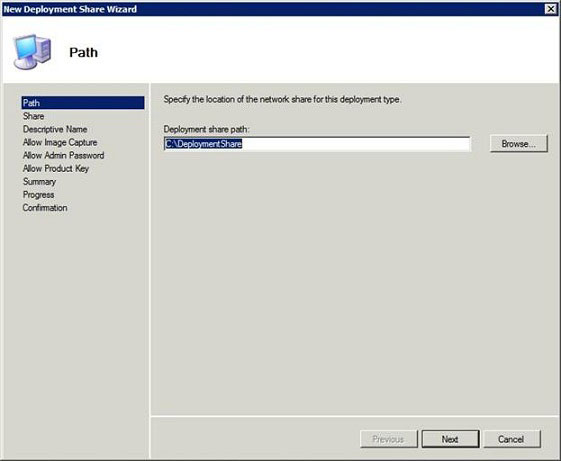
When you create a new public folder, Windows will launch the installation window. On the first screen, enter the path for the public folder, as shown below. This is the link to save all executable image files. Therefore, choose a location carefully and have a large storage space.
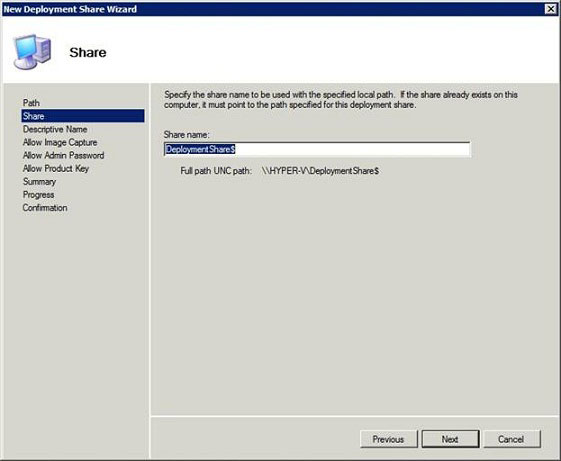
Click Next then name the public folder that will be created. The default name is DeploymentShare $ . Last name symbol to hide the folder.
After clicking Next , enter a description for the folder to be created. For the purposes of the article, I will use the default description of MDT Deployment Share .
Click Next and the installation window will ask users if they want to save the image file. Activate the option and click Next .
A screen appears asking if you want to grant an administrator password to users. Temporarily don't tick this option because we really don't want users to know the local admin password.
After clicking Next , the installation window will ask if you want Windows to request product key from the user. Ignore this option.
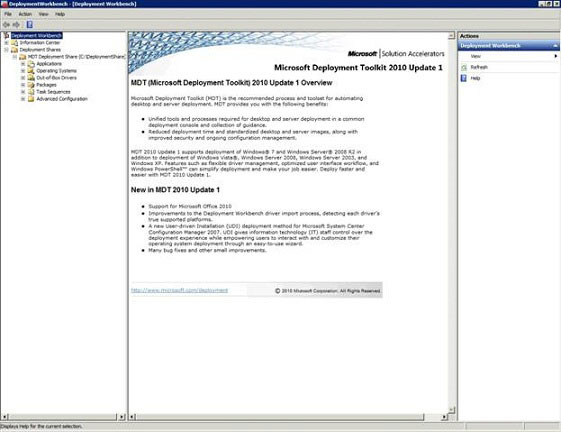
When you click Next , you will see a summary of the configuration options we have selected. Check to confirm the options. If all is well, click Next to create a public folder. When the process is complete, click Finish .
Conclude
So we have created the public folder. Now it's time to add some operating systems to the directory.
Was this article helpful?
Your feedback helps us improve.
Related Articles
 Create private cloud with Hyper-V (Part 3)7 minutes read
 Create private cloud with Hyper-V (Part 5)7 minutes read
 Create private cloud with Hyper-V (Part 2)7 minutes read
 Create private cloud with Hyper-V (Part 4)6 minutes read
 Create virtual cloud with Hyper-V (Part 6)7 minutes read
 Create virtual machines with Hyper-V on Windows 8 and Windows 1015 minutes read
Reader Comments 0
Sign in with email or Google to join the discussion.