Table of Contents
This updated guide examines Create Private Cloud with Hyper-v (Part 3) and organizes the essential facts, background, and practical takeaways in clear American English.
Introduce
The previous article showed users how to extract the contents of Windows installation media to create an executable image file. We have created two task sequences that are deploying the generic Windows Server 2008 R2 and Windows Server 2008 R2 client running Hyper-V. In this article, we will modify the Hyper-V task sequence setup to use to deploy Hyper-V server to manage virtual machines in the cloud.
Reconfigure the task sequence
Open Deployment Workbench and find control trees to Deployment Workbench | Deployment Shares | MDT Deployment Share | Task Sequences | OS Install . Now, right-click the task string we created for Hyper-V and select Properties from the pop-up menu. The attribute table will appear.
Select the Task Sequence tab in the properties table. This tab can be used to modify the current workflow. Since we are creating a Hyper-V server, we will need to install the task for the Hyper-V server. To do this, select the Tattoo option from the task sequence and then select Roles | Install Roles and Features from the Add menu. A detailed information frame displays a sequence of tasks (roles) and features that can be installed. Check the Hyper-V box (c64 only) .

You should check the Multipath I / O (Core) box . This option makes it easier to connect to the repository later. After selecting the components you want to install, click Apply then click OK .
Update to public folder
At this point, the user must update the public folder. Otherwise, the job sequence created will not work. To do this, look through the control tree to Deployment Workbench | Deployment Shares | MDT Deployment Share . Next, right-click the MDT Deployment Share folder and select Update Deployment Share from the pop-up menu.
An installation window will appear asking users if they want to optimize the boot image file to update the process or want to completely recreate the boot image file. At this point, choose to completely recreate the boot image file as shown below.
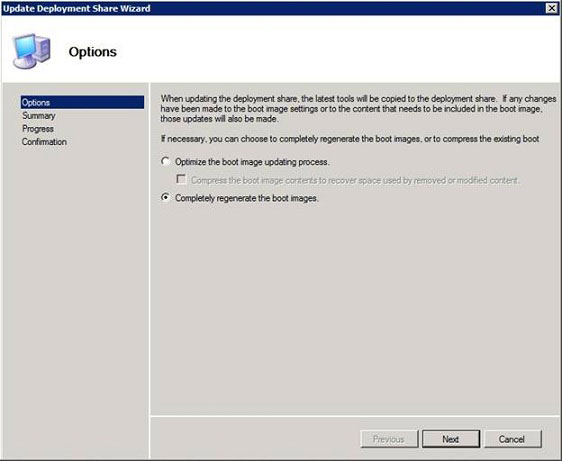
Click Next to see the summary screen confirming the selected action. Click Next again to create executable image files. Completion time depends on hardware configuration.
Install Windows Deployment Services
The next step is to install the executable services on the server running the Deployment Workbench from the Server Manager manager. Open Server Manager and select the Roles folder. Click the Add Roles link to let Windows launch the Add Roles installation window.
Click Next to bypass the Welcome screen. A screen will ask the user who wants to install for any task. Select Windows Deployment Services and click Next . A screen introducing the execution services appears. Click Next to bypass this screen.
Next, the program will ask which service (role service) that users want to install. There are two options: Deployment Server and Transport Server. Please select both, as shown below.
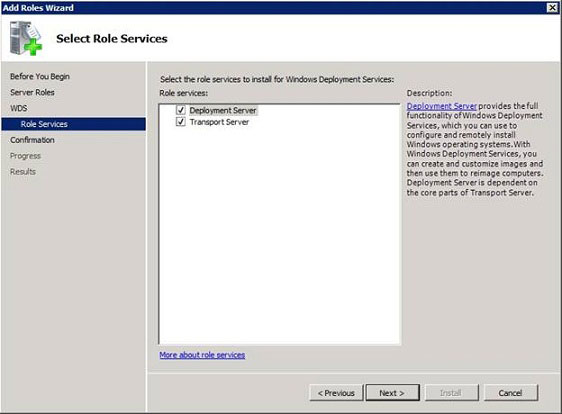
Click Next and then click Install . Windows will install Windows Deployment Services. After completing the installation, click Close .
Configure Windows Deployment Services
Now, Windows Deployment Services has been installed and must be configured. Look in Server Manager to Roles | Windows Deployment Services | Servers | .
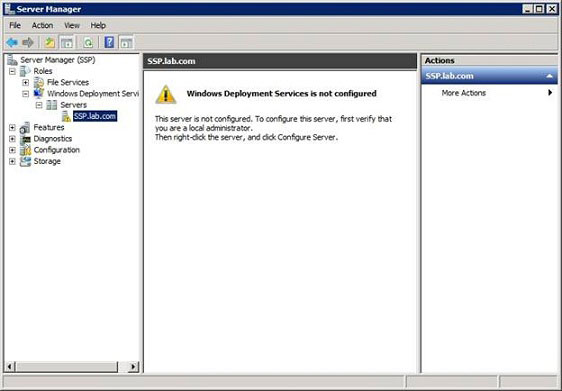
Right-click the server and select Configure Server from the menu. When the configuration window appears, click Next to bypass the introduction screen.
The next screen asks for the path to the remote installation directory. If possible, users should save this folder in a folder other than the C: drive.
Click Next . The installation window will ask how the user wants the server to process requests from the client. Select the option to enable all clients (know or not) then click Next . Windows will configure and start Windows Deployment Services. Once completed, you will see a screen asking if you want to add image files to the server now. This option is enabled by default but you need to uncheck it because we are using the Deployment Workbench for image files. Click Finish to complete the configuration process.
Add image files
Now, add some executable image files to Windows Deployment Services. To do this, look in Server Manager to Role | Windows Deployment Services | Servers | | Boot Images . Next, right-click the Boot Image folder and select add Boot Image . We will have to enter the address of the Windows image file (. WIM file) we want to add. Click Browse and find the path used by the public folder you created through the Deployment Workbench. In the previous article, we created the public folder at C: DeploymentShare so the path would be C: DeploymentShareBoot . In this path there is a file called LiteTouchPE_x64. That is the file to be imported so select it and click OK .

Click Next to enter the image file name. Then, click Next a few more times to import the image file. Once done, click Finish .
Conclude
At this point, we have created a boot image file that can be deployed, but we still have a long way to go if we want to use this technique to create our own cloud.
FAQ
What is Create Private Cloud with Hyper-v (Part 3) about?
It provides a structured overview of Private cloud, explains the main context, and highlights practical takeaways for readers.
Why does this topic matter?
Understanding the main concepts helps readers evaluate the issue, avoid common mistakes, and make better-informed decisions.
How should readers use this information?
Use the guidance as a practical starting point, confirm details that may have changed, and follow current product, safety, or security recommendations.
Related Articles
 Create Private Cloud with Hyper-v (Part 1)6 minutes read
 Create Private Cloud with Hyper-v (Part 5)7 minutes read
 Create Private Cloud with Hyper-v (Part 2)7 minutes read
 Create Private Cloud with Hyper-v (Part 4)6 minutes read
 Private Cloud: Create Virtual Cloud with Hyper-v (Part 6)7 minutes read
 Create Virtual Machines with Hyper-v on Windows 8 and Windows 1016 minutes read
Reader Comments 0
Sign in with email or Google to join the discussion.