Table of Contents
This updated guide examines Transfer from Linux Mail Server to Exchange Server 2007 (Part 3) and organizes the essential facts, background, and practical takeaways in clear American English.
Anderson Patricio
Update user information in Active Directory Now that we have created the user, we will switch to the user information section. Using the New-Mailbox command cannot add the information we have in the CSV file. So use the same Exchange Management Shell session and run another command to add the information side in the $ Passwdfile variable of the newly created user. The following command can be used (Figure 1):
$ FilePasswd |ForEach {Set-User $ _. Username –Office $ _. Office –Phone $ _. OfficePhone –HomePhone $ _. HomePhone}
 Figure 1: Add more information from $ Passwdfile to current AD accounts
The results seen in the User's Properties are shown in Figures 2 and 3 below.
 Figure 2: The user has received information from the $ PasswdFile variable
 Figure 3: User and phone number created in the Linux box
Using the same concept, we can create additional columns in the passwd.csv file to add more information in the new user account. For example, we can create a column called MobilePhone in the CSV file, add more information to all users and add –MobilePhone $ _. MobilePhone in the set-user command. Using this logic we can add the desired information in the new environment via the original CSV file. Group the workstations in the Active Directory domain To switch to a new environment, we must first work on workstations. Then note the following points before starting the process: • Make sure that all workstations use Active Directory DNS Server in DNS settings. • All workstations use the correct DNS suffix (Active Directory suffix) • Declare users after connecting their workstations in Active Directory, must log on to the domain with the current username information used to access the pre-set mail and password system. • Download the Windows 2003 Resource Kit and allow copying to all workstations as needed. • It is possible to perform this process slowly rather than working on all clients at the same time. We have just introduced some initial settings. All workstations need to be resolved through the Active Directory DNS Server and can access DNS resolution from an old zone (apatricio.ca) without problems. At this point, we can start migrating clients from the workgroup to Active Directory. 1. Enter the workstations into Active Directory 2. Additional information can be found in this article. 3. Log in locally as Administrator . 4. Copy moveuser.exe to c: 5. Configure the internal profile to be used with new Active Directory accounts (Figure 4). Run the following command:
Move
Local user is the internal username they are using.
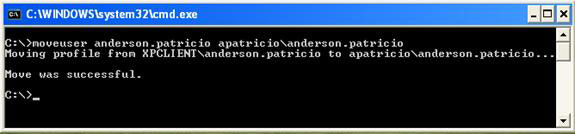 Figure 4: Switching the internal user profile to be used in the new Active Directory account
5. Log out with the computer as an administrator. 6. Users can login using their original username and password that we set up during the process of creating mailboxes via Powershell. 7. After logging in, the user will receive a message asking to change the password. Remind them to use the same password they are using to access Linux to receive mail. 8. Users need to access the same information they had before we moved the profile using moveuser.exe tool. Here the user experience will be similar; It includes desktop icons, Outlook Express, and so on, as shown in Figure 5.
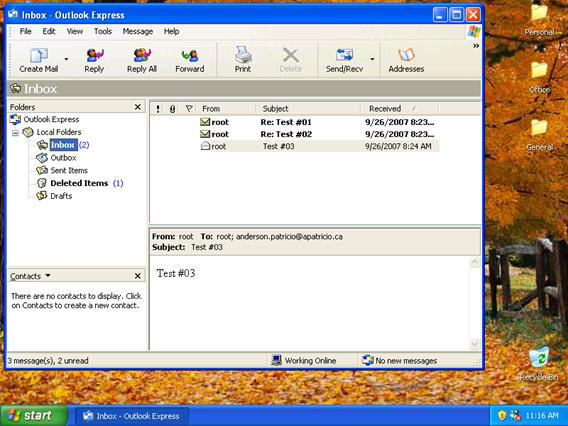 Figure 5: Users who are logged in to the domain will be able to access the information they have used internally
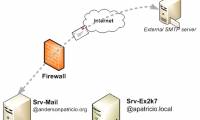
Transformation - current status (Update # 02) Now our workstations have started to be migrated to a new domain, all users are using Active Directory accounts to log in to the domain. Our users have enabled mailboxes, although they are still accessing the Linux Box. The picture of the working environment can be seen in the picture below:
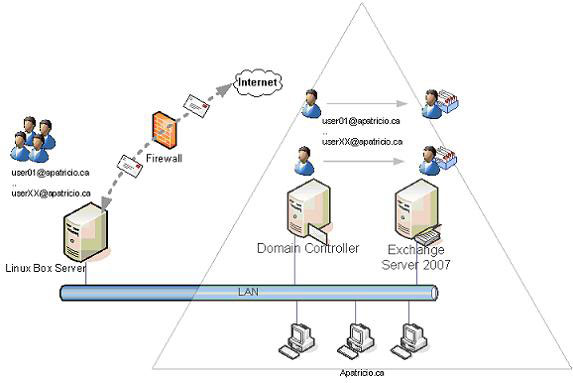 Figure 6: Current state of the script
The next steps will enable Exchange Server 2007 to accept the current client settings before switching to Windows Server 2007, to do so we must set up some components of Windows Server 2007 such as:
- POP3
- Receive Connector
- OWA
Configure POP3 settings in Windows Server 2007 Install Outlook 2007 on all workstations but until now existing clients using Outlook Express still work fine. We will adjust them to Windows Server 2007 using the current settings. To do that we need to enable POP3 in Exchange Server 2007: 1. Open the Exchange Management Console. 2. Go to Client Access section. 3. In the working pane, click Exchange Server 2007 , in the results pane, click POP3 and IMAP4 tab 4. Click POP3 and in Toolbox Actions click Properties under POP3. 5. Click the Authentication tab. 6. Select Plain text login ( Basic Authentication ) as shown in Figure 7.
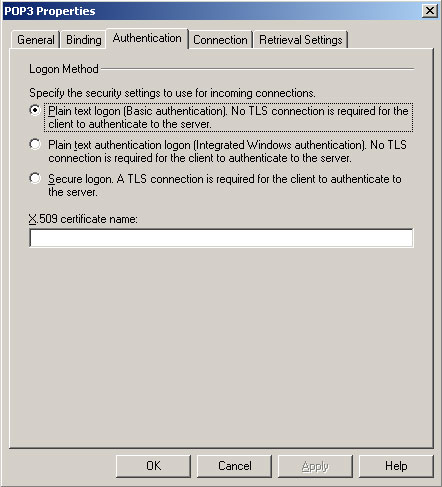 Figure 7: POP3 authentication configuration
7. Click OK 8. Open services.msc and configure POP3 Service to start automatically and click Start . Get a workstation to validate the new POP3 Settings. Configure this workstation with a test user in the current environment (Linux box) and then change Outlook Express settings to use the Exchange Server IP address. Set up to test users who can download messages via POP3 protocol. We can send some test messages to the user mailbox using Exchange 2007 OWA because the new Exchange 2007 mailbox of the new user is empty. Configure Receive Connector for internal users To allow internal users to send mail through SMTP, we can create a Receive Connector to allow all internal clients to send messages through it. This will be a temporary configuration. After installing Outlook 2007 on clients they will use MAPI and this connector may be removed. 1. Open the Exchange Management Console . 2. Open Server Configuration . 3. Click Hub Transport . 4. In Toolbox Actions, click New SMTP Receive Connector . 5. In the Introduction section, label the new receive connector and select Custom . Click Next . 6. In the Local Network Setting section, type the FQDN name to be used for this Receive Connector . Click Next . 7. In Remote Network settings, we must add the internal network and click Next . 8. In the New Connector, a listing will be displayed, click New . (Figure 8)
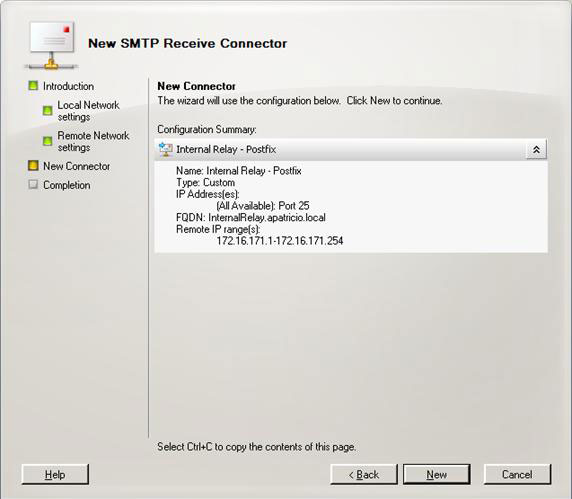 Figure 8: End of a new receiver that all internal clients will use
If your current environment allows internal users to send messages through the Linux box, we must enable Anonymous users in the new Receive Connector. To do that, check Anonymous users on the Permissions Groups tab (Figure 9).
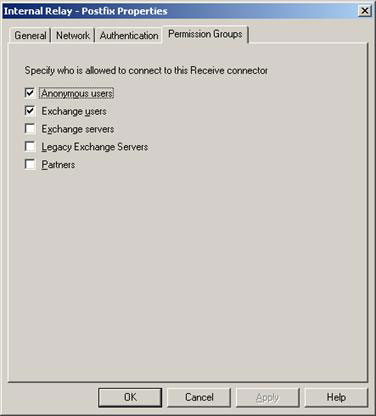 Figure 9: Allow asynchronous users (Anonymous users) to send messages through the receive connector inside.
The last setting to perform in the new Receive Connector is to allow the internal clients to send Internet messages via the new connector (Figure 10). By default, Windows Server 2007 will allow only internal domain forwarding. Internal users cannot send messages inside, to change this behavior we need to run the following command:
Get-ReceiveConnector * Internal * |Add-ADPermission –user 'NT AUTHORITYANONYMOUS LOGON' –ExtendendRights ms-Exch-SMTP-Accept-Any-Recipient
Note : The name of the Receive connector is ' Internal Receive Connector '.
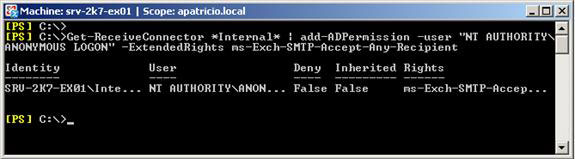 Figure 10: Adding ms-Exch-SMTP-Accept-Any-Recipient to Anonymous users in the Receive Connector inside.
Now the part that validates the Receive Connector! Here are some tests to validate whether our internal client works well in a new environment:
- Telnet 25 The FQDN next to 220 must be the name set during the Receive Connector, otherwise make sure the IP address range in the remote network settings contains the IP address of the host where we are performing the test.
- Configure a computer with the Windows Server 2007 IP address in the SMTP configuration and send mail to recipients inside and outside the Internet. The process needs to work well.
If everything goes well, all users can send messages inside and outside. If you have other settings for sending mail like SMTP Authenticated or TLS, change Exchange Server 2007 so that it works exactly for your needs before changing the environment. Conclude In this article, I have shown you how to update user properties and configure some Windows Server 2007 components to work with the current environment. In the next part of this series, we will introduce the final steps in moving between messaging systems and installing Microsoft Outlook on workstations to convert user data from internal to base. Exchange data.
FAQ
What is Transfer from Linux Mail Server to Exchange Server 2007 (Part 3) about?
It provides a structured overview of user, explains the main context, and highlights practical takeaways for readers.
Why does this topic matter?
Understanding the main concepts helps readers evaluate the issue, avoid common mistakes, and make better-informed decisions.
How should readers use this information?
Use the guidance as a practical starting point, confirm details that may have changed, and follow current product, safety, or security recommendations.
Related Articles
 Transfer from Linux Mail Server to Exchange Server 2007 (Part 1)11 minutes read
 Transfer from Linux Mail Server to Exchange Server 2007 (Part 2)10 minutes read
 Transfer from Linux Mail Server to Exchange Server 2007 (Part 4)10 minutes read
 Transfer Mdaemon to Exchange 2007/2003 (Part 2)9 minutes read
 Transfer Mdaemon to Exchange 2007/2003 (P.7)8 minutes read
 Exchange Server: Transfer Exchange 2003 to Exchange 2007 (Part 2)9 minutes read
Reader Comments 0
Sign in with email or Google to join the discussion.