Access and use shared email addresses - Part 2
 Access and use shared email addresses - Part 1
Neil Hobson
Network Administration - This is the second and final part of the two-way introduction series and access to shared email addresses in Exchange 2007. The email addresses shared here we talk about. are shared email addresses that most organizations use like info@neilhobson.com or sales@neilhobson.com. Typically, every organization wants more people to access these email addresses, more importantly, can send notifications to choose whether the replies are coming from a shared email address or from a user's email address.
In the first part of this series, we showed you a method in which distribution lists have a shared email address of info@neilhobson.com. Although this method generally works quite well, there is a requirement that users who access a list have the rights to send replies as if they come from a shared emai address or other functions such as Whether Reply All is used inside Outlook or not. A better method of using shared email addresses is to create a shared mailbox, so in this second part, I will talk about that configuration as it relates to Exchange 2007.
Mailbox sharing
In the shared mailbox configuration, you can simply create a user mailbox called Info. Such a method means that the Exchange 2007 email address policies that you defined for your domain will assign this mailbox the correct SMTP address. For example, if we have an email address policy configured for the neilhobson.com domain, creating an Info mailbox means that the SMTP address will be automatically created as info@neilhobson.com. When you're done with this, set the permissions for the user to allow access to the shared mailbox and then add the mailbox for the user's Outlook profile so that they can see the two mailboxes when logged in. Outlook. In part one of this series, we used an example of some of our users named Ann, Bob and Carol need to access the shared mailbox and so we will continue to use these names in part two. . Inside the shared Info mailbox, splitting folders can be created for Ann, Bob and Carol so they can check which notifications they're working on. Let's take a look at this setup process. The first thing to do here is to create a shared mailbox. We created a distribution group in part one of this article using the Exchange Management Console, so let's focus on using the Exchange Management Shell. One of you can be quite knowledgeable about creating new users and mailboxes and may want to skip this section. However, this article is for new admins for Exchange 2007 so we will introduce that.
To create a new user and a related mailbox from the Exchange Management Shell you can use the New-Mailbox command. This command not only creates a mailbox with its name implied that it also creates an Active Directory user account because this user account must exist in order for the mailbox to exist. One thing that can be allowed before running this command is to set up a secure password through the management shell. To do that, you need to enter a password into a variable and save it as a security string. This can be done with the following command:
$ Password = Read-Host 'Password' –AsSecureString
This command will save your given password into the Password variable so that it can then be transferred to the New-Mailbox command to create a password for the new user account. The command used to create a new user account and mailbox is:
New-Mailbox –UserPrincipalName info@neilhobson.com –Alias Info –Name Info –FirstName Info –DisplayName Info –Password $ Password –Database 'First Storage GroupMailbox Database' –OrganizationalUnit 'Exchange Users'
The above command itself is easy to understand. For example, -OrganizationalUnit specifies which OU to create a new account in. You can also see that we have set properties Alias , Name , FirstName and DisplayName with an Info value to simplify things. If everything is correct then you will see a screen as shown below (Figure 6).
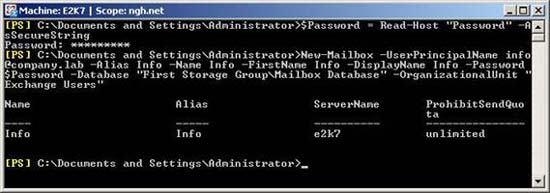
Figure 6: Creating User Account and Mailbox through Exchange Management Shell
Once the account and mailbox are set up, we need to allow Ann, Bob and Carol to access the mailbox so that it can be opened as an additional mailbox in their Outlook profiles and beyond that send an email to It appears that the source sent is info@neilhobson.com. To do that, we can use the Exchange Management Shell and now use the Add-MailboxPermission command. The full command used is:
Add-MailboxPermission –Identity Info –User Ann –AccessRights FullAccess
This command is shown in Figure 7.

Figure 7: Adding permissions for Mailbox
This command allows Ann to have full access to the Info mailbox. You need to run the same command or times, when specifying Bob and specifying Carol. If you have many users to add, the other possible method used here is to use the array below.
$ FullAccessUsers = 'Ann', 'Bob', 'Carol'
ForEach ($ SingleUser in $ FullAccessUsers) {Add-MailboxPermission –Identity Info –User $ SingleUser –AccessRights FullAccess}
With the array method, you can see that the $ FullAccessUsers array is defined with aliases for each user we want to provide access to. Then the $ SingleUser variable will be assigned to each username in the array in turn. The value of each username will then be shown in the Add-MailboxPermission command via the $ SingleUser variable. You can use array methods in many ways within the Exchange Management Shell.
Now Ann, Bob, and Carol have full mailbox access terms for the new mailbox, they can add Info mailbox as an additional mailbox to their Outlook profile and access the contents within the mailbox. this. There are full instructions on how to do that using Outlook 2007. This is what needs to be done for Ann, Bob and Carol.
-
In Outlook 2007, go to Tools and select Account Settings.
- In the Account Settings window, mark the Exchange account as shown in Figure 8, then click the Change . button .
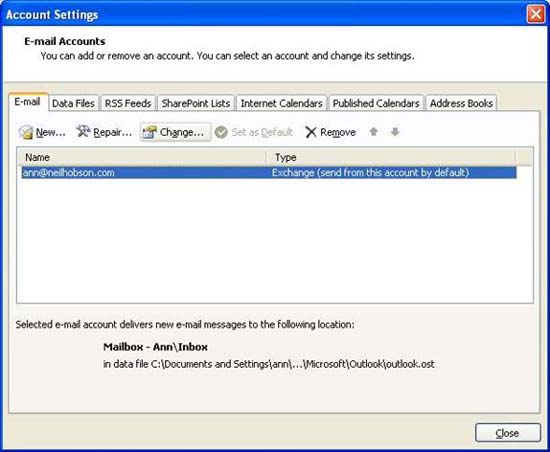
Figure 8: Account Settings Window
- The Change E-mail Account window will be displayed as shown in Figure 9. Select the More Settings button .
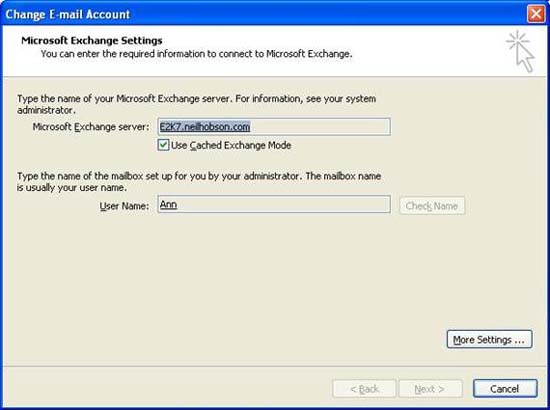
Figure 9: Changing the E-mail Account Window
- The Microsoft Exchange window will be displayed. Click the Advanced tab and you will see a new window appear as shown in Figure 10.
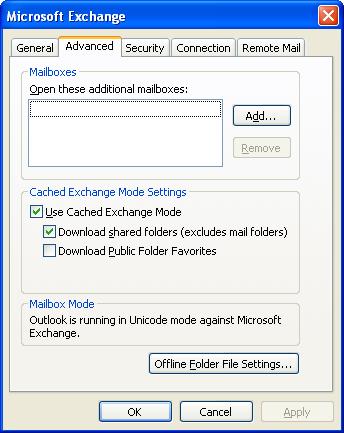
Figure 10: Prepare an additional Mailbox
- Click the Add . button , in the Add Mailbox window enter the name of the mailbox to add to the profile. In this case, Info will be entered because this is the name of the mailbox to add. Click Ok to return you to the Microsoft Exchange window, see Figure 11.
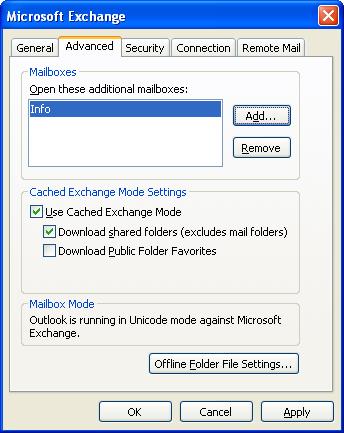
Figure 11: Completing an additional Additional Mailbox (Additional Mailbox)
-
Here, all you need to do is click OK in this window, and you'll return to the Change E-mail Account window from where you clicked Next and then Finish to return you to the Account Settings window. . Then you just need to click to return to Outlook.
- Back in Outlook, you will see additional mailboxes listed in the left pane. This mailbox can be expanded as other mailboxes, as shown in Figure 12.
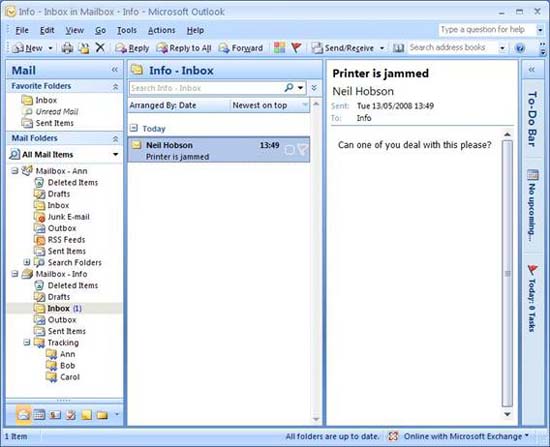
Figure 12: Additional Mailbox in Outlook
In Figure 12 above, you will see up to three user folders created in the Tracking folder, each of which is used for each user. These directories allow users to save notifications for the purpose of rechecking the process. For example, the email currently requesting removal of a 'jammed printer' is read by Ann. When Ann read the email and solved Ann's problem, she can copy the message from the mailbox folder to her own personal folder 'Ann' located in the Tracking folder. When replying to messages in a shared mailbox, note that the reply will be automatically filled in to appear the original address from the Info mailbox instead of Ann's personal account, as shown in Figure 13.
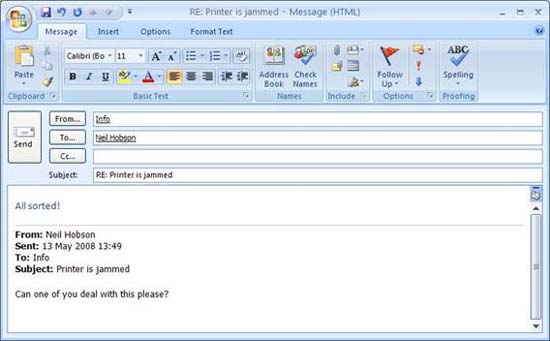
Figure 13: Reply from a Shared Mailbox
Conclude
Over the two parts of this article, we have introduced two methods to allow access to a shared email address, with the ability to reply using this address. The first method used distribution lists and the second method used shared mailboxes. In either of these methods, any method can work well in your organization, but take a moment to evaluate both and choose the most appropriate option for your organization.
You should read it
- ★ Managing log files of Exchange Server 2007 - Part 2
- ★ Exchange Server 2007's spam filtering feature does not need the Exchange Server 2007 Edge Server
- ★ Transfer MDaemon to Exchange 2007/2003 (P.3)
- ★ Check mail in Exchange 2007 (Part 2)
- ★ Transfer from Linux Mail Server to Exchange Server 2007 (Part 1)