Transfer MDaemon to Exchange 2007/2003 (P.3)
In the previous section, we created an Accepted Domain and Send Connector that supports the use of two Coexistence systems.
>> Transfer MDaemon to Exchange 2007/2003 (Part 2)
>> Transfer MDaemon to Exchange 2007/2003 (Part 1)
Then the mail server system has the following model: 
Next in this section we will configure the Exchange Server 2007 to receive mail from the Internet, and configure it as a Relay Server for the Daemon server, then proceed with the test in case Coexistence has set.
Configure Receive Connector
By default, Windows Exchange 2007 has two Receive Connectors (Default Receive Connector and Client Receive Connector), we will add another Receive Connector and configure this Connector to forward all emails sent from the server's IP address. MDaemon. We will then configure the MDaemon server to send email to the Exchange server, and the Exchange server will send an email to the Internet. In addition, we will have to configure the Default Connector to receive mail from the Internet without requiring authentication (the default setting).
First, we will create a Receive Connector to allow MDaemon server to send mail:

On the Network Settings page, use the default settings (use all available IP addresses and receive via port 25) and use an FQDN for this new Receive Connector . Then click the Next button.
On the Remote Network page, remove all the entries in Remote IP Address (es) then click on the Add button and select the MDaemon server IP address . Click Next .

On the New Connector page you will see a summary table of all the settings made during the creation of the new Connector. Here, click the New button.
On the Completion page, click Finish to finish the process of creating a new Receive Connector .
The Receive Connector has been created but we need to do some more. Double-click the Receive Connector you just created, select the Permission Groups tab, select the Anonymous Users option and click OK .
Now the new Receive Connector allows MDaemon server to deliver local mail in Exchange Serverb 2007, but it does not allow MDaemon server to use Exchange Server as a forwarding server to send mail to recipients on the Internet. We can configure Exchange Server to act as a relay server so that the MDaemon server can send mail to all users using the Exchange Management Shell:
Now the Exchange server has received mail from MDaemon server and delivered these messages to internal users or external users (users on the Internet). The next step is to configure Exchange Server 2007 to receive mail from the Internet. This configuration process is quite simple, you just need to configure the Default Receive Connector to approve Anonymous User (anonymous user). The operations are similar to the operations we've just done above.
Configure Mail Flow for MDaemon server
If you are moving from another third-party mail server to an Exchange server, you need to apply the following settings to the system you are using. Basically, Mail Flow configuration for MDaemon is a process that ensures MDaemon will send all mail to the Exchange server. Remember that if users belong to the same server (MDaemon or Exchange Server), SMTP Routing will not work because both systems will check their local address first and then send the mail.
To configure MDaemon to forward all mail to Exchange server, you need to do the following:


Check Mail Routing
We have completed the necessary configuration to allow Exchange to receive and forward mail in case of using two systems, but we need to check the new settings to see if they really look good. is not. Follow these steps:
After performing the test, we can convert incoming mail traffic to the new Exchange server without affecting mail traffic. You need to change the firewall system settings currently applied to forward external mail traffic that will be received over 25 ports from the external source to the new Exchange Server IP address.
Conclude
In this section, we have done some operations with Receive Connector in case of using Coexistence to combine two Exchange Server and third-party mail servers, and perform some checks for the settings. In the next section we will perform directory synchronization to create a Global Address List number in the conversion process.
>> Transfer MDaemon to Exchange 2007/2003 (Part 2)
>> Transfer MDaemon to Exchange 2007/2003 (Part 1)
Then the mail server system has the following model:

Figure 1: Mail system diagram after creating Accepted Domain and Send Connector.
Next in this section we will configure the Exchange Server 2007 to receive mail from the Internet, and configure it as a Relay Server for the Daemon server, then proceed with the test in case Coexistence has set.
Configure Receive Connector
By default, Windows Exchange 2007 has two Receive Connectors (Default Receive Connector and Client Receive Connector), we will add another Receive Connector and configure this Connector to forward all emails sent from the server's IP address. MDaemon. We will then configure the MDaemon server to send email to the Exchange server, and the Exchange server will send an email to the Internet. In addition, we will have to configure the Default Connector to receive mail from the Internet without requiring authentication (the default setting).
First, we will create a Receive Connector to allow MDaemon server to send mail:
- Open the Exchange Management Console .
- Expand the Server Configuration section .
- Click on Hub Transport .
- Select the server in the right panel.
- Click the New Receive Connector in the Toolbox Actions .
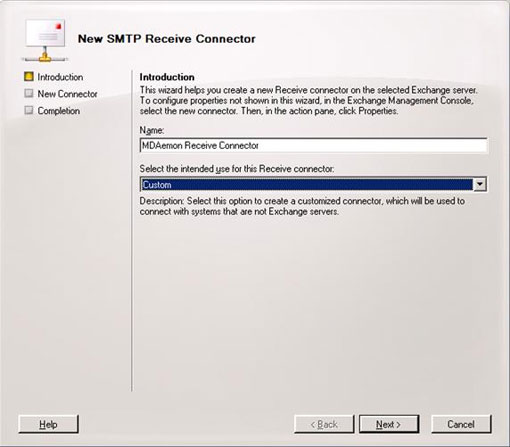
- On the introduction page, enter a name for the new Receive Connector , then select Custom and click the Next button.

Figure 2: The Receive Connector creation window.
On the Network Settings page, use the default settings (use all available IP addresses and receive via port 25) and use an FQDN for this new Receive Connector . Then click the Next button.
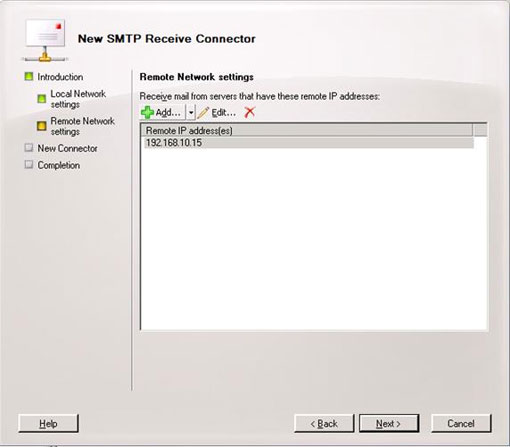
On the Remote Network page, remove all the entries in Remote IP Address (es) then click on the Add button and select the MDaemon server IP address . Click Next .

Figure 3: Select the MDaemon server IP address.
On the New Connector page you will see a summary table of all the settings made during the creation of the new Connector. Here, click the New button.
On the Completion page, click Finish to finish the process of creating a new Receive Connector .
The Receive Connector has been created but we need to do some more. Double-click the Receive Connector you just created, select the Permission Groups tab, select the Anonymous Users option and click OK .
Now the new Receive Connector allows MDaemon server to deliver local mail in Exchange Serverb 2007, but it does not allow MDaemon server to use Exchange Server as a forwarding server to send mail to recipients on the Internet. We can configure Exchange Server to act as a relay server so that the MDaemon server can send mail to all users using the Exchange Management Shell:
Get-ReceiveConnector 'MDaemon Receive Connector' | Add-ADPermission –User 'NT AuthorityAnonymous Logon'-ExtendedRights: ms-exch-SMTP-Accept-Any-RecipientNote: You must be very careful when using the above command. If you configure this, when the Receive Connector connects to the Internet, you will allow any external server to use your server as a forwarding server, and your server will become a monitored object. .
Now the Exchange server has received mail from MDaemon server and delivered these messages to internal users or external users (users on the Internet). The next step is to configure Exchange Server 2007 to receive mail from the Internet. This configuration process is quite simple, you just need to configure the Default Receive Connector to approve Anonymous User (anonymous user). The operations are similar to the operations we've just done above.
Configure Mail Flow for MDaemon server
If you are moving from another third-party mail server to an Exchange server, you need to apply the following settings to the system you are using. Basically, Mail Flow configuration for MDaemon is a process that ensures MDaemon will send all mail to the Exchange server. Remember that if users belong to the same server (MDaemon or Exchange Server), SMTP Routing will not work because both systems will check their local address first and then send the mail.
To configure MDaemon to forward all mail to Exchange server, you need to do the following:
- Open Mdaemn Console ( Go to Start | Programs | Mdaemon | Start Mdaemon ).
- Click Setup to select Primary Domain .
- Click on the Delivery tab (Figure 4), then select the option Try direct delivery but send the email problems to the server specified below (Perform direct delivery as you send error emails to the server specified below ), and in The Mail server field enters the IP address of the Exchange server.

Figure 4: Setting up the server to receive email errors.
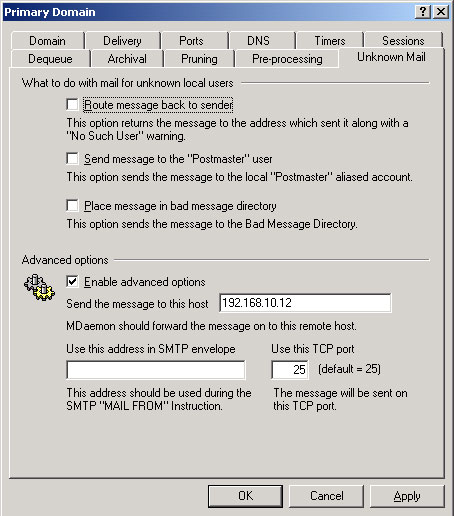
- Select the Unknown Mail tab (Figure 5). Here you have to deselect two options for Send message to the 'Postmaster' user (return mail to the sent user) and Place message in the bad message directory (save mail in a bad mail folder), then select Enable Advanced Options option and add the Exchange server IP address to the Send the message to this host field .

Figure 5: Configuration for Unknown Mail.
Check Mail Routing
We have completed the necessary configuration to allow Exchange to receive and forward mail in case of using two systems, but we need to check the new settings to see if they really look good. is not. Follow these steps:
- Create a new mailbox for users in the Exchange server.
- Open Exchange Management Console and check this new user's SMTP address. You can use that email address to perform follow-up tests.
- From any client or Exchange server, use the telnet utility to connect on Exchange server port 25 and send a simultaneous mail to this new user and an existing user in MDaemon.
- Log in to the MDaemon server and try sending mail to an Exchange user and an external user.
- Log in to OWA and send mail to an MDaemon user.
- Log in to OWA and try replying to mail sent from MDaemon (step 4).
After performing the test, we can convert incoming mail traffic to the new Exchange server without affecting mail traffic. You need to change the firewall system settings currently applied to forward external mail traffic that will be received over 25 ports from the external source to the new Exchange Server IP address.
Conclude
In this section, we have done some operations with Receive Connector in case of using Coexistence to combine two Exchange Server and third-party mail servers, and perform some checks for the settings. In the next section we will perform directory synchronization to create a Global Address List number in the conversion process.
Share by
Kareem Winters
Update 26 May 2019