6 ways to permanently delete files on Windows - You will not be able to get that file back again
Method 1: Completely delete a file on your computer using the Recycle Bin setting
The Recycle Bin is where deleted items are temporarily stored in Windows unless they are permanently deleted. It provides users with the option to recover deleted files in the Windows operating system since Windows 95. Until the user permanently deletes these files, they will not be permanently deleted from the hard drive; All these deleted files or folders are stored in the Recycle Bin. Additionally, the Recycle Bin allows you to restore all files stored in it to their original storage location.
You cannot use files directly in the Recycle Bin; You must first restore the files. Since Windows 95, it is displayed in all Windows versions. However, in newer versions of the Windows operating system, its icon may not appear. In this case, you can display the Recycle Bin icon on Windows by going to the settings. If the Recycle Bin has no junk files, it will appear as an empty trash bin. When there is some data, the Recycle Bin will appear with paper icons in it.
Until you empty the trash, all temporarily deleted files will be stored. But your files start being deleted from the trash if the trash's storage limit is exhausted or your hard drive is full or almost out of space.
If you want to completely delete a file on your computer using the Recycle Bin immediately, do the following:
Step 1 : Right-click the Recycle Bin icon on the Desktop and select Properties

Step 2 : In the Recycle Bin Properties dialog box , click on each drive and then check the Don't move files to the Recycle Bin option. Removes files immediately when deleted . Then, click OK .

So from now on, when you delete a file, it will no longer go to the trash.
Method 2: Use a keyboard shortcut to permanently delete files
When you do not want to set up as above but just want to select which files you want to permanently delete, you can press the key combination Shift+Delete .
Method 3: Use the Cipher tool available on Windows to permanently delete files
The third way you can use to permanently delete data on Windows is to use the Cipher tool available on Windows.
Whenever you create text files and encrypt them until the encryption process is complete, Windows creates a backup copy of the file, in case anything goes wrong during the encryption process. encrypted, data can still be recovered this way. Once encryption is complete, the backup will be deleted. But again, this deleted backup file can be restored using data recovery software, until it is overwritten by other data.
When you use this built-in tool, it creates a temporary folder named EFSTMPWP on the system partition. It will then add temporary files in that directory and write random data including 0, 1 and other random numbers to those files.
Cipher thus allows you to not only encrypt and decrypt data but also securely erase it. Therefore, many people also use it to delete files permanently.
Cipher does not have a graphical interface so it is very user friendly, and the commands are extremely simple. Using Cipher helps you not need many operations to permanently delete a file, just encrypt Cipher to the drive and the next time you delete as usual, the files will automatically disappear forever.
Cipher is a command line utility, it is necessary to open Command Prompt/PowerShell to use the tool.
Step 1: Open Command Prompt under Admin, first enter cmdthe Seach Start Menu box or on the Taskbar, then right-click Command Prompt and select Run as administrator.
If you use Windows 10 with the latest versions, the Run as administrator button will appear as soon as you search for Command Prompt.
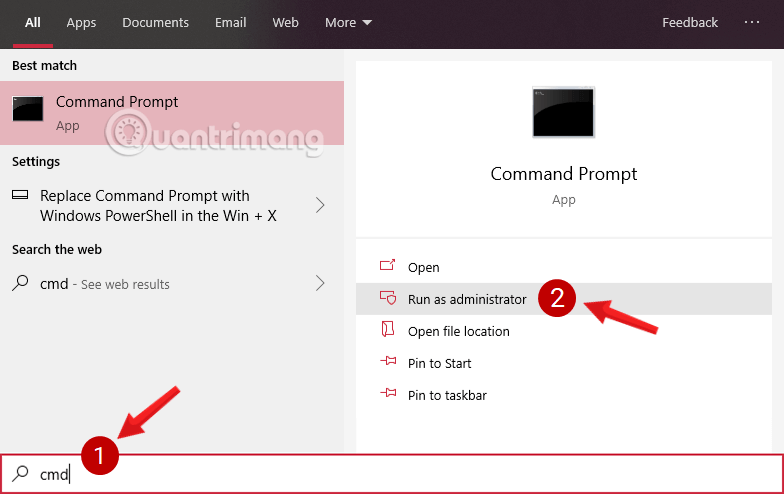
Click Yes if the User Account Control message appears on the screen.
Step 2: On the Command Prompt window , enter the command below and press Enter to let Cipher encrypt the drive you want the files to be permanently deleted when performing the Delete operation:
cipher /w:C: 
The above command will perform encryption on drive C, so that files later when deleted will "disappear" forever and cannot be recovered.
To change drives, replace letter C with other drive letters, for example D, E., or you can also navigate directly to a certain folder in the drive if you only want to perform encryption on the drive. that item alone. For example, if you want to delete a folder QuanTriMangCongNghe/Windows10in drive D, enter the following command:
cipher /w:D:QuanTriMangCongNghe/Windows10 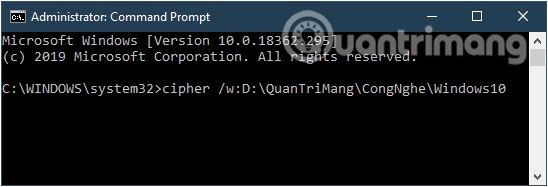
Note: This process will take a lot of time, so it's better to do it when you have an empty computer doing nothing.
Method 4: Permanently delete files on Windows with Eraser
If Cipher above is not the utility for you, then try Eraser. This is an extremely powerful open source tool that you can use to permanently delete data that you don't want others to know about, and importantly, it's completely free. Data deleted through this tool cannot be recovered.
Step 1: Install Eraser on your Windows computer.
Step 2: Once the software is installed, you can use Eraser to permanently erase data. Right click on the file and click on the Eraser option.
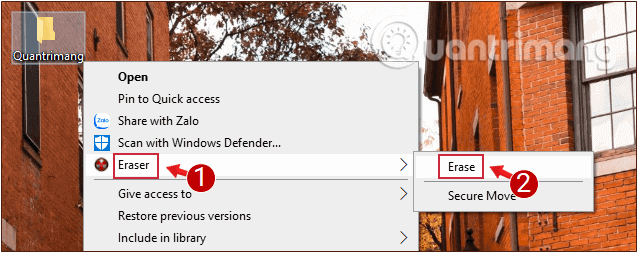
Step 3: On the notification dialog box that appears asking if you are sure you want to delete the selected file, click Yes to confirm the action.

And now the files are permanently deleted.
Additionally, you can also launch the Eraser tool and permanently delete the files you want through its interface.
Method 5: Delete files through formatting the partition
The format feature allows you to permanently delete all files on the partition. When formatting a partition, you need to remember to uncheck the Perform a quick format option . If you perform the Format Partition operation by default, files can be recovered.
There are several methods available to perform formatting such as using Disk Management or Command Prompt. Here, the article will show you how to format files on Disk Management.
Step 1 : Press Win+ Rat the same time to open the Run box. After typing diskmgmt.msc , click OK to continue.
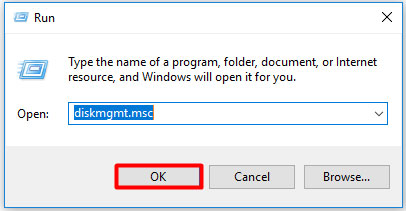
Step 2 : Select the partition containing the files to be deleted, then right-click on it. Then, select the Format option from the feature list.
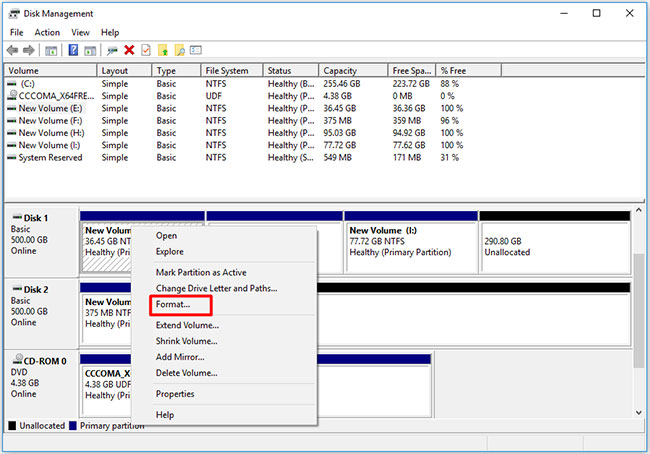
Tip : You need to make sure all files are no longer needed or that you have backed up important files before formatting. Otherwise, you may lose valuable data.
Step 3 : Cancel the Perform a quick format selection , then click OK to continue.
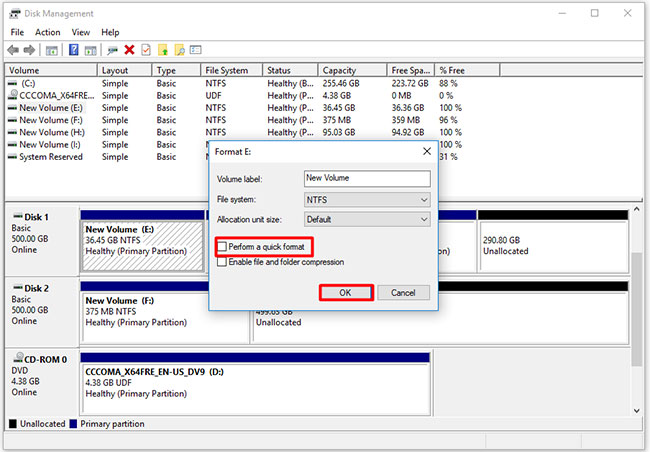
Tip : If you do not cancel the Perform a quick format request , the files cannot be permanently deleted.
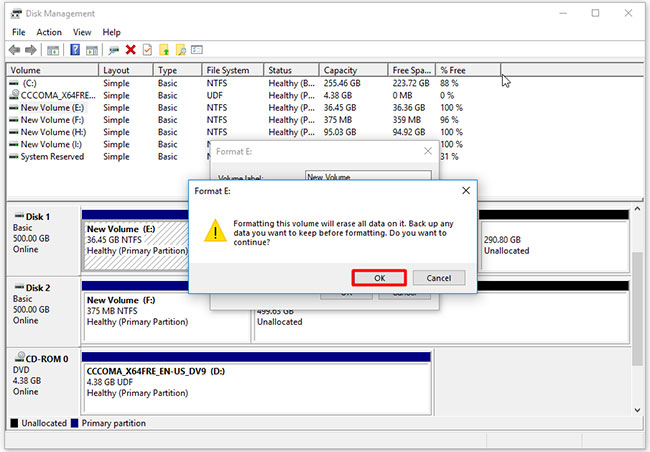
Step 4 : Click OK in the pop-up window to perform the format operation.
Method 6: Delete files via Command Prompt
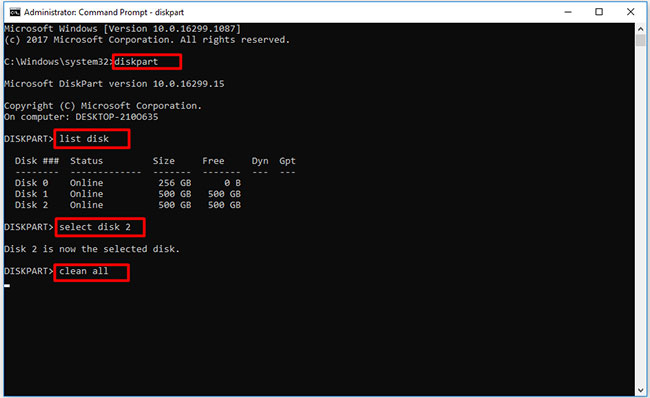
Command Prompt also allows you to permanently delete files. If you don't want to use a third-party tool, you can try this method. You can delete your junk files by executing a command clean allin Command Prompt.
Below are specific steps to delete files permanently via Command Prompt.
Step 1 : Open Command Prompt with admin rights.
Step 2 : Enter the following commands on the pop-up page. After typing each command, press the key Enterto continue.
- diskpart
- list disk
- select disk N ( N is the number of drives on which the files you want to delete are located)
- clean all
Good luck!