How to completely delete data on the computer?
Completely erasing the data on the computer is essential, especially before selling the device or deleting sensitive data permanently, not wanting to store any more. How to delete data that cannot be recovered? Please refer to this article.
Before selling or getting rid of a computer - whether it is active or broken - you should wipe sensitive documents and data. For absolute safety, you should do this even if you just leave them somewhere around your home, such as a garage or storage. One thing you will never know who will get your hands on your old computers.
If you think you just need to delete sensitive documents and you can safely dispose of your system, this is not true at all. The traces left on the hard drive may exist beyond what you imagine. The fact is that emptying the Recycle Bin or even reformatting the hard drive is not safe enough.

You can still save e-mails on your computer, including important login information and sensitive content, remembered web passwords on web browsers as well as saved passwords for Other services and applications. All of that can be completely restored even though Windows cannot boot. Other users can use a live CD to restore or bring the hard drive in your computer to another computer.
How to completely delete data on the computer
- All problems belong to the hard drive
- Why delete and format is not the same as "wipe" hard drive?
- "Wipe" how hard drive works?
- What to do before deleting a hard drive?
- Clear data completely on Windows computers
- Delete each data on Windows computer
- Erase data completely on Windows hard drive
- Clear data completely on macOS
- For internal hard drives
- For external hard drives
All problems belong to the hard drive
Remember that this is used to store all your data, files and other data that is the hard drive. You can basically remove the hard drive, the system output is in effect and now your task is to protect the hard drive. However, you still need to delete these hard drives before removing and hiding them somewhere.
Why delete and format is not the same as "wipe" hard drive?
A hard drive is a type of device used to store digital data. Files are stored on the hard disk surface from and rotating disks from within the hard drive box. The hard drive changes the magnetic properties of the disk surface to 1 or 0 when reading or writing data. Therefore, all data on the hard drive will be saved as basic binary data. For example, when the system stores data such as photos, music, etc. on the hard drive, rows 0 and 1 are recorded on magnetic disks.
- How are delete and erase, wipe and shred different?
When deleting a file, these numbers 0 and 1 will not be affected, only the pointer indicates the deleted file. Therefore, you can still recover deleted files before the file data is overwritten or corrupted. So what about disk format? Disk format works in the same way, it does not really "wipe" data. You can use recovery software to retrieve lost files in formatted drives.
"Wipe" how hard drive works?
To completely erase the hard drive, you should delete the binary data, which means overwriting the numbers 0 and 1 with new data. When replacing binary data of a file and overwriting with new data, it cannot be recovered anymore. Some specialized hard drive removal software can fill the hard drive with zero or random information by sector, ensuring that it cannot recover data from a "wipe" hard drive.
What to do before deleting a hard drive?
You need to do some work before deleting the computer hard drive to make sure the hard drive is completely erased without causing problems.
- Download and install hard drive erase software. If you intend to manually delete the hard drive, you need an effective and easy to use erase tool. If you want to delete the entire computer, you need to make sure the software that works on the hard drive can boot.
- Ensure the computer battery is full. If you want to delete computer data, you should make sure the battery is full or connected to the power outlet. If the power goes out while deleting the hard drive, this may damage the hard drive.
- Back up data to another hard drive. When you delete your computer, all data will be lost, so you need to back up files you want to keep on another hard drive.
See also: Transfer data between computers
- Remember to save the software key number. The software you buy will be lost after wiping your computer data, you need to reinstall them on the new hard drive. So please write the key of these programs to enable them after reinstalling.
See also: 21 best free software key finders
- Download the driver. If you are going to reinstall the operating system after wiping the hard drive you need to download the necessary drivers for the new system. You can go to the device's official website and download the latest driver version.
See more: 5 basic ways to update, update drivers for computers
- Prepare a boot disk. If you delete the main hard drive of the computer, you must perform the task without booting the system. In this case you need a USB drive or bootable CD.
See also: Instructions for creating USB boot with Hiren's BootCD quickly
Clear data completely on Windows computers
Delete each data on Windows computer
Basically there are two methods of data deletion: the method of selecting files to delete (cleaning) and cleaning method (wipe) the entire hard drive.
If you sell or dispose of your computer and the data security issue is not very important to you, you may consider a manual removal solution at this time. Just leave Windows intact and delete all your sensitive files and passwords yourself with Shift + Delete . However, this method is not really safe because it may miss the data to delete.
If you don't want to risk your data and privacy, or you don't want to do it manually, you can ' wipe ' your hard drive. This means that you will delete all data, including Windows, applications, documents, passwords, etc. everything. This action not only erases the data but also makes it impossible to recover the data by replacing all the old data with white data. This method is acceptable for government organizations.
However, if you 'wipe' the entire hard drive you can still reinstall Windows later if you have the installation disc and the product key. (Sometimes some product keys are in a sticker in the computer).
We will discuss both methods. We should first review what to look for and need to delete for manual methods. After that, I will consider completely 'hard' way of hard drive.
When you press the Delete key, Windows will move the files to Recycle Bin. Even after you Empty the Recycle Bin, they can still be restored. This is only useful when you accidentally delete a file, but the bad case is to try to secure your data to avoid snooping or sniffing failure completely. Free utilities like Restoration and NTFS Undelete, can make it easy for someone to recover your files.
To ensure that deleted files cannot be recovered again, you must use a file cutter (visualized as a paper cutter in the secure room, before removing it to be cut off). It is similar to the hard drive 'wipe' technique. The files you take to the cutter will be completely destroyed, forever.
Here are some places you can start your cleaning:
- Personal files and documents: Start with personal folders, these are folders created by Windows, such as Documents, Pictures, Music, and Videos. You then need to clean the hard drive for any personal documents or files. Open Computer and click on the drives to directly access specific folders. You can ignore the Program Files and Windows folders because these folders will not contain personal files.
When you find the folders or files you want to cancel, select them, right-click, and delete with the file cutter that you downloaded. Do not click Delete; There will be a new section for the file cutter on your right-click menu.
- Browser files and settings: You definitely want to delete the history, favorites, remembered passwords and other temporary files. In Internet Explorer 8, click Safety> Delete Browsing History . In Internet Explorer 7, click Tools> Delete Browsing History . In other versions, navigate to the favorites menu and then delete them.
- Server and email settings: If you use an email client, like Microsoft Outlook, you should delete email messages and settings connected to your email server or service. With Outlook, you can delete PST file. In Windows XP these files are usually located in C: Documents and SettingsUsernameLocal SettingsApplication DataMicrosoftOutlook . In Windows Vista and Windows 7, check out C: UsersusernameAppDataLocalMicrosoftOutlook.
Windows files need to be deleted
- Network key and wireless password: When connecting to an encrypted wireless network, you must enter a network key or password. This password will then be saved because you will not need to re-enter it at the next connection. To delete these passwords, simply delete the wireless network profile set up with Windows. Navigate to wireless settings via the network icon in the system tray or via Control Panel.
- Network shared passwords: With these passwords, you can use the Network Password Recovery utility of NirSoft. This utility can scan and display all saved network passwords, from which you can select and delete them.
- Password for VPN and dial-up connections : Start by calling the Network Connections window, either via the network icon in the system tray or Control Panel. Then open dial-up and VPN connections to make sure the passwords are not saved. If they have already been selected, deselect the Save Password option or delete the connection with it.
- Restore points: You just need to disable the Windows System Restore feature. Open Control Panel, find System Tools, and open System Restore settings.
- Remote Desktop: If you used Windows Remote Desktop feature to control the remote computer, you need to make sure it is not saved. Click Start> All Programs> Accessories> Remote Desktop Connection.
- Temporary files: You can use the Disk Cleanup utility included in Windows: click Start> All Programs> Accessories> System Tools> Disk Cleanup . You should definitely do this eventually because it will take care of Recycle Bin carefully.
There may be other programs or software that can store passwords or sensitive information. Therefore you need to delete sensitive information or remove the program. Here are some other applications you may have installed and need to check:
- Financial and accounting software
- FTP programs or SSH clients
- Instant Messengers (such as MSN, Windows Live, Yahoo Messenger, ICQ, and AOL)
Last but not least, you should remove the password that protects your Windows account. Open User Account settings via Control Panel. You can also delete other Windows accounts.
Erase data completely on Windows hard drive
Delete data completely on the hard drive using the command
If you are afraid to install additional software on your computer, you can use the tools available in Windows. To completely delete the data on the computer, do the following:
- Go to the command line by clicking Start> Run> cmd or Windows + R> cmd
- Enter the command: Cipher / w: C
Inside:
- / w: Delete any data
- C: The drive needs to delete the data, you can change to other drives like D, E to erase all data on the computer
Erase the data completely on the hard drive by resetting the PC
This method uses the reset feature in Windows 8.1 or Windows 10 during the reinstallation of the operating system. It has an option to delete everything on the hard drive. The steps below are done on Windows 10, if you use older versions of Windows, you can try other methods.
Step 1 . Click on the Start menu and select Settings . On the Windows settings window, click Updates & Security .
Step 2 . Click Recovery on the left navigation option and then click the Get Started button in the Reset this PC section.
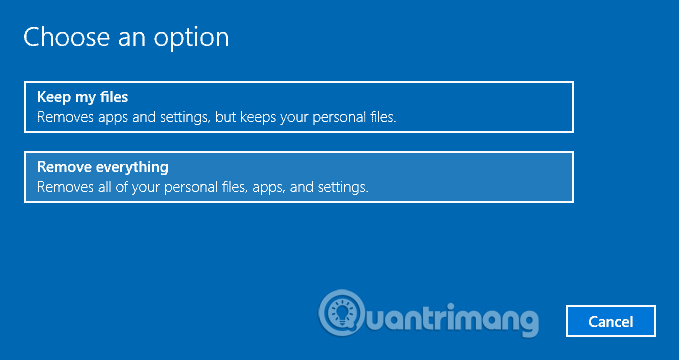
Step 3 . Select Remove everything option to delete all personal files, applications and settings.
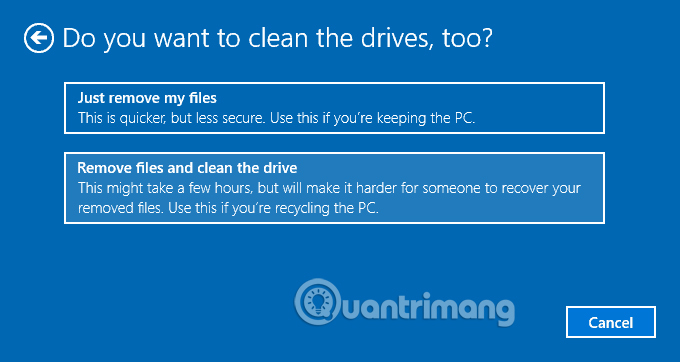
Step 4 . Select Remove files and clean the drive when asked if you want to clean the hard drive. This process can be a bit time-consuming but make sure no one can recover these deleted files.
Step 5 . Click Next> Reset in the next step to complete the process.
Erase data completely on the hard drive with software
If you take the hard drive out of your computer and plug it into another computer, you can use a tool like Disk Wipe in Windows. This is a tool that can delete partitions of the hard drive, but do not delete the partition that is installed and running Windows.
To delete the drive that has the operating system installed on your computer, you must create a boot disk or USB boot and boot with that utility. This may allow you to work even if Windows cannot boot. Active @ Kill Disk is an example of this type of tool. Or can use DBAN also completely free. The following illustration will use Active Kill Disk to do this.
After installing Active Kill Disk, go to Start > All Programs > Active KillDisk > KillDisk for Windows . A compact and very simple interface is displayed, and you just need to select the hard drive (internal or external) that you want to delete on the left side of the screen.
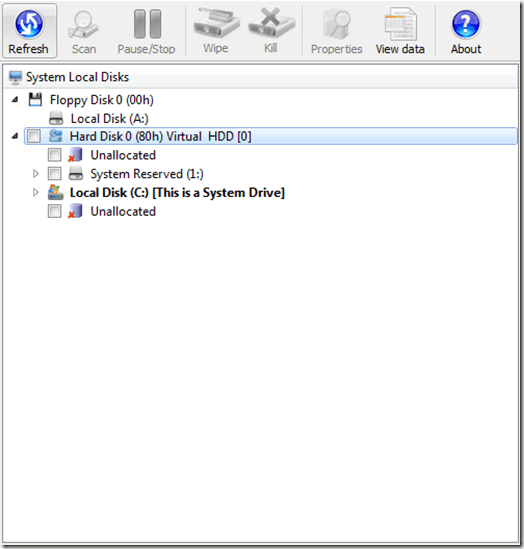
When a drive is selected, the upper Kill button will work. Click the Kill button. Now the Kill form appears, allowing you to select customizations for deleting the drive, then clicking the Start button. Note that you can also choose a pass method to delete.
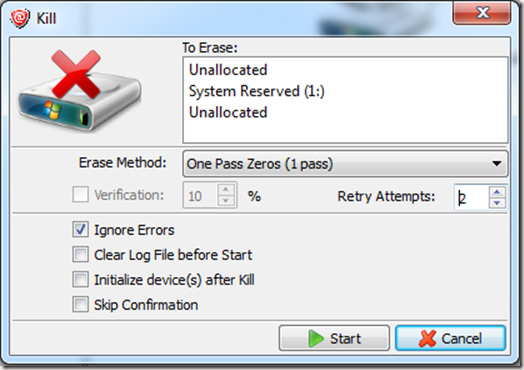
Now, you just need to wait for the format disk to finish everything. After success, the drive is now completely clean as a new hard drive and has no data at all when using programs to try to recover data.
Clear data completely on macOS
OS X has integrated the Disk Utility utility to safely delete hard drives. However, the process will vary, depending on whether you are erasing an internal or external hard drive.
For internal hard drives
To get started, insert the first installation disc that came with your Mac when purchasing it. May be labeled as the MacBook Install Disc.
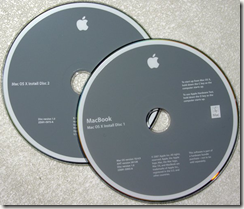
Restart the Apple Logo computer> Restart . As soon as reboot, when you hear the boot sound sound and see the Apple Logo, hold down the C key. Keep holding down the key until you see the wheel spin below the Apple logo.
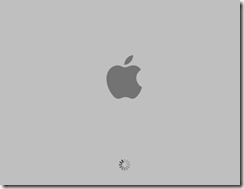
By holding down the C key, we will boot from the installation disk, not the hard drive. Once the OS X installation screen appears, click Continue to the next screen. Move the mouse over the top of the screen. This will activate Mac OS X, the navigation bar appears on the screen. Select Utilities > Disk Utility . After Disk Utility opens, select the Mac's internal hard drive from the list of devices, located along the left side of the Disk Utility window. Click the Erase tab.
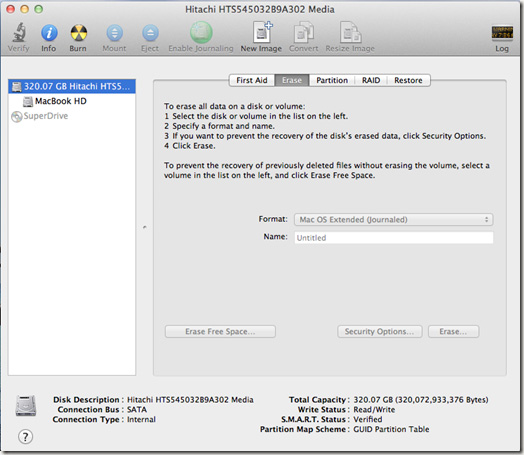
The Format setting is Mac OS Extended Journaled and enter a name for the hard drive. Next, click on the Security Options option . From here, you can choose a level of deletion. 35-pass takes a long time, but it is the safest, because it overwrites on the hard drive 35 times. For a quick way to delete (of course less than 35-pass security), choose 0-pass or 7-pass . Finally, click the Erase button . to proceed to delete the data on the drive.
For external hard drives
The process of cleaning an external hard drive is similar. However, it can be done directly in OS X, so you don't have to reboot and boot from an installation disk. Simply navigate to Finder > Applications > Utilities > Disk Utility to access Disk Utility.
I wish you all success!
See more:
- Delete sensitive data before selling old computers
- This is how to reset application data on Windows 10
- Delete data from your computer: Make sure all the files you put in the Trash actually disappear