4 experiences in Windows 7 you may not know yet
TipsMake.com - For normal Windows 7 users, most will accept the default settings of the system and do not change too many internal settings. The reason is to minimize the risk of operating system damage. However, some people are interested in discovering, refining settings with the aim of making their work faster and more efficient. Here are 4 experiences in using Windows 7 that will help increase computer performance.
1. Reduce the display time of thumbnails in Taskbar
Sometimes it is convenient to preview the current state of a program without switching to it. Windows 7 provides a small feature called thumbnail, so that whenever the user moves the mouse over a program tab in the taskbar, its thumbnail will display. However, you may have to wait a long time to see the thumbnail. The following procedure will help you improve this condition.
Note: create restore points before editing anything in the registry!
First click Start and enter regedit in the search box. Press Enter .
Browse to HKEY_CURRENT_USERControl PanelMouse .
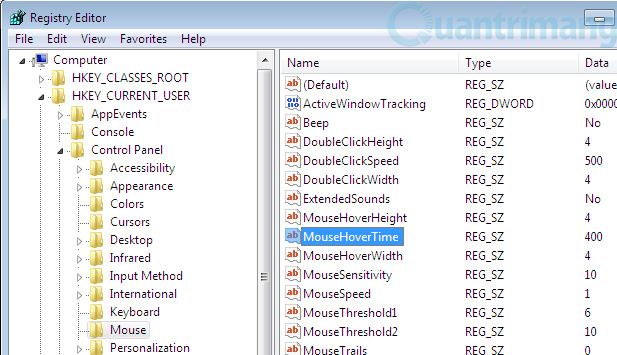
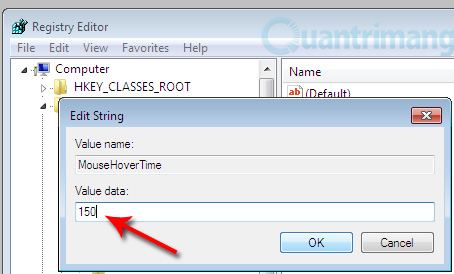
Double-click the MouseHoverTime key. The default value is 400 , you can change it to 150 (the time is in milliseconds) to reduce the display time of the thumbnail. Click OK to save the changes and exit the registry editor. Then restart the computer to feel the difference.
2. Prevent memory consumption of Windows 7
Windows always uses RAM to store all components of running computer programs, services, and libraries. In addition, RAM stores all the programs that it thinks you can use. This feature is known as SuperFetch . SuperFetch understands the applications you use and preloads into memory, so your system will react faster. SuperFetch uses smart priority coordination to understand which applications you use often. For example, weekends are different from everyday things, so your computer will be ready to do what you want. Windows 7 may also prioritize your applications rather than the following programs (Background), so when you come back, the computer will leave the sleep state and immediately start working. However, many users have complained about memory loss issues in Windows 7, for systems with low RAM memory can reduce this situation by disabling Superfetch :
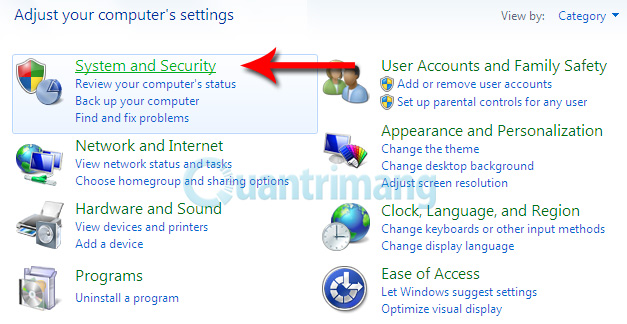
Click Start > Control Panel . In default display mode, select ' System and Security ' (in Windows Vista 'System and Maintenance ').
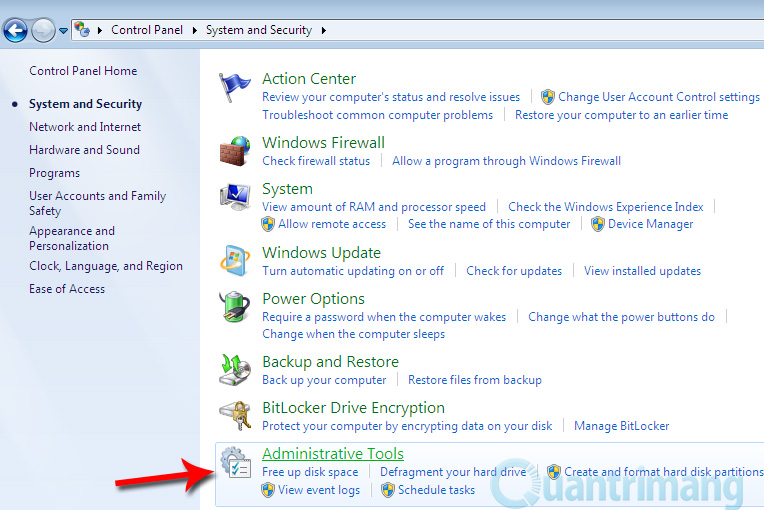
Click ' Administrative Tools '.
Here you click ' Services ' to open the Services service window. Browse to the line named Superfetch > right-click and choose Properties :
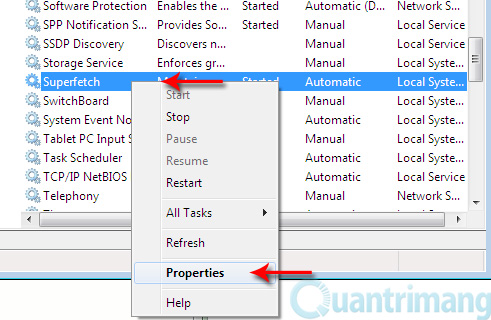
(Or you can go directly to the Services window by entering services.msc into the Start menu search box).
In Properties , the default Startip type item is Automatic , you click on it and change it to Disabled . Click the Stop button below and wait for the application to be disabled. Then click OK .
By disabling the Superfetch your computer will be " easier " to breathe . You may need to reboot to be effective. However, the computer uses a lot of memory, there are many other causes such as viruses, running programs that leak memory . So you need to monitor the use of resources regularly with the task manager tool ( Ctrl + Shift + Esc).
3. Add the program to Startup quickly
With the daily programs you need to use, allowing them to start automatically with Windows, though it can slow down the system at the beginning, but also very convenient because users do not need to open each program one by one. Just start Windows and wait a bit and all the necessary things will appear and be ready for use.
All you need to do is add shortcuts to the Startup folder in All Programs of the Start menu (if you don't see this folder, you can add them according to the instructions here ).
Click and hold the mouse on the program shortcut to be added, move to the Start menu icon:
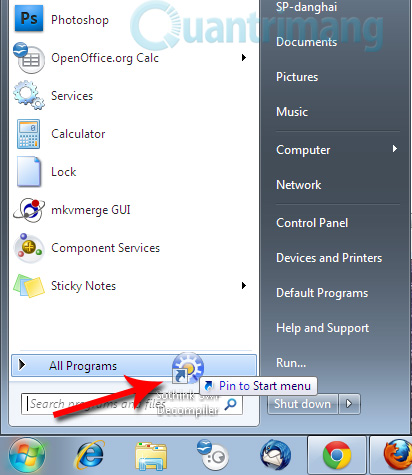
Then (still holding the mouse) drag to the Startup folder and insert it in:
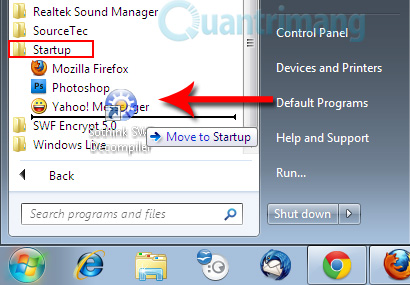
Or you can go to Start > All Programs > right-click on the Startup > Open folder . Then add shortcuts to the opened window.
4. Hide unnecessary Update options in Windows
The latest updates often contain security patches or add new features to help the computer avoid vulnerabilities and run more stable. However, not all patches are necessary for all users, such as language packs . If you do not want to update these programs, you can hide them, and leave only the important parts. .
First open the Windows Update window, click on the link for the updates found:
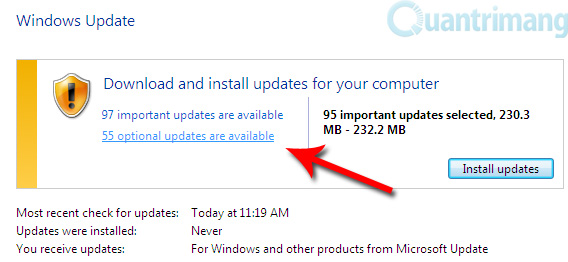
Select the items you want to hide, right-click and select Hide Updates :
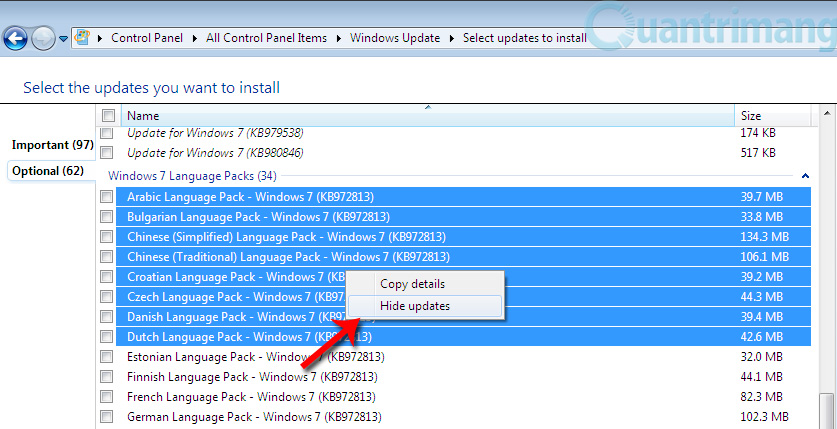
Then these parts will be dimmed and you can proceed to update other important patches.
If you want to restore these skipped versions, go to Start >> All Programs >> Windows Update . Select Restore Hidden Updates from the left menu:
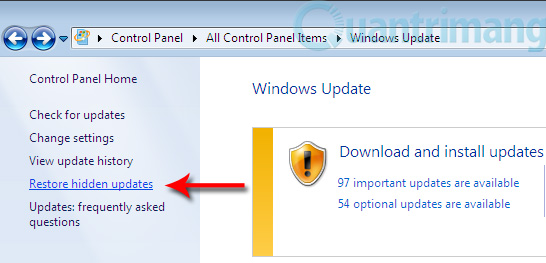
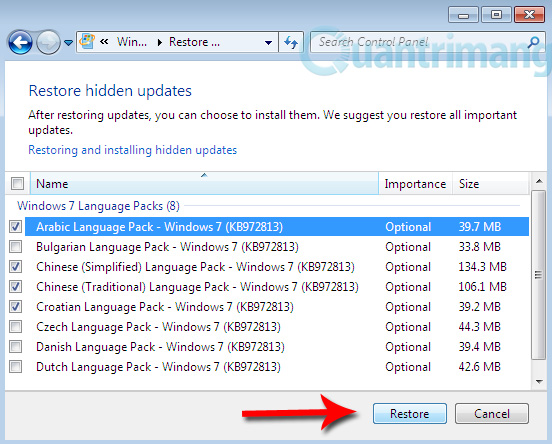
Select the required items and click Restore , then they will be added to the update list and you can proceed with the installation as usual:
You should read it
- ★ Turn off the Win 10 update, stop Windows 10 from updating automatically
- ★ Instructions for updating on Windows 11
- ★ How to hide setup options in Windows 10 Creators Update Settings
- ★ History of Microsoft Windows operating system throughout the ages
- ★ Steps to turn off Windows 11 Update, How to stop updating Windows 11