4 essential tips for managing Excel Ribbon
The ribbon in Microsoft Excel was introduced from Excel 2007. The ability to customize the Ribbon began to appear in Office 2010.
You can hide and display the ribbon, add commands to tabs on the ribbon and even create your own tabs. Find out through the following article!
How to manage Excel Ribbon effectively?
- What is Excel ribbon?
- 1. How to hide and display ribbon in Excel
- Hide Excel Ribbon
- Display Excel Ribbon
- Automatically hide Ribbon
- 2. What to do if Excel Ribbon disappears?
- 3. Customize Excel Ribbon
- Add a new group to a tab on the Ribbon
- Add a command to the new group
- Add your own custom tabs
- Rearrange tabs, groups and commands
- Hide tabs on Excel Ribbon
Rename the items on the Ribbon- Use the icon instead of the text on the ribbon
- 4. Reset the customizations in Excel
What is Excel ribbon?
Excel Ribbon is an icon strip above the spreadsheet area that looks like a complicated toolbar, replacing menus and toolbars in Excel 2003 and earlier versions.
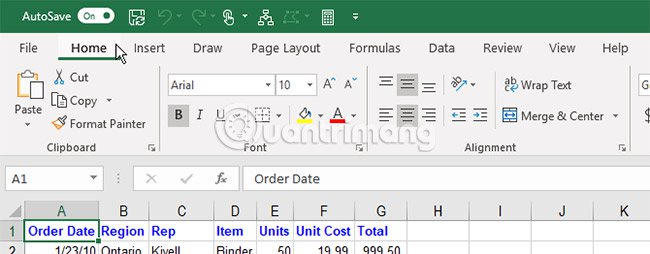
Above the ribbon are tabs, such as Home, Insert and Page Layout. Clicking on a tab will activate the tab's toolbar. Each group contains symbols, representing different commands. For example, when Excel opens, the Home tab displays common commands grouped by function, such as Clipboard tools and Font format .
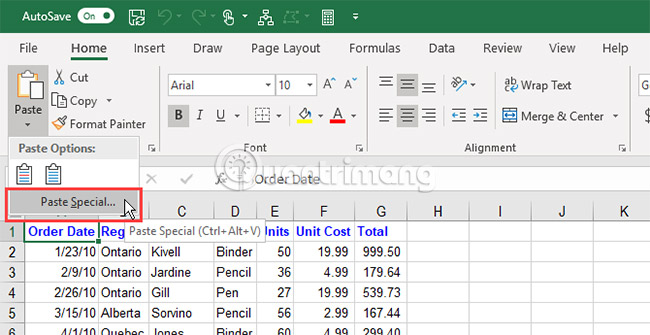
Some buttons open the menu with additional options. For example, the lower part of the Paste button in the Clipboard group , will open the menu with additional paste options.
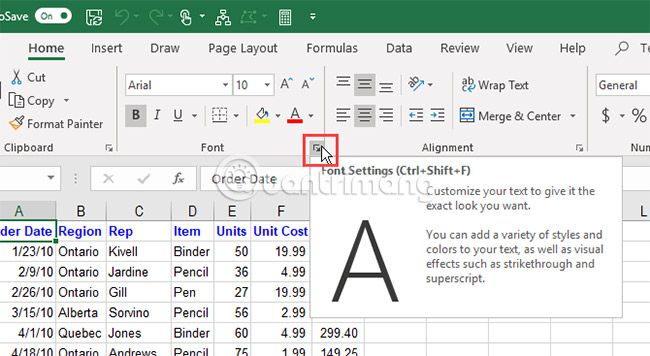
Each group has a button in the lower right corner to open a dialog box containing additional options related to that group. For example, the dialog box on the Font group will open the Font Settings dialog box .
1. How to hide and display ribbon in Excel
Users can hide and display the Excel ribbon (also known as ribbon collapse) to maximize the available space for spreadsheets. This is especially useful if you have a laptop with a small screen.
Hide Excel Ribbon
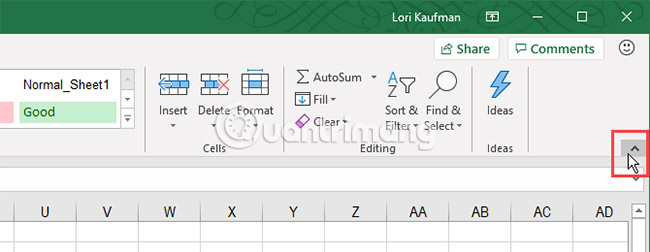
To hide the ribbon, click the up arrow button in the lower right corner of the ribbon.
You can also double-click one of the tabs on the ribbon or press Ctrl + F1 to hide the ribbon.
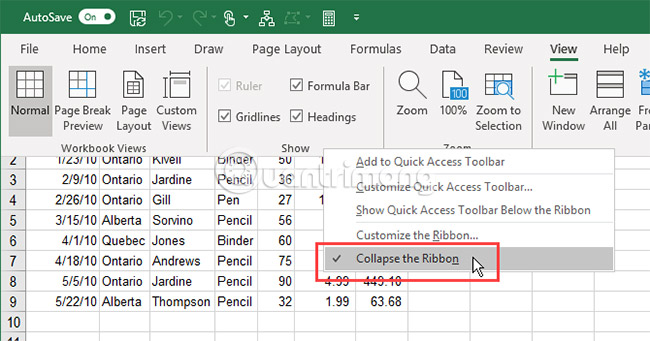
Another way to collapse or hide the ribbon is to right-click on the ribbon and select Collapse the Ribbon . Put a checkmark next to the Collapse the Ribbon option to collapse the ribbon when not using it.
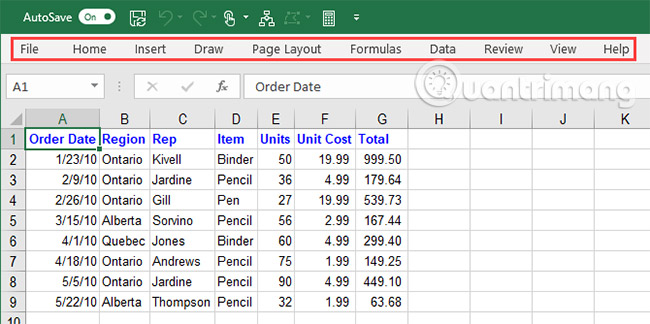
When the ribbon is hidden, only the tabs are displayed. Click the tab to temporarily display the ribbon. When you click the button or command on the tab, the ribbon will be hidden again.
Display Excel Ribbon
To display the ribbon permanently, double-click the tab or press the Excel Ctrl + F1 shortcut again.
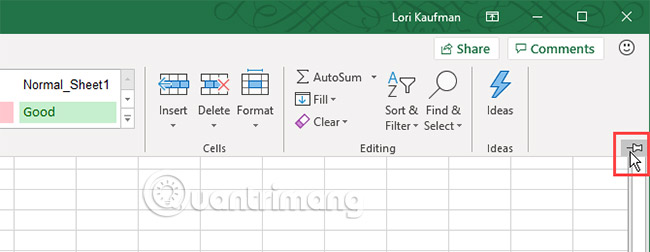
You can also click a tab to temporarily display the ribbon. Then, click the pin icon in the lower right corner of the ribbon.
Another way to display the ribbon permanently is to right-click on the tab bar and click Collapse the Ribbon again to uncheck this option.
Automatically hide Ribbon
If the screen space is limited, you can automatically hide the entire ribbon, including tabs.
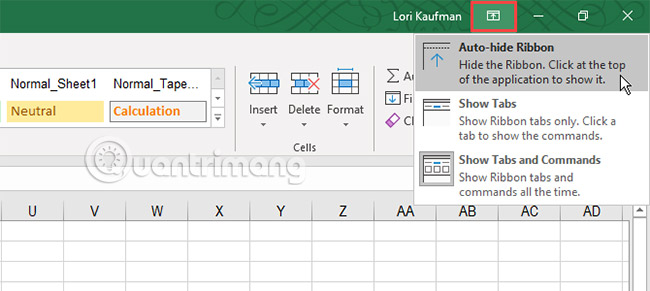
To automatically hide the ribbon and tabs, click the Ribbon Display Options button in the upper right corner of the Excel window and select Auto-hide Ribbon.
Show Tab option hides the ribbon but displays tabs.
To display the tabs and ribbon again, select Show Tabs and Commands .
To display the ribbon when it is automatically hidden, move the mouse over the top of the Excel window until you see a green bar and click on the bar.
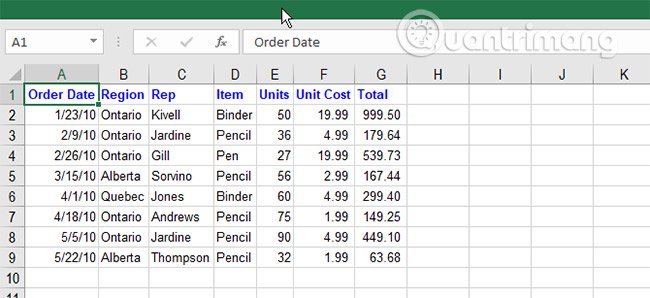
The ribbon will appear on the spreadsheet. Click a tab and then click a command. The ribbon will automatically hide. To permanently display the ribbon and tabs, select Show Tabs and Commands from the Ribbon Display Options button.
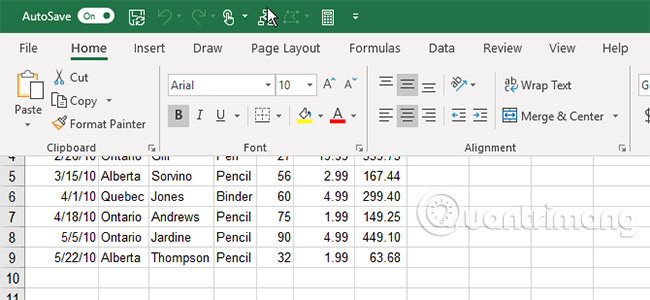
2. What to do if Excel Ribbon disappears?
If your Excel ribbon disappears, chances are it is only temporarily hidden. You can unhide the ribbon in Excel as described in the Display Ribbon Excel section above if you only see the tab name appear.
If the spreadsheet takes up the entire screen and you don't see the ribbon or tabs, the ribbon is in Auto-hide mode. See the section Automatically hide the ribbon above to learn how to retrieve the ribbon.
3. Customize Excel Ribbon
Microsoft has added the ability to customize the ribbon in Excel 2010. You can do things like:
- Rename and rearrange tabs and groups on tabs
- Hide tabs
- Add and delete groups on existing tabs
- Add custom tabs and groups containing the commands you want to access easily
But you can change the default commands, such as changing their name or icon, completely removing or changing the order of the default commands.
To customize the ribbon, right-click the ribbon and select Customize the Ribbon. You can also go to File> Options> Customize Ribbon .
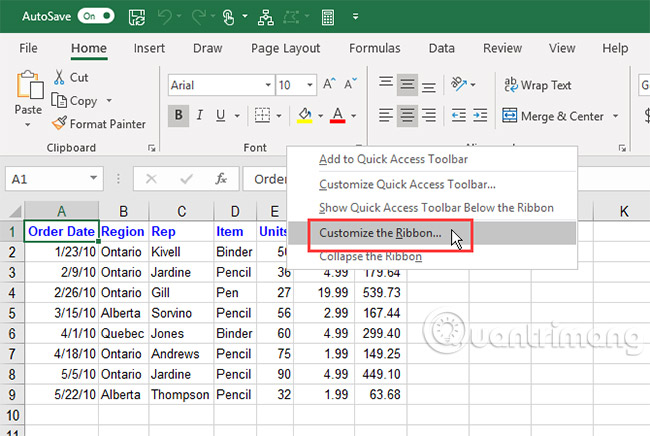
Add a new group to a tab on the Ribbon
All commands on the ribbon must be in a group. To add commands to an existing integrated tab, you must first create a new group on that tab.
You can also add commands to groups on your own custom tab and how it will be done later.
On the Customize the Ribbon screen in the Excel Options dialog box , select Commands Not in the Ribbon from the drop-down list Choose commands. You may want some commands in this list available on the ribbon.
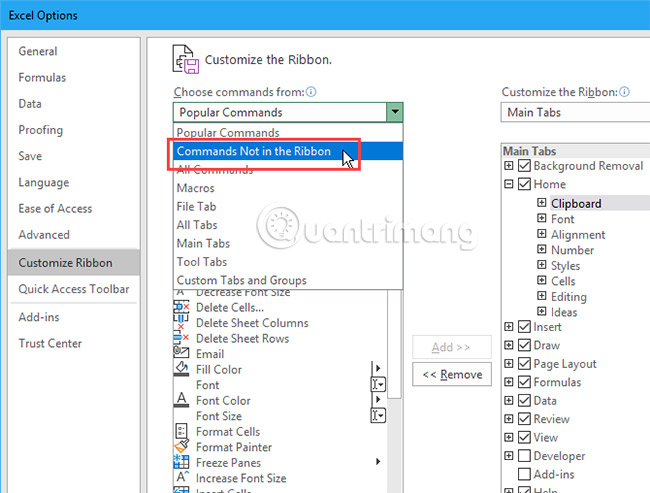
Make sure the Main Tabs is selected in the drop-down list Customize the Ribbon on the right.
To add commands to an existing tab, you must first create a new group on that tab. You can add commands to existing groups on Main Tabs. For example, we will add a command to the Home tab . So, select the Home tab in the list on the right and then click New Group below the list.
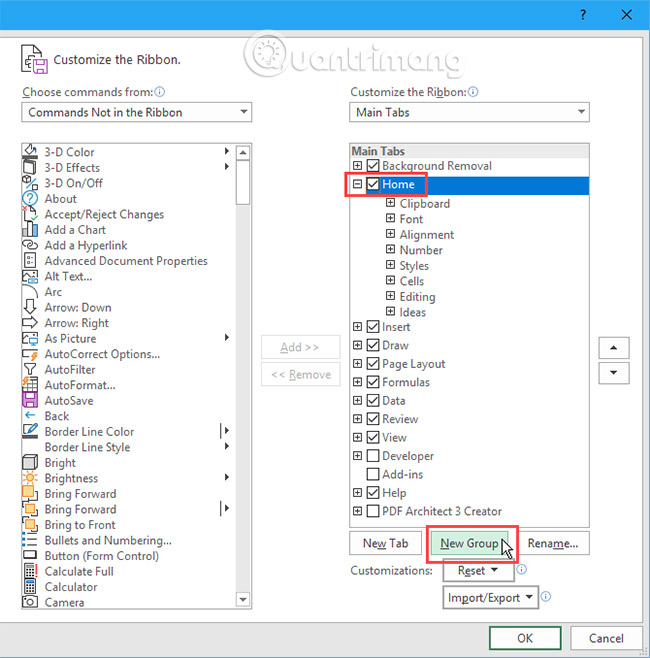
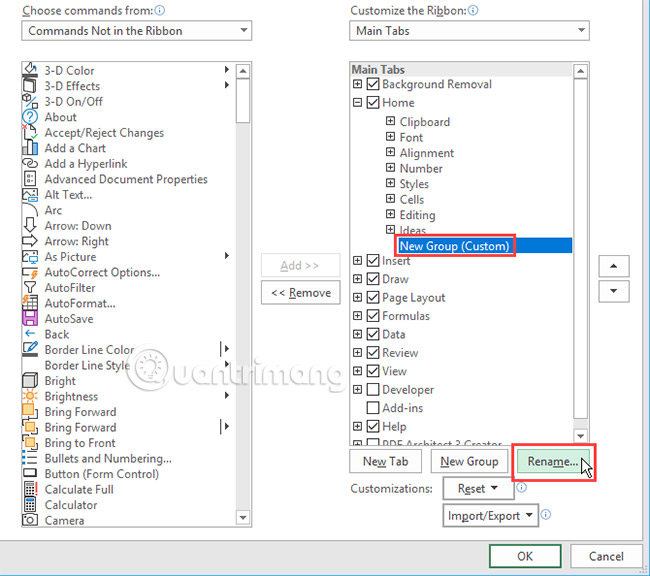
New groups are added at the end of the list of groups on the Home tab with the default name New Group. Custom words are added at the end of the names of new groups to help you keep track of custom groups created. But the Custom word is not displayed on the tab.
To rename the new group, select it and click Rename.
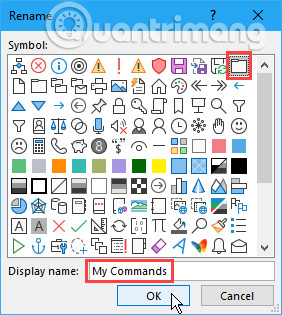
Enter a name for the new group in the Display name box on the Rename dialog box .
When the Excel window is too narrow to display the names of the groups on the ribbon, show only the icons. You can select the display icon for your new group from the Symbol box. Then, click OK.
Add a command to the new group
You can now add commands to the new group. Make sure the new group is selected on the right. Then, click the command you want to add to the list of commands on the left. Then, click Add.
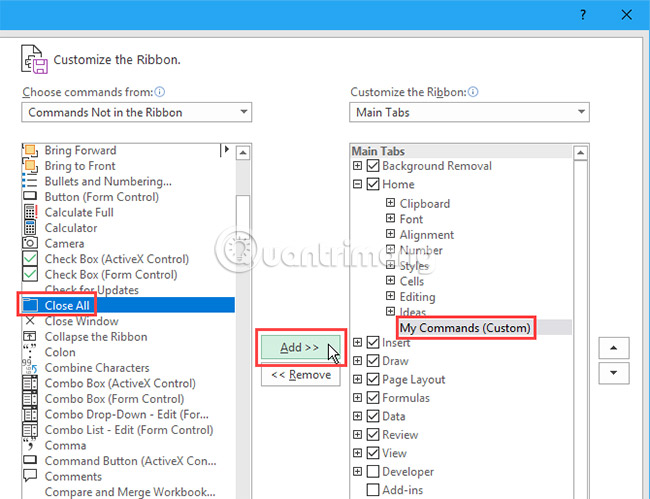
The command is added to the tab in the new group you created.
Click OK to close the Excel Options dialog box .
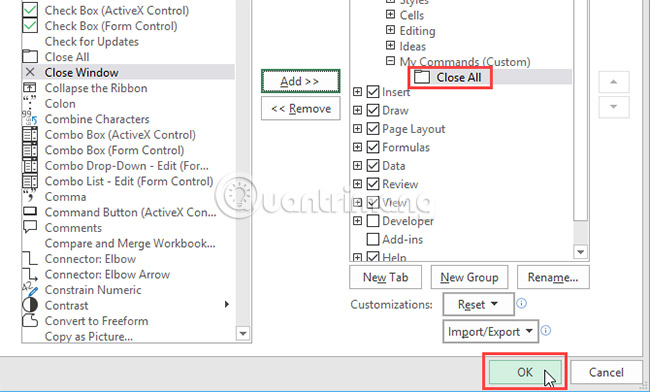
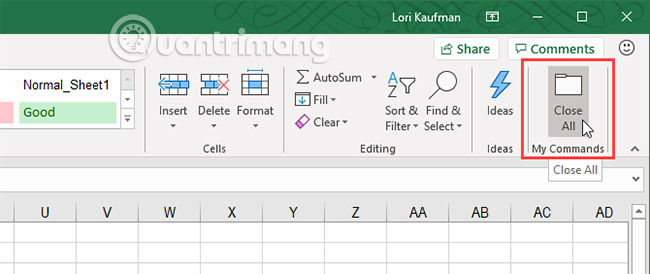
Because the new group is added at the end of the list of groups on the Home tab , it will display on the far right of the tab.
You can add new groups anywhere on a tab. But first, learn how to add a new custom tab to the ribbon.
Add your own custom tabs
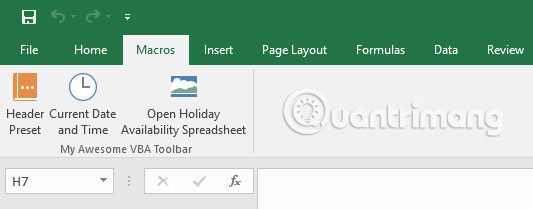
In addition to adding groups and commands to the built-in tabs, you can create your own custom tabs. For example, if you create some frequently used macros, you can create a custom tab for your macros to access them more easily.
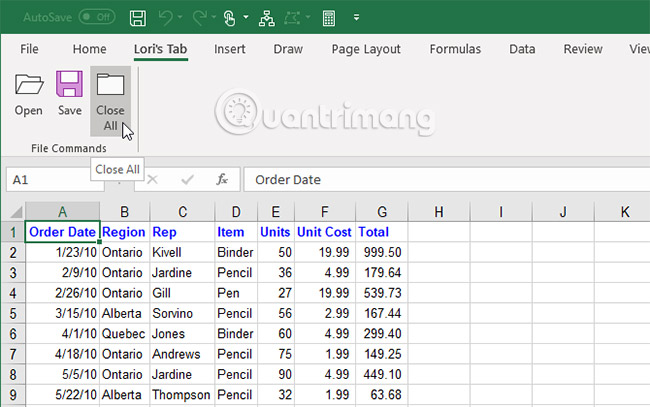
You can also use custom tabs to collect the commands you use frequently in a convenient place.
Rearrange tabs, groups and commands
You can arrange tabs and groups in any order you want. The commands already on the integrated tabs can be rearranged. But you can reorder any commands added to custom groups on the integrated or custom tab.
To move tabs, groups or commands, access the Customize the Ribbon section of the Excel Options dialog box .
In the list on the right, select the tab, group or command in a custom group you want to move. Then, click the up or down arrow to the right of the list to move it to a new location.
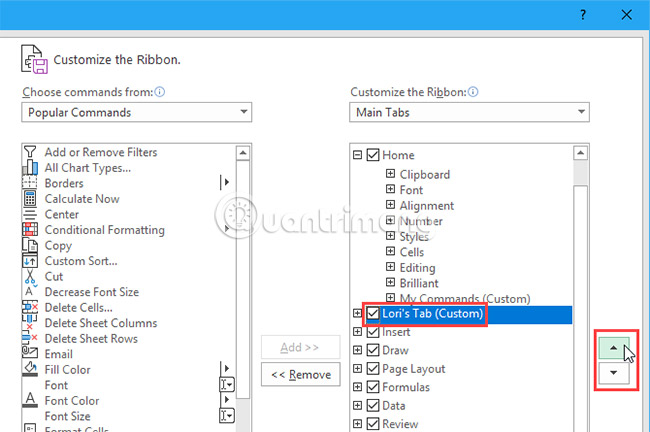
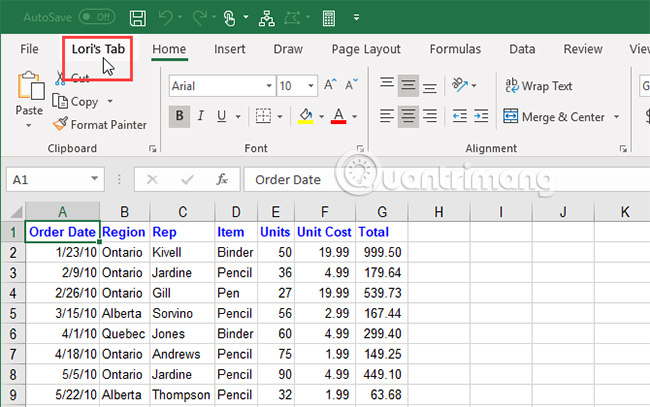
You can place custom tabs in the most convenient place for you on the ribbon.
Hide tabs on Excel Ribbon
If there are some unused tabs, you can hide them.
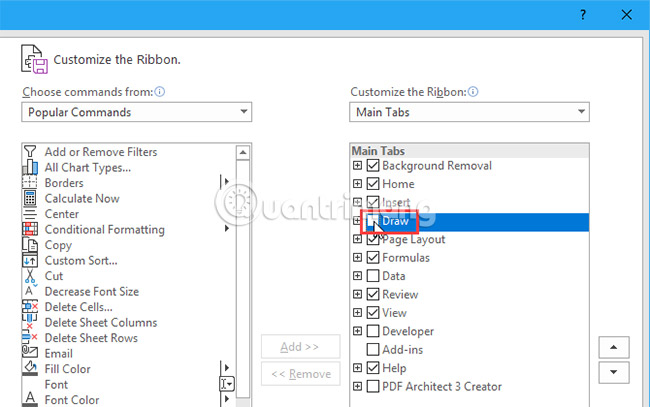
Right-click on the ribbon and select Customize the Ribbon .
On the right, uncheck the boxes for any tab you want to hide. Then, click OK.
Rename the items on the Ribbon
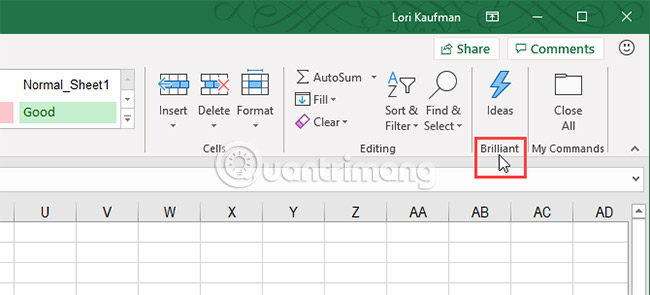
In addition to providing custom names for custom tabs and groups, you can also rename existing groups on integrated tabs. however, it is not possible to rename the existing commands on the ribbon.
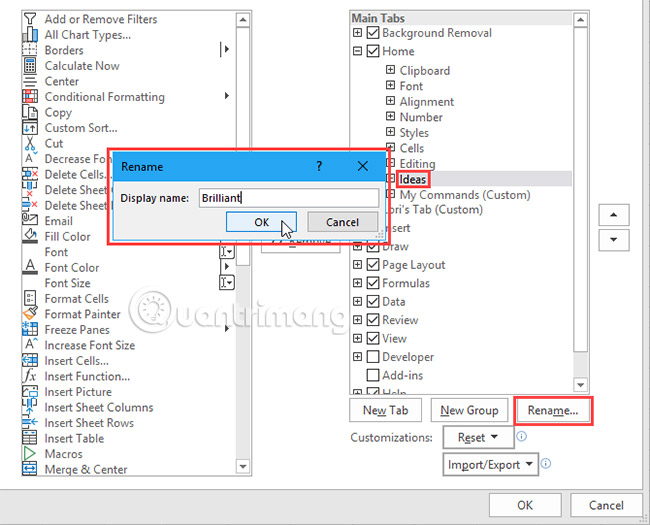
On the right side of the Customize the Ribbon screen on the Excel Options dialog box , select the group you want to rename and click the Rename option below the list.
On the Rename dialog box , enter the name you want and click OK. Now the group will display with the name you have chosen.
Use the icon instead of the text on the ribbon
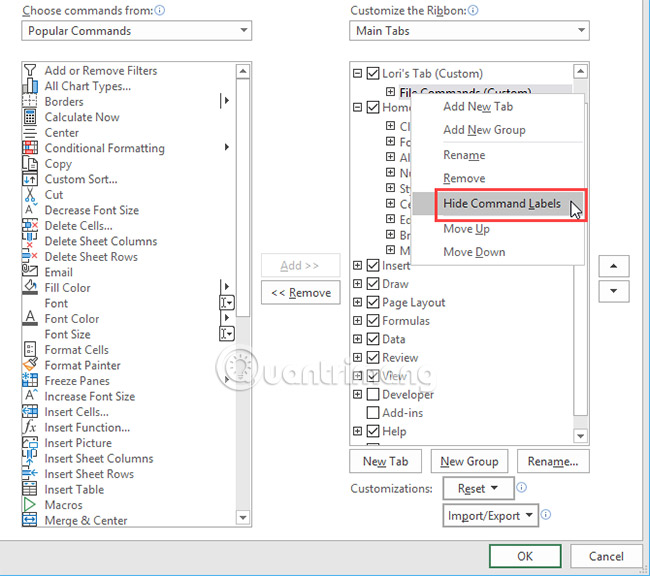
If using a laptop with a small screen, you can spend some space on the ribbon by deleting the text from the commands you add to the custom groups and only use the icons for them. You can remove text from integrated commands on the main tab. In addition, you must remove the text from all the icons in a custom group, not just some of them.
On the Customize the Ribbon screen in the Excel Options dialog box , right-click the group you want to change and select Hide Command Labels .
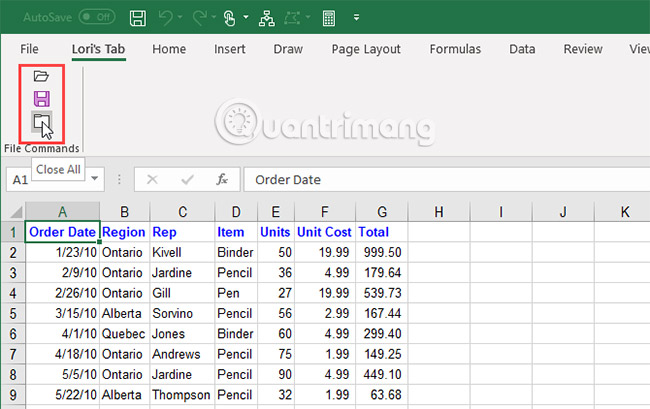
The commands in the custom group will now display without text.
4. Reset the customizations in Excel
If you have made many customizations for Ribbon Excel and want to return to the default settings, you can reset your preferences.
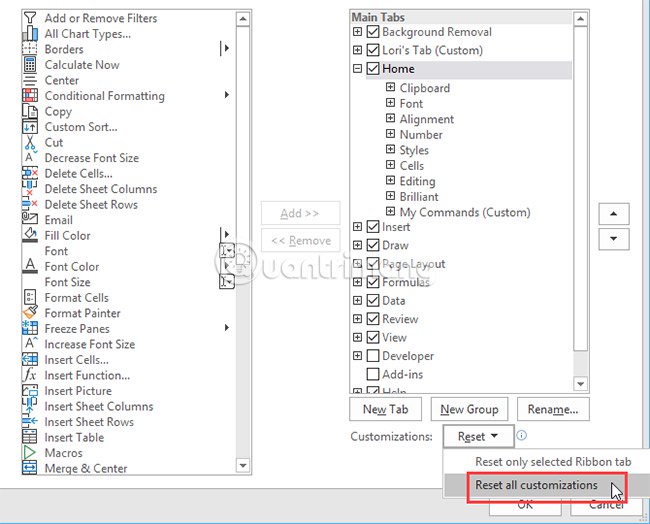
To reset a tab, select that tab in the list on the right on the Customize the Ribbon screen in the Excel Options dialog box . Then click Reset and select Reset only selected Ribbon tab .
To reset all tabs on the ribbon, press Reset and select Reset all customizations. Note that this option also resets the Quick Access Toolbar. Please select Yes on the confirmation dialog.

Customizing Excel ribbon saves time and is a tool to work more efficiently. But it is just one of the simpler ways to improve productivity in Excel.
Good luck!
See more:
- 8 convenient tools in Excel you may not know yet
- How to add the Developer tab to the Ribbon in Microsoft Word
- Backup and restore Office 2010 Ribbon toolbar