21 tips for Google Docs product suite
 If you don't know much about Google Docs, you should probably try this product. This is a set of products that works entirely within the browser window, although it is slightly slower than the products running on the local workstation, but the suite has a lot of useful tools and is provided free of charge.
Unlike software releases for workstations such as Microsoft Office, the Microsoft product suite often receives a comprehensive upgrade every few years, for Google Docs, changes to this product appear. continuously. Google add-ons appear continuously from Google Labs and from Google Apps Marketplace.
There are many mysteries that probably a lot of people do not know all about what lies beneath Google Docs. Perhaps because of that, in this article we want to introduce you to 21 little-known tips in presentation software, word processing, or spreadsheets .
Before you begin, you need to be aware that Google Docs products work best on Google's Chrome browser or Mozilla's Firefox. The performance of the products in this suite is somewhat limited in Microsoft's Internet Explorer browser.
1. Perform a search in Docs and Gmail together

Users can work with multiple currency types in the same worksheet by clicking the More Formats button on the toolbar. However there is one thing that you will definitely find more interesting than being able to perform a search action on both your Gmail and your Google documents at the same time. The answer here is entirely possible, Gmail Labs provides a way to do that. To get into Labs from Gmail, click Settings in the upper right part of the screen, then click on the Labs link.
Search for Apps Search section; here, click Enable , then click the Save Changes button at the top or bottom of the list. From this point forward, any search that performs a search request within Gmail will be performed on all your documents, the results included in the document will be exported. shown below the Gmail results.
2. Work with a variety of currencies in a spreadsheet
To set up a basic currency format for a worksheet, click File then Spreadsheet Settings . Change the Locale setting to the relevant country (for example, the US uses the dollar).
Regardless of the selected Locale setting, you can mark cells or a range of cells that will be formatted in a different currency. To do this, check the boxes and click the More Formats button on the toolbar (it is the button that says '123'). Then go to the More Currencies menu and select the currency type.
3. Create drawings inside the demo
While creating a presentation, you don't need to switch to a separate drawing component to create a sketch, but instead click Insert and then Drawing . These commands will open an interface for drawing in a floating window. When finished, click Save and Close to insert the drawing into the presentation, where you can resize and resize it.
4. Set the image to a fixed location

Images can be fixed to a certain location within documents and text that must be displayed around them. By default, the Google Docs word processor inserts images in the way they move with text; This arrangement is known as line positioning. To set a hard image to a certain page to make it permanent even if the text changes first select the image and then in the section under Fixed , the only way to move the image is to click and drag it. .
5. Quickly backup all Offline documents
If you prefer to save all documents on Google's server to your local hard drive on your computer, move your mouse over the file in the file list in Google Docs. Next, select Actions and select Download in the menu that appears.
In the dialog box that appears, click the All Items tab. You will see that each type will have many downloadable items; If you like an item, click the Download button. The files will be downloaded in a .zip file.
6. Collect spreadsheet data with forms
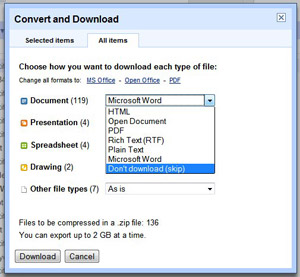
If you don't want the work you do in the cloud, you can backup Google Docs files to your local computer. Sometimes you also need to collect data from colleagues, customers or other individuals. Forms will allow you to quickly and easily achieve these essentials, which can provide simple interfaces that can be emailed to people or integrated on web pages.
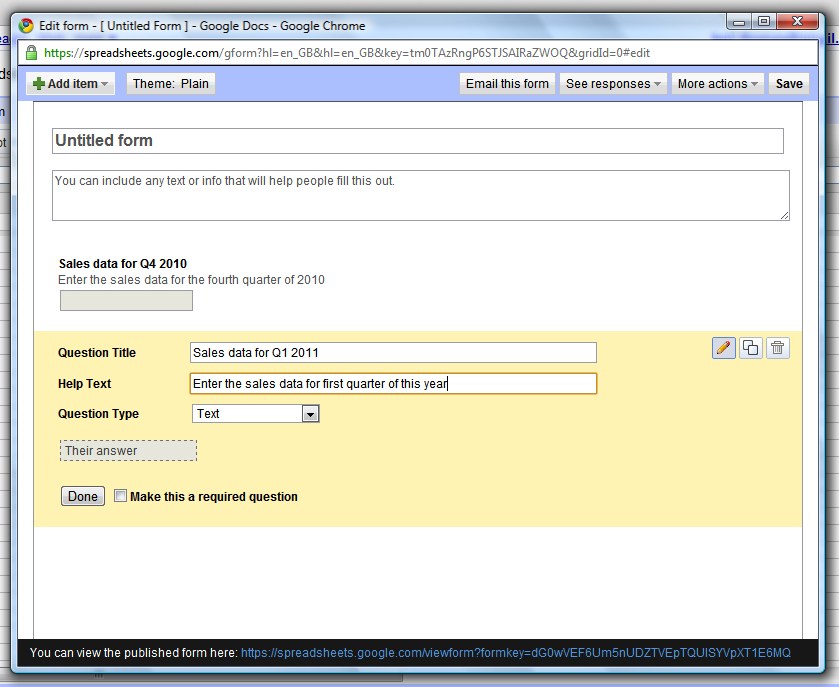
To start, open a new worksheet and select Form ; then select Create a Form . In the window that appears, type your question in the question title field. You can provide an explanation in the help field if you want, then this text will appear on the question on the form. In the Question Type field, select the type of answer you are looking for. If you require digital data, select Text .
To enter another question, hover over Sample Question 2 and click on the pen icon. Then repeat the steps described above. To add more questions, click the Add Item button at the top left of the window.
When completing the questions, email the form to its intended recipient by clicking the Email This Form button. Alternatively, open the More Actions list and select Embed to get the HTML code to insert into the website.
Any data people enter on the form will appear at the top of the spreadsheet. You can manage or delete forms using the Form menu inside the spreadsheet.
7. Insert links easily
It is possible to activate forms to collect public data that attendees do not show attendees their spreadsheet. The most common way to insert a hyperlink into text is to select Insert then Link or press Ctrl-K . Another option is to click and drag a shortcut from the bookmarks toolbar or even from the bookmarks menu to the To What URL field, where it will become a hyperlink. However, it should be noted that this method only works in Mozilla Firefox and Google Chrome. You can even drag links from the bookmarks toolbar and bookmarks menu to your document to create hyperlinks.
8. Maximum drafting space
Leaving the toolbar you will have a maximum window for editing, to do this, select View then Hide Controls . To return to the previous normal state, simply press Esc .
You can combine this setting with your browser's 'full-screen' mode to use the entire screen for editing. To switch to full screen mode in most browsers, press F11 on the keyboard. Hovering the mouse pointer over the top of the screen will make the menu appear again, clicking the Restore button will return the normal window.
9. Discover templates
Add-on Previews of Google Labs allows you to preview your documents within Gmail. Besides Google 's word processing and spreadsheet tools, there are hundreds of templates, including complex templates for tax - related tasks for other special purposes.
To see the templates, select Create New, then From Template on the Docs homepage.
10. Preview documents in Gmail
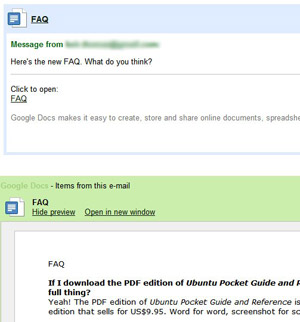
With live view (inside the Gmail window) a document you receive via email, activate Google Docs Previews in Mail add-on in Google Labs. To access Labs, select Settings , then Labs . When you find the add-on, select Enable and then click Save Settings.
11. Use colored lines to color the worksheet
You can automatically change the color of the spreadsheet cells based on their content. To do this, check the boxes you want to use colors and select Format then Change Colors with Rules .
From the drop-down list in the dialog box, select the desired standard. Then enter the filter criteria you want to use in the next text field. For example, to color-code all cells containing the name "Melvin", select Text Contains from the drop-down list and enter melvin in the text field.
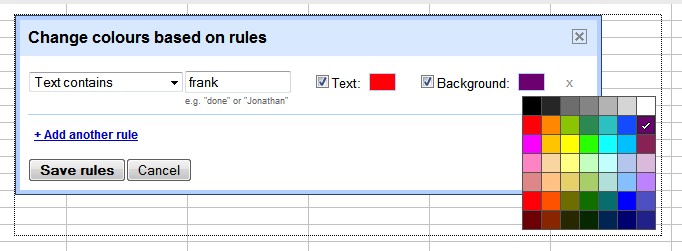
Google allows you to automatically color-code your worksheet cells based on their content. Then, in the Text and Background boxes, select the colors for the cell you want, then click Save Rules when you're done with your selection.
12. Click and drop the image into the Docs form from the desktop
To insert a picture into a text document, click and drop the image from a folder on your hard drive or on the desktop into the browser window. This method only applies to Google Chrome and Mozilla Firefox.
13. Fix printing errors in general
If you frequently misspell, you can use the Google Docs auto-correction feature when editing inside a word processor. Select Tools and then Preferences . In the dialog box that appears, enter the wrong text in the Replace field and enter the corrected text in the With field. For example, many people mistype the word 'the' into 'teh', so to avoid that you can enter 'teh' in the Replace field and 'the' in the With field.
14. Search effectively
You can define your searches in the home page using operators, such as, type: spreadsheet , which will return matching results from spreadsheets in the search results section. Search.
15. Use Bookmark to navigate long documents
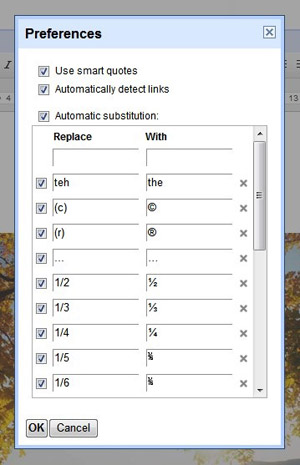
Google Docs can fix errors when you type. Inside the word processing documents, you can define bookmarks and then create links to jump straight to the bookmark. This method is very useful when you create pages that contain tables.
To insert a bookmark, select Insert then Bookmark . To create a link for a bookmark, highlight the word or phrase you want people to click to jump to the bookmark, then press Ctrl-K . Select the Bookmark button in the results dialog and select the bookmark you created earlier.
16. Share Docs with non-Google users
You can even share with people who don't have a Google account to view and edit their documents. To share a file, click the keystone icon next to the document title in the upper left corner of the window. In the dialog box that appears, select Change next to the Private item in the list. In the new dialog, select Public on the Web or Anyone with the Link . If you want the viewer to edit the document as well as view it, check Allow Anyone to Edit . Then click the Save button and copy and paste the link into one or more emails.
17. Mark multiple documents once
Adding a star to a document is a useful way of creating items in the homepage list. On the Docs home page, you can insert stars for multiple files by selecting them by the way: Hold down Ctrl or Shift when you select the file name. Then drop the file name into the upper part of the Starred section in the filter list on the top left of the interface.
18. Find the technical details of the video
Right-click the thumbnail preview of any video file on the home page and select Show Video Info, you can see the technical details of the file, such as its resolution.
19. Use a text editor to create a website
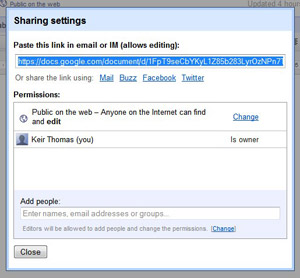
Even people who don't use Google Docs can share files with you. If you feel complicated with website design software or HTML, you can use Google's editor to create simple web pages. To insert a photo, simply click and drag them into the browser window, as mentioned above; Insert links by marking text or image files and pressing Ctrl-K .
When creating a website, click File , then Download As and HTML (Zipped) to download the data. The resulting directory will have an HTML file along with a directory of supporting files. Edit the name of the HTML file, index.html , then upload the file and the supporting file folder to your website.
20. Save drawings under a scalable form
If you create a drawing in Google Docs and want to download it for offline use, then select the SVG option from the File, Download As menu . After doing this you will create a file that can be enlarged or reduced without compromising quality, unlike JPEG and PNG files.
21. Use multiple accounts
A recently added feature to Gmail allows users with multiple Gmail accounts to switch between email addresses without logging in and out. To enable this feature, select My Account in the upper right corner of the Gmail page and click the Edit button next to Multiple Sign-On . Then click the On and Save button.
From now on, you can switch between your accounts by clicking on the down arrow next to the email address located at the top right of the screen. Click Sign in to Another Account to add a new account, but be aware that you can only have up to three accounts.
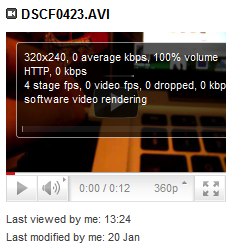
Right-clicking on a preview of a video file will show you detailed technical information about it, such as resolution. However, Google Docs does not work with multiple subscriptions. It only maintains your main account login, this is the form that you have enabled multiple subscriptions (this account will be from Default situated in the login list). If you click on a link to share documents within the email from other accounts, you will be prompted that you do not have access to the file.