Table of Contents
2 Simple Ways to View and Read MAC Addresses on Windows 10 is easier to understand when the core ideas are paired with practical examples. The sections below explain the topic clearly, highlight useful steps, and point out details that can prevent common errors.
1. Method 1
Step 1:
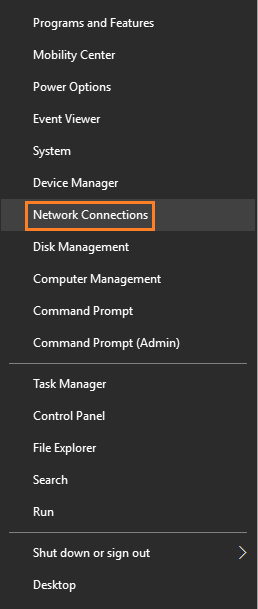
Right-click the Start button in the bottom left corner of the screen, or alternatively press the Windows + X key combination to open the Power User Menu.
Step 2:
On the Power User Menu, click Network Connections .
Step 3:
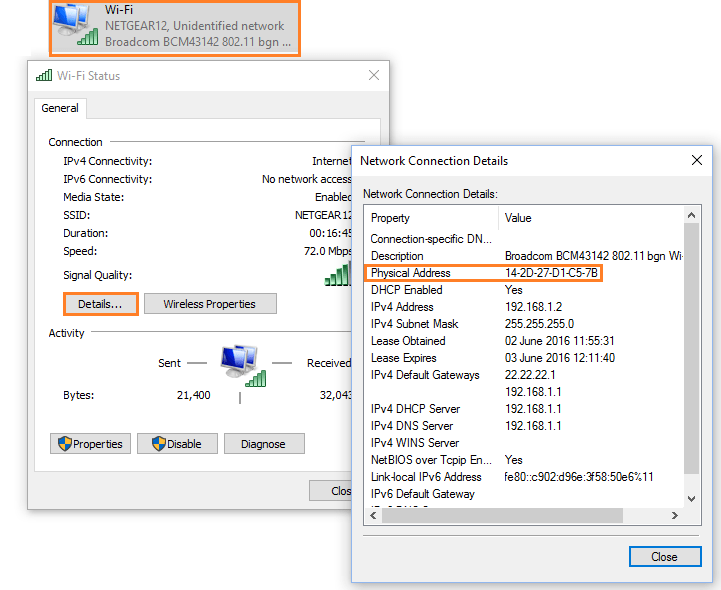
On the next window, double-click the Wifi Adapter or Ethernet Adapter icon, depending on the Internet connection you connect to.
Step 4:
Next click on Details.
Here you will see the MAC address on your Windows 10 computer in the Physical Address section.
2. Another way
Step 1:
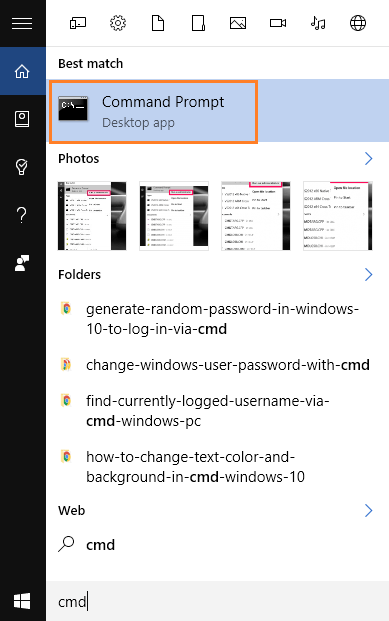
Enter cmd in the Search box on the Start Menu, on the search results list, click Command Prompt to open the Command Prompt window.
Step 2:
On the Command Prompt window, enter the command below and press Enter:
getmac / v / fo list
At this point you will be provided with information on the system. In the Physical Address section, you will see the MAC address on your Windows 10 computer.

Refer to some of the following articles:
- What is IP spoofing? And what is a denial of service (DoS) attack?
- Conflict of IP address error when connecting to Wifi on iPhone, iPad, this is a fix
- How to identify an unauthorized login IP address of your Facebook account
Good luck!
FAQ
What should you know about 1. Method 1 Step 1?
Right-click the Start button in the bottom left corner of the screen, or alternatively press the Windows + X key combination to open the Power User Menu.
What should you know about step 2?
On the Power User Menu, click Network Connections.
What should you know about step 3?
On the next window, double-click the Wifi Adapter or Ethernet Adapter icon, depending on the Internet connection you connect to.
Related Articles
 How to View the LAN and WAN IP Addresses of Computers on Windows 7, 8,105 minutes read
 View and Read MAC Addresses of Windows 7, 8, 10 and Mac OS X3 minutes read
 How to View RAM RAM on a PC3 minutes read
 How to Find Available IP Addresses2 minutes read
 How to Open and View .EML Files on Windows 7, 8 and 10?4 minutes read
 How Do Computers Read Documents to You?: Read Word Documents6 minutes read
Reader Comments 0
Sign in with email or Google to join the discussion.