Trick to customize the Quick Access Toolbar on Office 2013
The Ribbon in the Microsoft Office application allows users to manipulate with commands or options. However, there is another useful feature to help you shorten the operation, save time, that is to use the Quick Access Toolbar . You only need one click to add any command on the Quick Access Toolbar .
To customize the Quick Access Toolbar on Office 2013 such as Word , first click on the downward-facing arrow icon to the right of the Quick Access Toolbar. A drop-down menu appears on the screen, in this menu select More Command .
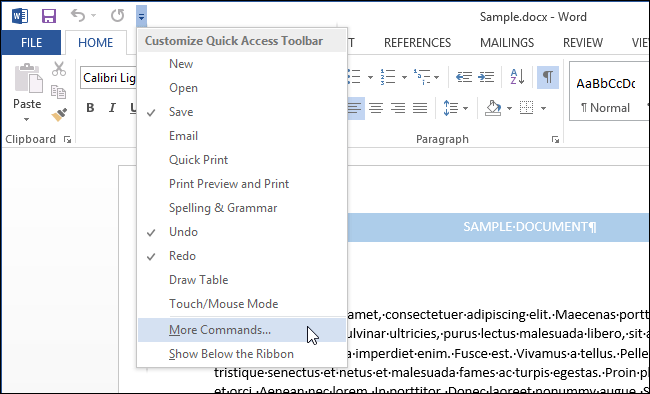
Note : You can also right-click any blank area on the Ribbon. A popup menu will appear on the screen. On that popup menu, select the option Customize Quick Access Toolbar .
By default, you can select the Popular Commands command shown in the list of commands in the drop-down list Choose commands from . Alternatively, you can scroll down and select the All commends or Command Not in the Ribbon option .
In the example shown is to add a command to open the AutoFormat dialog, so in Choose commands from , select Commands Not in the Ribbon.
Scroll down to find the command you want to add, after selecting the command, click Add.
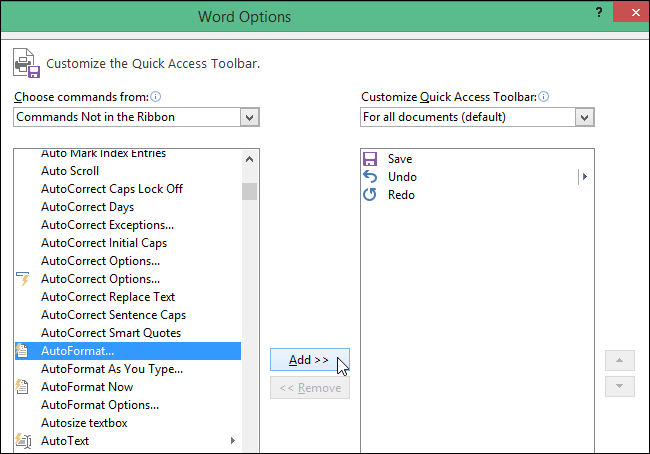
You can also rearrange the order of commands on the Quick Access Toolbar. To move the command, in the list of commands in the right pane, select Move Up or Move Down to move the command position to another folder.
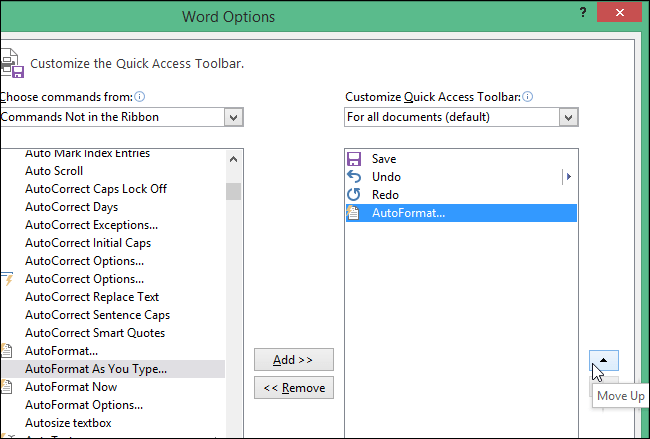
After adding the command and arranging the positions, click OK to save the changes and close the Word Options dialog box.
Now that the command is available on the Quick Access Toolbar, you only need one click to access it.
To customize the Qucik Access Toolbar on Excel, PowerPoint, Outlook, and Access, you follow the same steps.
You can refer to more:
-
10 features in Word 2013 make working faster and easier
-
Instructions for editing PDF files in Word 2013
-
Instructions for calculating total lines and columns in Word 2013
Good luck!
You should read it
- Backup and restore Office 2010 Ribbon toolbar
- Display the full file path in the Quick Access toolbar
- How to Add a Button to a Macro
- Create a quick access key in the Quick Access section in Excel
- New feature in Google Toolbar 5 for IE
- Start with PowerPoint 2016
- Quickly identify file locations in Word 2013
- How to remove unwanted Toolbar on Chrome, Firefox, IE and Edge browsers?
May be interested
- Instructions to disable ScreenTip in Word 2013screentips are notes, short instructions about functions or tasks of program icons. when you move the mouse to the icon, select a function in office, the screentip is defaulted in advanced display mode.
- Instructions for copying or moving Worksheet in Excel 2013the move or copy command allows you to easily move or copy the entire worksheet, including all data and formats in excel, in case you create a new sheet or a new book that wants to copy data from excel. old to.
- How to print hidden text in Word?hidden text is text that you can't see on the screen. so how to print the hidden text. in the article below, network administrator will show you how to print hidden text in word.
- How to split PDF file without Vietnamese errorin the previous article, we showed you how to convert pdf to word without vietnamese error. but this way is limited to the original pdf file size, only supports files below 1mb. usually pdf files are now quite large, with files up to hundreds of megabytes. so how to fix this problem? it is breaking up pdf files into different parts.
- How to change the default save file format in Word, Excel and Powerpoint 2016?if you are using word, excel or powerpoint 2016. suppose in the case of sharing documents and documents for people who are using older versions of word, excel or powerpoint, in this case you have to reset default file format.
- 4 steps to set PDF password onlinepreviously, tipsmake.com once instructed you to set pdf password with microsoft word office software. today, we will share with you how to set a password online quickly and simply without installing additional external software. please consult.