Table of Contents
Follow the instructions below to share photos with temporary icloud links on iPhone and iPad efficiently and safely. Each section focuses on the actions, settings, and troubleshooting details that matter most.
IOS 12 version allows you to share photos with temporary iCloud links from iPhone and iPad. It's convenient and faster than traditional methods. With this method you can share specific images for your friends, even those who don't use iOS devices.
This link will automatically be canceled after 30 days. However, you can also cancel them before they expire.
How to share photos with Expiring Link on iPhone
Before starting, you need to turn on iCloud Photos on your iOS device. Just go to Settings> Apple ID account> iCloud> Photos> then turn on the switch next to ICloud Photos.
Step 1. Open Photos app on iOS device.
Step 2. Now, select the image you want to share and click the Share button.
Step 3. Next, select Copy Link In the sharing panel.
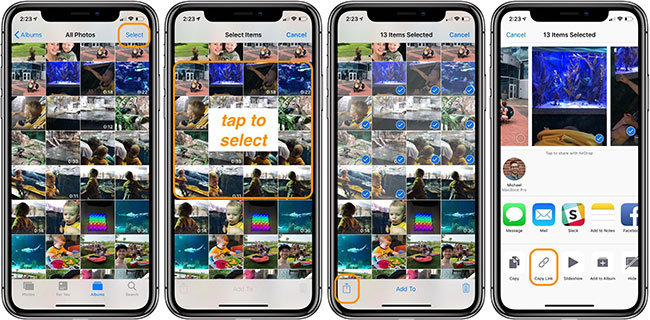
Step 4. Wait for the link to be created. Link creation time will depend on file size.
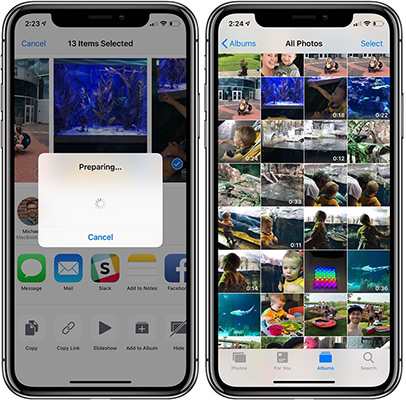
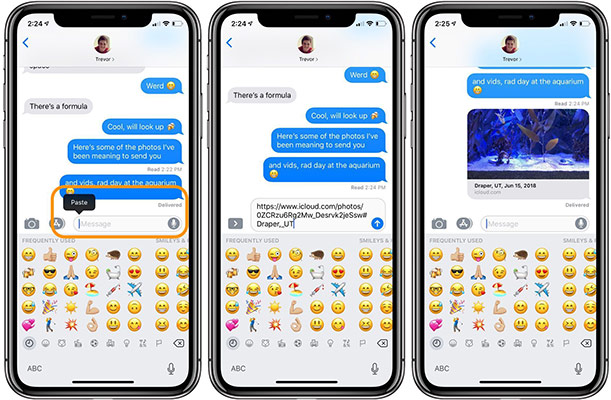
Step 5. When the link has been successfully copied to the clipboard, you can share the link using your preferred media. It is similar to sharing any link. For example, you can open the Messages application and paste the link into a text field. Then press send as usual.
How to receive shared photos
On Android devices or iOS devices not running iOS 12 and computers
When you click the link, you will be redirected to icloud. com. Here, all submitted images appears. You can select the Download option to download these images to the device. Besides, you can also select or deselect images before pressing the download button.
On iOS devices running iOS 12
When clicking on the link, will you get a popup "Open"? 'Sender name' Shared this . You will join as 'Your name'. You just need to click Open. The shared images will be available in the For You section of the Photos app. Select the 'Add All' option to add images to the library.
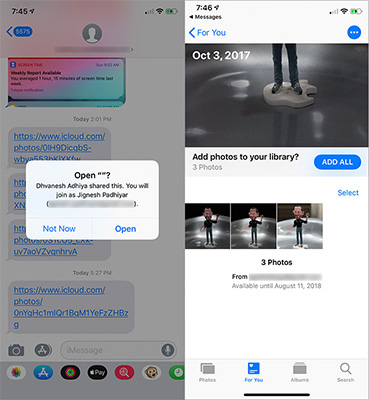
To add a photo to the library, tap on the image you like and then press the 'Add to the Librar' button.
How to copy shared photo links
When needed to share the same photo with other friends, you don't need to repeat the above steps. (within 30 days of creating the link).
Step 1. Open the Photos App on your iOS device> tab For You > Recently Shared.
Step 2. Click the photo group.
Step 3. Next, click the menu button at the top right and select Copy Link.
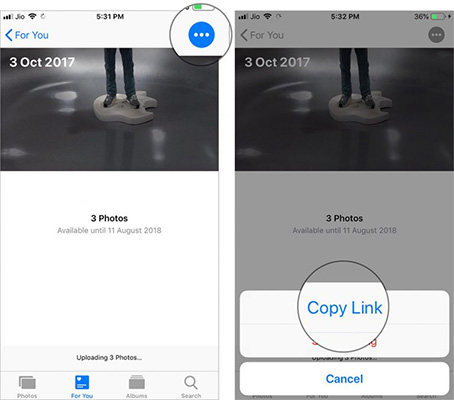
Finally share the link via favorite media.
How to prevent friends from seeing shared photos
You open the Photos App> tab For You > Recently Shared > select a group of photos. Touch the menu button at the top right and select Stop Sharing .
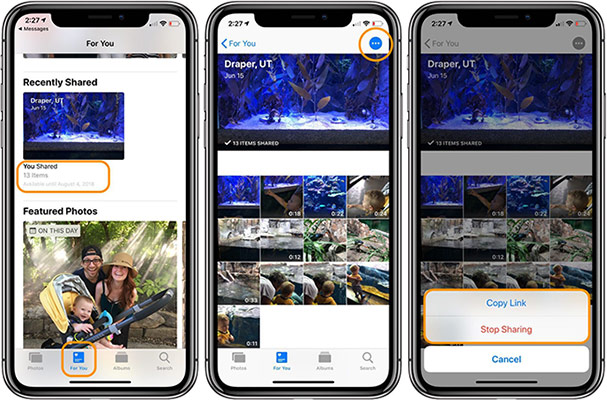
With iOS 12, sharing photos on iPhone is much more convenient, you can easily share photo collections of recent travel trips, photo of new technology events to attend, photo of school,. with friends without email or other cloud storage tools.
- Instructions to delete and revoke messages on Zalo
- Instructions to play Wi-Fi with iPhone / iPad
- Instructions on how to share and send GIF images via Zalo
- How to cover personal information of photos on the phone
FAQ
What should I prepare before I share photos with temporary icloud links on iPhone and iPad?
Review the requirements in the guide, confirm that your device or software is compatible, and save important work before changing settings related to share photos with temporary icloud links on iPhone and iPad.
Why might share photos with temporary icloud links on iPhone and iPad not work as expected?
The most common causes are incompatible versions, missing permissions, incorrect settings, or an interrupted internet connection. Recheck each step and restart the app or device when appropriate.
Can beginners follow these share photos with temporary icloud links on iPhone and iPad steps?
Yes. Follow the steps in order, avoid skipping confirmation screens, and compare your interface with the screenshots because labels may differ slightly between versions.
Related Articles
 How to Use iCloud Photos on iPhone, iPad, and Mac4 minutes read
 How to Share Icloud Folder on Iphone and Ipad3 minutes read
 How to Turn on Icloud Photo Sharing on Iphone, Ipad, Mac and Windows4 minutes read
 How to Create and Share iCloud Photo Album on iPhone or iPad3 minutes read
 6 Best Icloud Drive Alternatives for iPhone/iPad8 minutes read
 How to Share Photos on iPhone with Family Sharing4 minutes read
Reader Comments 0
Sign in with email or Google to join the discussion.