Setting up a VPN server on Router Tomato - Part 1
Setting up a virtual private network is a way that you don't have to buy expensive devices and still allow users to remotely access or connect offices together safely..
Network administration - Setting up a virtual private network is a way that you don't have to buy expensive devices and still allow users to remotely access or connect offices together safely. The advantages of virtual private networks also bring many benefits for small and medium sized businesses.
Microsoft provides you with VPN client and server functionality right inside the Windows operating system; However, this set of features is very limited, only Vista versions and later versions have a better level of security. There is another method, however, that we will cover is installing a software on the Wireless Router that is loaded with the server and the OpenVPN client for free. You probably already know how to do this via DD-WRT software, but in this article we will introduce you to another software, a variation of TomatoVPN.
Find compatible Router
We cannot use Tomato software on any wireless router. Make sure you have a router that is compatible with it. Firms with routers supporting this software include Linksys, Buffalo and Asus. You can check the compatibility of the model and the specific version here.
Once you have verified your router is compatible, download and install the software.
In this tutorial we rely on TomatoVPN's 1.27vpn3.6 release, using the server and OpenVPN client 2.1.1. Then on a computer (PC), will use OpenVPN 2.1.4 to create SSL certificates and create VPN client activity on computers.
Initial login
Start by connecting to the TomatoVPN Router and logging in to the web console. Open the browser and enter the Router's default 192.168.1.1 IP address. Then log in with the default username and password, both are "admin".
Before taking any action with the VPN features, be sure to configure the security basics: wireless settings (WPA or WPA2 security) and Router's password for the control panel. .
Change the Router Subnet and IP
Because VPN connections will link networks together, we must be careful with subnets and IPs so that there is no conflict. TomatoVPN's default IP address is 192.168.1.1 and this is sometimes the cause of the problem. Please use a different address, such as 192.168.50.1 to avoid conflict issues. If you have multiple offices, assign each office a different IP / subnet, such as 192.168.51.1 and 192.168.52.1.
To change TomatoVPN Router, connect and invoke the web console by entering the default IP address 192.168.1.1 into the web browser. Continue to click Basic> Network (see Figure 1). Change the Router IP Address, such as 192.168.50.1 and adjust the IP Address Range according to, for example, 192.168.50.100 - 192.168.50.149. Then click Save .
You must now use the new IP to log into the TomatoVPN console
Register and configure dynamic DNS service
If you connect to the Internet where you want to set up a VPN server using a dynamic IP address, then you need to use the dynamic DNS service. Otherwise you will have to find the Internet connection's IP yourself and update it on the clients when the address changes.
Register for a dynamic DNS service, such as from No-IP. Then on the TomatoVPN Router, click Basic> DDNS, enter the details for the service. Your router will now automatically update the hostname to point to your current IP address. You just need to enter the hostname on the client VPN configuration instead of the IP address.

Figure 1: Tomato VPN Router
Create server and client certificates
Since OpenVPN uses SSL, you must create and install SSL certificates on the server and client. Choose a secure computer to create and manage PKI, then download and install OpenVPN with Windows Installer. Note that you need to return to this computer to create additional client certificates in the future.
When installing OpenVPN, you can start the work below:
1. Open Command Prompt: Click Start , type cmd and press Enter .
2. Switch to the folder easy-rsa : cd C: Program FilesOpenVPNeasy-rsa.
3. Run the batch file to create the configuration files: init-config (see Figure 2
4. To open the Command Prompt window for later use.
Next, go to the directory below in Windows: C: Program FilesOpenVPNeasy-rsa. Then right-click the vars.bat file and click Edit . You must change the default values of all the settings below:
• KEY_COUNTRY
• KEY_PROVINCE
• KEY_CITY
• KEY_ORG
• KEY_EMAIL
If you open the file with Notepad without any lines returned, everything is OK now. You only need to edit the set values between the equals sign and the word 'set'. For greater clarity, we can download and use editors like VIM.
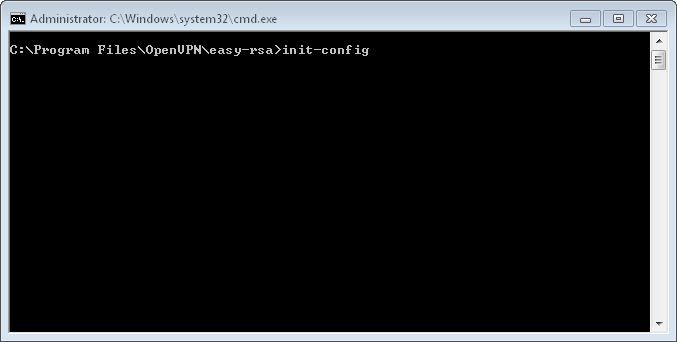
Figure 2: Configuration file for Tomato VPN Router
Now go back to the Command Prompt window and initialize the PKI by entering the following commands:
Vars
clean-all
build-ca
When you see the prompt to enter the parameters (see Figure 3), set only in vars.bat file , press Enter to accept them. It is possible to leave the Organizational Unit Name blank. However, we need to enter the Common Name section . This will be the name of the CA certificate that will be installed on the server and all clients. Choose a name, such as " ABC_Corp-VPN-CA".
You can now create a certificate and security key for the server with the command:
build-key-server server
We will see a prompt to enter the parameters again. Accept the default values for things required in vars.bat. With Common Name, enter a name like "ABC_Corp-VPN-Server". Be sure to enter a secure password and you can remember or save it in a secure location. When prompted to sign and store the certificate, confirm the details and then press 'y'.
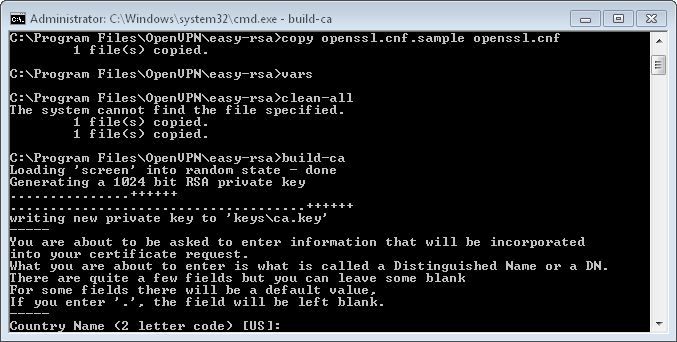
Figure 3: Tomato VPN Router parameters
Next, you can create client certificates for computers and the Router will remotely connect to your VPN server. You must also create a separate certificate for each client. Enter " build-key " into the Command Prompt, then a space and the name of the certificate. For example, with three clients:
build-key client1
build-key client2
build-key client3
You may want to have more details for the name, so specify who or the Router will use it.
Reminder to enter parameters may appear again. Select a unique Common Name for each parameter. Can optionally create a password.
Note: If you have to create additional client certificates in the future, return to the easy-rsa directory in the Command Prompt, type "vars", then use the build-key command, such as build-key client2 .
Now you must create Diffie Hellman parameters by typing:
build-dh
Finally, you will see your certificates in the directory below:
C: Program FilesOpenVPNeasy-rsakeys
Note: CA, server and all client keys should be kept private and secure.