Set up wireless network
After regularly using a wireless connection on a Windows 7 system, you will have a list of saved wireless networks connected.
After regularly using a wireless connection on a Windows 7 system, you will have a list of saved wireless networks connected.
For faster access in case you frequently use one or two certain wireless networks, the following settings will help you.
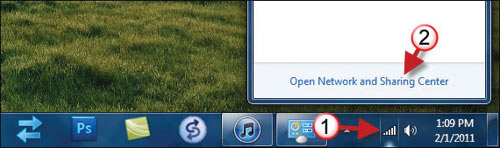
To do so, click on the wireless network icon in the Taskbar (1). If you do not see this icon in the Taskbar, go to Control Panel > Network and Internet > Network and Sharing Center (2).
In the Network and Sharing Center window, click on the Manage wireless networks (3) link in the left column.

You should now see the Manage Wireless Networks window, which allows you to manage the wireless networks listed in the list.
To set up a wireless network as a regular network, click on the network name (4) you want to use. Next press Move up (5) button until the selected wireless network tops the list.

This will enable Windows to connect to this network immediately before switching to connecting to other networks on the list. If the list of wireless networks is too many and there are many networks you no longer use, you can leave it by clicking the network name, and then clicking the Remove (A) button to remove it from the list.
- Instructions to fix Wi-Fi connection error on iOS 6
- Security when working with Wi-Fi Hotspot
- How to fix a wireless network - Part 1
- Set up an Open-Mesh wireless network for Linux
- 9 mistakes often get caught up in wireless networks
- 4 steps to set up your home wireless network
- The process of setting up a wireless network
- Guide to building an Ultimate Wireless Network
- Upgrade Wi-Fi security from WEP to WPA2
- Network security guide before vulnerability 196


-
 What are wireless headphones? Differentiating between Wireless and True Wireless headphones.
-
How to fix a malfunctioning Wireless Router or Wi-Fi transmitter.
-
How to Install/Uninstall Wireless Display on Windows 11
-
Advantages and disadvantages of wireless charging
-
9 Essential Tech Gadgets for Working from Home
-
What is a silent wireless mouse? Top best silent mice
 What are wireless headphones? Differentiating between Wireless and True Wireless headphones.
 How to fix a malfunctioning Wireless Router or Wi-Fi transmitter.
 How to Install/Uninstall Wireless Display on Windows 11
 Advantages and disadvantages of wireless charging
 9 Essential Tech Gadgets for Working from Home
 What is a silent wireless mouse? Top best silent mice