Set up a VPN server on Router Tomato - Part 2
In this section, we will learn how to configure the VPN server and client, then test the whole process.
Network Administration - In the previous part of this series, we upgraded the wireless router with TomatoVPN software and started preparing to use its VPN server. This is a very economical and secure way for remote users to access your network or connect multiple offices together. In this section, we will learn how to configure the VPN server and client, then test the whole process.
Configure the VPN server
Now you have everything you need to configure the VPN server on TomatoVPN Router. Connect to the router and open the web console. Then click VPN Tunneling> Server (see Figure 1). Here are the example settings:
• Start with WAN: Checked
• Interface Type: TAP
• Protocol: UDP
• Port: 1194
• Firewall: Automatic
• Authorization Mode: TLS
• Extra HMAC authorization: Disabled

Figure 1: Configuring the VPN server
With Client Address Pool, uncheck this item and ensure that the IP address range is in the same subnet as the Router. For example, if you change the Router's IP address to 192.168.50.1, then set your IP address range to 192.168.50 to 192.168.50.55. Then your system can support 6 VPN clients at the same time. You can completely increase this range if there are more clients than this number. Here should not be confused with the predefined range for local users, for example 192.168.50.100 to 192.168.50.149.
Click Save to save the changes.
Next, click the Advanced tab. For the Compression section, select Disabled . If you want all the Internet traffic of clients to go through VPN, such as to protect traffic on public networks, check Direct clients to redirect Internet traffic. To allow VPN clients to access each other's resources, check Manage Client-Specific Options and Allow ClientClient. Otherwise, VPN clients will be able to access the shared resources of computers directly connected to the TomatoVPN Router's internal network server configuration. After doing this, click Save to save the changes.

Figure 2: Advanced tab
Now click the Keys tab (see Figure 3) and fill in the fields by copying the contents of the files you created in the easy-rsakeys folder:
• Certificate Authority - ca.crt
• Server Certificate - server.crt
• Server Key - server.key
• Diffie Hellman parameters - dh1024.pem
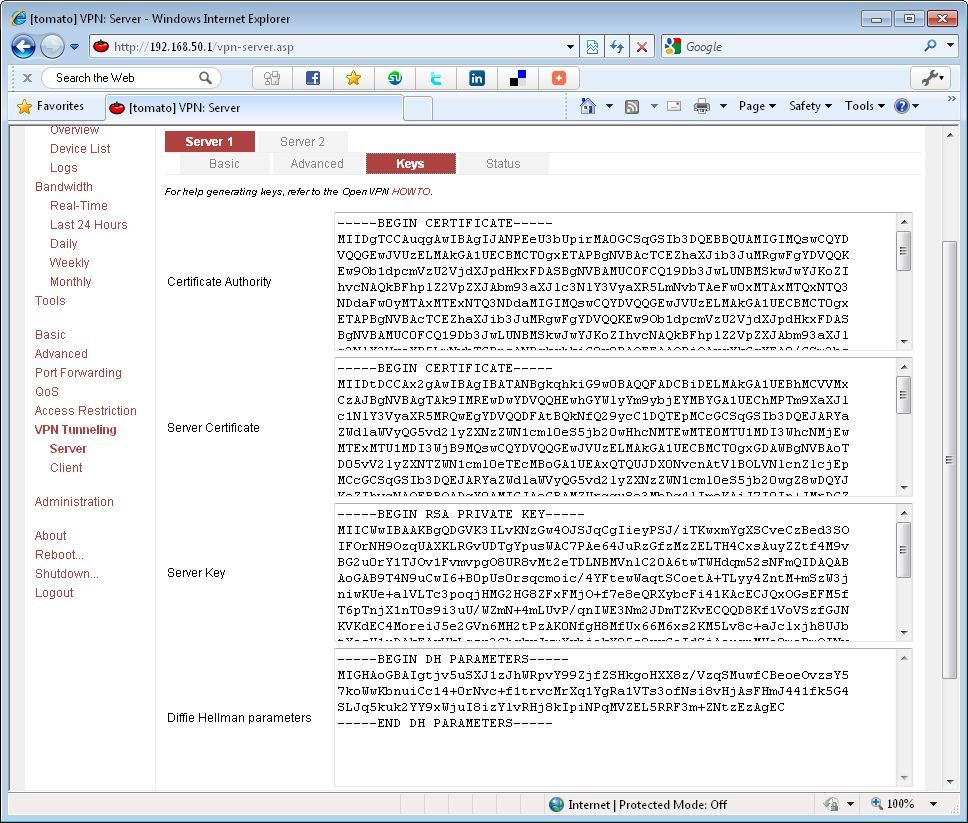
Figure 3: Tab Keys
Open these files in Notepad to view and copy content. Some files you can right-click, select Open With, Notepad.
For server certificates, do not integrate the first part of the file. Similar to other files, start with ----- BEGIN CERTIFICATE ----- and end ----- END CERTIFICATE -----.
Once done, click Save .
Launch the VPN server
Now you're ready to run the VPN server. On any server tab, click the Start Now button . If successful, this button will change to Stop Now and you will see the General Statistics section on the Status tab.
Configure the client on computers
At this point you can configure the clients you want to connect to the VPN server. Start by downloading and installing OpenVPN on each computer. Next, open Notepad and paste it into the code below:
remote XXX.XXX.XXX.XXX 1194
client
dev tun0
proto udp
resolv-retry infinite
nobind
persist-key
persist-tun
float
ca.crt
client1.crt cert
client1.key key
ns-cert-type server
Replace the remote address at the beginning with your Internet or WAN IP address. Alternatively, you can use a hostname, for example, from a dynamic DNS service, if your Internet connection doesn't have a static IP. Also make sure that the client certificate's filename and key are correct.
Save the Notepad file with the extension .ovpn to the following address: C: Program FilesOpenVPNconfig.
Copy the CA certificate (ca.crt) and certificate and client key (client1.crt & client1.key) from the computer you created the PKI above to the same location (C: Program FilesOpenVPNconfig) on the client.
The client settings are set up so you can connect now. Click Start> All Programs> OpenVPN> OpenVPN GUI. Then right-click the icon in the system tray and click Connect.
Configure the client on additional TomatoVPN routers
If you want to connect to the VPN server as a whole, you can set up additional TomatoVPN routers at other locations. You can use the VPN client on the Router so that all users on the remote network can access it.
Connect to the router and open the web console. Then click VPN Tunneling> Client. On the Basic tab (see Figure 4), make sure you want to enable Start with WAN so that the VPN client can automatically start when the Router starts. Enter the WAN address or the TomatoVPN Internet IP address hosting the VPN server for the Server Address section. Another way you can use it is to use hostname, in case of using dynamic DNS service when there is no static IP address. Other settings can be defaulted. Then click Save to save the changes.
Click Advanced , for the Compression section, select Disabled . Then click Save .
Next, click the Keys tab and fill in the fields by copying the contents of the files you created in the easy-rsakeys folder :
• Certificate Authority - ca.crt
• Client Certificate - ie client1.crt
• Client Key - ie client1.key
For the client certificate section, do not insert the first part of the file. Similar to other components, start with ----- BEGIN CERTIFICATE - and end with ----- END CERTIFICATE -----.
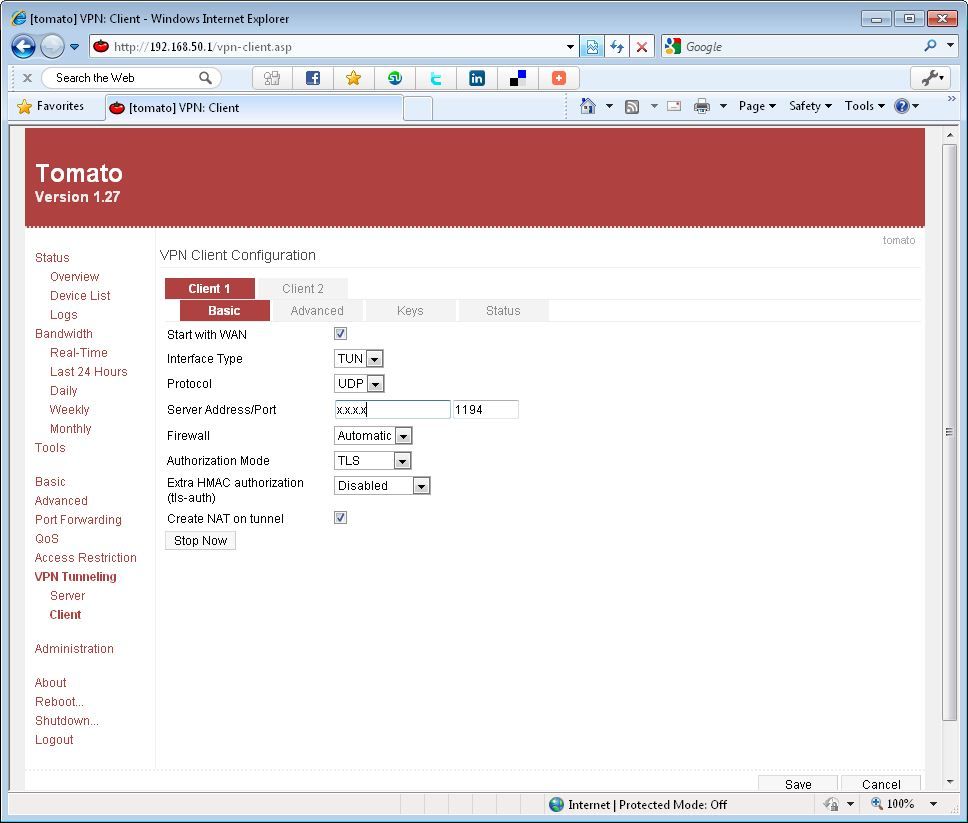
Figure 4: Basic tab
Once done, click Save. Next to connect, click Start Now. If successful, this button will change to Stop Now and you will see general statistics on the Status tab.
Last check
Once connected, you can access network resources as well as shares on the local network of the TomatoVPN Router hosting the server.
If you want to test your installation without leaving your location, connect to the TomatoVPN Router hosting the WAN / Internet VPN server to an Ethernet port on another Router. To test connecting a client on a computer, connect to another router and configure the VPN client with Router TomatoVPN's WAN IP address. This will simulate a connection from the Internet. Once done, want to use it via the Internet, get Router TomatoVPN and connect it directly to the Internet modem.
Was this article helpful?
Your feedback helps us improve.
Related Articles
 Setting up a VPN server on Router Tomato - Part 18 minutes read
 5 tips to help make optimal use of Tomato on the Router15 minutes read
 How to change DNS server on the most popular routers15 minutes read
 Increase network performance by installing Tomato on the Router6 minutes read
 Upgrade the router using Tomato firmware9 minutes read
 DD-WRT, Tomato and OpenWrt - Where is the best firmware router?6 minutes read
Reader Comments 0
Sign in with email or Google to join the discussion.