Set up remote access with dynamic IP address
 Network administration - Some users have problems with remote connections just because their computers use dynamic IP addresses. However, there are many ways to overcome this problem and we want to show you one of those ways.
Note : This is only a solution to the dynamic IP problem, so the tutorial does not focus on introducing your computer to a remote desktop. In addition, you need to configure the firewall to allow the inbound connection to be saved and also configure the router to the connection forwarding port.
To solve the problem with a computer with dynamic IP, we need to have a DNS address that can update IP addresses regularly. This is a static DNS, but the IP address it is pointing to changes constantly. By pointing your remote device to this static DNS, you will be able to connect to your computer using dynamic IP.
Here's how:
1. Go to DynDNS and enter the hostname. In this case, we used the hostname named ' damien '. Next, click the ' Your current location's IP address is . ' link to enter the current IP address. When you're done, click 'Add to cart'.

2. The above will prompt you to create an account. It will then send you an activation email. Click the link in that email to activate the service.
3. Log in to your DynDNS account and click the ' Dynamic DNS Host ' link in the sidebar. Click ' Checkout to Activate '.

4. You need to install the DNS upgrade client in your computer. This upgrade client will continuously declare the DNS server of the IP address, so it can change the following IP address. With Windows and Mac, you can install DynDNS Updater. This client software is available for both Windows and Mac. With Linux, you can try ddclient. (Note: some routers support dynamic DNS. You can check your router configuration before installing the software.)
In this case, we focus on Linux because this setting is more complex.
5. Download ddclient. Extract the tar file to the Home home directory. Open the ddclient folder and then leave the folder open and not do anything.
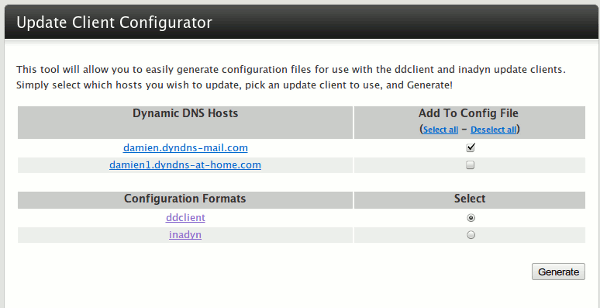
6. Go to DynDNS Update Client Configurator, select the hostname you want to use and ddclient, then click 'Generate'.

7. Copy and paste the code below into the text editor. You will notice that the middle part has the password = ## YOUR PASSWORD ## line. Replace ## YOUR PASSWORD ## with the DNS login password. Save the file as ' ddclient.conf ' (without quotes) in the ddclient directory.
8. Next, open a terminal and type:
cd ddclient
sudo cp ddclient / usr / sbin /
sudo mkdir / etc / ddclient
sudo cp ddclient.conf / etc / ddclient / ddclient.conf
9. Finally, launch ddclient with the command line
ddclient
So far you can configure your computer to work as a remote desktop. All you need to do is point your connected device to your DynDNS.
You should read it
- ★ 5 best remote desktop applications for Linux to access remote computers
- ★ The difference between Remote Desktop (RDP) and VPN
- ★ Access Windows Remote Desktop via Internet
- ★ How to Hear Audio from the Remote PC when Using Remote Desktop
- ★ Use Remote Desktop to access remote computers via the Internet