Table of Contents
USB WriteProtector is an old portable utility that makes removable USB disks read-only on the Windows computer where the setting is enabled. It does not permanently lock the drive, does not stop files being copied from the USB, and does not protect the device when it is connected to another computer. On current Windows editions, the built-in Removable Storage policy is a clearer option.

What USB write protection does
When write access is denied, users can normally open and copy existing files from a USB drive, but cannot create, edit, delete, rename, or format content on that removable disk. This can reduce accidental changes and unauthorized copying to USB storage.
Write protection is not antivirus protection. A readable infected file can still be opened, and malware already running on the PC may use other paths. Keep Windows and security software updated, scan removable media, and use backups.
Use the built-in Windows policy when available
Windows Pro, Enterprise, and Education include a Group Policy setting for removable disks.
- Press Win+R, enter
gpedit.msc, and press Enter. - Open Computer Configuration > Administrative Templates > System > Removable Storage Access.
- Double-click Removable Disks: Deny write access.
- Select Enabled, choose Apply, then OK.
- Disconnect and reconnect the USB drive, or restart Windows if the policy does not apply immediately.
To restore writing, return the policy to Not Configured or Disabled. The setting applies to removable disks connected to this PC, not to one particular flash drive. Microsoft documents the policy under Removable Storage Access.
Use USB WriteProtector only if you trust the copy
The screenshots below describe USB WriteProtector 1.2, a legacy third-party interface. Its original publisher and current support are difficult to verify. Do not download it from an unfamiliar mirror; use the Windows policy above when possible.
1. Extract the utility
Extract the full archive to a normal folder. Do not run the executable from inside the ZIP file.
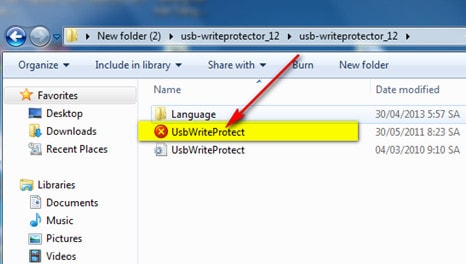
2. Run with administrator rights
Right-click USBWriteProtector and choose Run as administrator. Administrative permission is needed because the utility changes a system-wide Windows setting.
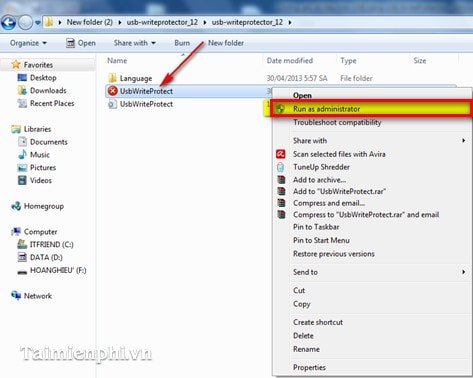
If Windows SmartScreen or security software blocks the file, do not bypass the warning unless you can independently verify the source and file integrity.
3. Enable write protection
The initial screen may show USB write protection OFF, which allows normal writing. Select USB write protection ON and apply the change.
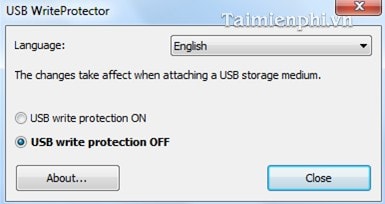
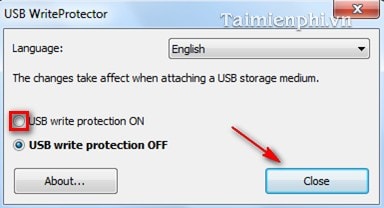
Disconnect and reconnect the removable drive. Then test safely by creating a small empty text file. Windows should report that the disk is write-protected.
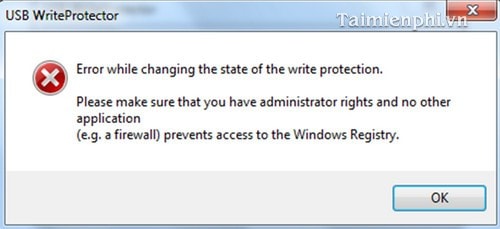
Important limitations
- The setting normally applies to removable USB disks on the current PC, not just the drive that was plugged in during setup.
- It does not travel with the USB drive; another computer can still write to that drive.
- It blocks writing to the USB, not reading or copying files from it.
- Some devices may be classified differently and not follow the same policy.
- Backup, formatting, and disk-checking tools may fail while write access is denied.
Test before relying on the restriction
- Connect a noncritical USB drive.
- Confirm that existing files can be opened.
- Try creating, renaming, deleting, and editing a test file.
- Try the same drive in another computer to understand the local-only scope.
- Disable the policy and verify that normal writing returns.
If the USB remains write-protected
First check for a physical lock switch. Then confirm that Group Policy or the old utility has been disabled and reconnect the drive. If Windows still reports read-only status, follow TipsMake's guide to fixing USB write-protection errors. Be cautious with DiskPart: selecting the wrong disk or using destructive commands can erase data.
Related USB controls
TipsMake also explains how to enable USB write protection through the Windows registry and how administrators can control removable storage with Group Policy. If a protected drive needs reformatting, back up accessible files first and review the write-protected USB formatting guide.
Related Articles
 Why Do Merged Drives Lose Data? How to Fix It?6 minutes read
 How to Prevent Virus Infection on USB Effectively4 minutes read
 minutes read
 8 Mistakes When Writing a CV That Put You at Risk of Long-term5 minutes read
 6 Clever and Unique Ways to Reuse Old USB Drives: Explained7 minutes read
 Backup Data: Directly on the System or Apply the Cloud Model4 minutes read
Reader Comments 0
Sign in with email or Google to join the discussion.