How to format a write-protected USB drive (Write Protected)
If you are trying to copy data to USB but encounter a Write Protected error, a write-protected USB format error but don't know how to fix it or where to start, please refer to the instructions on how to format a write-protected USB, error. Format the Write Protected drive below..
Unlike regular USB drives, write-protected USB drives do not allow users to format or reformat, and there is no option to enable or disable the write-protection feature. Readers, please continue reading TipsMake's article below to learn how to properly format a USB drive and how to format a write-protected USB drive (Write Protected).
I. Is the USB drive write-protected or defective?
Before going into the steps of formatting a USB drive, we need to find out if the USB drive is write-protected, defective, or damaged. Possible:
- The USB port on the computer is faulty or damaged. Try plugging it into another USB port to see if the error persists.
- The USB drive is defective or damaged. Try using and connecting another USB drive to see if the error occurs.
II. How to format a write-protected USB drive (Write Protected)
Before you begin, plug your USB drive into a USB port on your computer.
Windows has a built-in hard drive partition management tool called Diskpart. To open Diskpart, press Windows + R to open the Run window, then enter cmd there and press Enter to open Command Prompt.
The User Access Control (UAC) window will appear on the screen asking you to confirm. Click Yes to continue.
The Command Prompt window will now appear on the screen. Enter the command below:
1. diskpart
A new command line window will appear on the screen with the DISKPART command prompt. Enter the command below to see which hard drive is connected to your computer:
2. list disk
The above command will list all available devices. Where Disk 0 is the system drive on the computer. This is the Windows installation drive. If there are multiple partitions, these partitions will be numbered consecutively in order. Note the size shown for each drive.
The USB drive connected to your computer is Disk 1, or possibly Disk 2, . . This USB drive has quite small size and capacity.
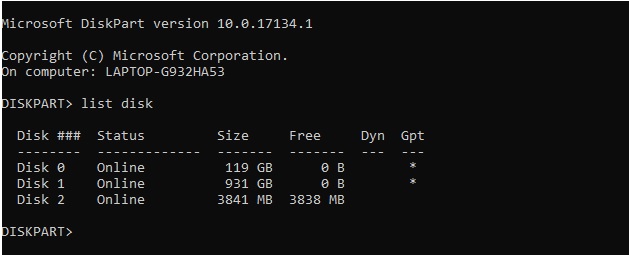
As you can see in the image above, Disk 0 has a size of 119GB and Disk 1 is 931GB (2 partitions of the same hard drive), Disk 2 is 16GB. So Disk 2 is the USB drive.
However, sometimes the USB drive capacity can be up to 1TB. So make sure you have selected the correct USB drive to format, format and perform the next steps.
Next step, select your USB drive, in this tutorial the USB drive is disk 2, so we will enter the command below:
3. select disk 2
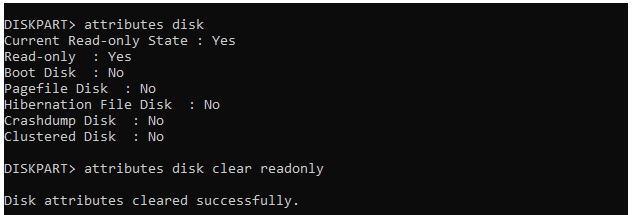
The above command confirms disk 2 is the selected drive. Next step run the command below to request the attribute:
4. attributes disk
The screen will display different information. Your task is to check the first line is Current Read-only State. If the USB drive cannot be written or reformatted, the Current Read-only State is set to Yes.
To remove the write protected attribute on the USB drive, run the command below:
5. attributes disk clear readonly
If the command is executed successfully, the message "Disk attributes cleared successfully" will be displayed on the screen.
To format a USB drive using diskpart's Clean command , first make sure the USB drive is selected:
6. select disk 2
clean
Use the command below to create and format the partition:
7. create partition primary
format fs=ntfs
Wait until the process finishes and your USB drive has been formatted. Try copying and storing files and data in the USB drive to see if the error persists or not.
III. Write-protected USB format tool, Write Protected drive format
Below are some free tools and utilities to properly Format USB, format your USB drive in case a Write Protect error occurs.
1. SD Formatter
Although designed specifically for SD memory cards, the SD Formatter tool is also compatible with USB drives. Just connect the device, select your USB drive and select the Format option.

Download SDFormatter to your device and install it here.
2. Kingston Format Utility
Kingston Format Utility is the ideal solution for formatting USB devices on older Windows operating systems (Windows XP to Windows 7).
After downloading the tool, run the EXE file and click Browse to select a location (on the desktop or Documents folder). Click Unzip , then browse to the new location and double-click the Kingston Format Utility.exe file .
Do the above to run the application, then all you need to do is select the device and file system from the menu. Click Format to format the device.
Download Kingston Format Utility to your device and install it here.
Link: https://taimienphi.vn/download-kingston-format-utility-34337
If the above methods are not available, visit the manufacturer's homepage for support.
The above article TipsMake has just shown you how to format and format a write-protected USB drive (Write Protected). In addition, if you have any questions or concerns, you can leave your comments in the comments section below the article.
You can learn more about how to format your computer's hard drive safely and without affecting your data. This article on Taimienphi introduces you to the standard way to format your hard drive and how to format your hard drive quickly. You can choose either method. .